Friday, October 14, 2011

how-to:nail art brushes + acrylic painting Part 1

Sorry for not being able to blog regularly. I think i have been apologizing over & over again because of my lack of updates. I hope that you'll be able to forgive me with this post. My long overdue post about nail art brushes.


This 15 pc. brush set is from BornPretty.

It has a pretty good selection of brushes in making different designs. It got detailing, liner, fan, angled, filbert & dotting tools. According to the website it has:
3 drawing tools
7 painting tools
2 liners
1 dotting tool
2 fan brushes for nail art effect


I seriously can't understand why there is a need for 2 fan brushes though. i'd rather have another filbert brush to go with this set.

I prefer acrylic as my medium all because it's easy to work with. You can easily wipe it out when you made an error (provided that it's still wet). Unlike polishes where you have to redo everything once more. I have received tons of questions if it's ok to use the acrylic sets that painters use.

I, myself, use acrylic sets like that. I think as long as you put on base coat, it won't harm your nails. I have even tried using it as my base color & nothing happened on my nails.

note:
Make sure that you do not get the acrylics on the ferrule or you'll risk the bristles of your brush splaying out. Getting the debris out of ferrule is not an easy task. You'll end up ruining your brush when it splayed out, especially for detailing brushes! Just dip the bristles half-way on the acrylic & make sure you clean it after every use.

Let's start by prepping up first & what you need before you start playing with colors.


First of all, you have to remember that acrylic dries fast. It is water-based so you would need to spritz water on it every now & them to keep it easy to work with. So you would need an atomizer filled with water (mine is really small...see that small orange bottle?) to keep it pliable.

Then of course, something that you can use as a pallet. I just use old CDs. Something to wipe your brushes with... kitchen towel or tissue & of course your jar of water to clean your brushes.

Now that we got that out of the way let's go to the brushes...

My favorite brush of all...
THE DETAILING BRUSH


This is the most versatile brush of all because you can make specific designs with this.
Detailing brush has fine tip so that you'll be able to maneuver it easily. I mostly use this on my nail art tutorials. Here are some of the designs that i did using this brush. Just click the title of each picture to see the step by step tutorial on how to make that design.


You just need to have steady hands when doing detailed work, well, since acrylic can be easily removed with wet wipes, you can practice the design as much as you want on the surface without worrying about it.
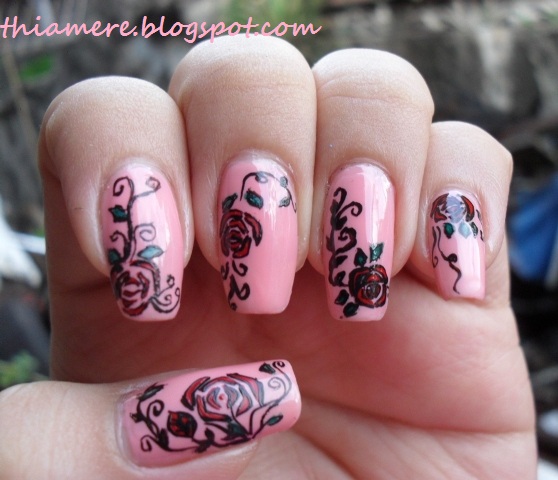

You can do lines easily with this brush too...
even dots!


You can also use your polish as your medium, just make sure that you will not get the polish into the ferrule... same goes with acrylics.


If there is one brush that i would recommend that you buy, it would be this. You can also use artist brushes. In fact, my favorite detailing brushes are craft brushes. Sizes would vary of course, just go for the smallest ones, which i think is 3/0, if my memory serves me right.

You can do a lot of designs with detailing brushes!
Love love love detailing brushes!

THE FILBERT BRUSH


This is a very nice brush to make flowers with.
Please refer to this illustration on how to make flower petals.


You just need to lay it on the surface then drag it either towards you or going out.
See the 2 different flowers using this brush?
Cute,huh?
^_~


This is one design that i made using a filbert brush.

THE STRIPING BRUSH


Striping brush have flat ferrule as opposed to detailing brushes that has a round ferrule.
So, what designs can you make with it?
Basically, you use it to make stripes!

Of course, it doesn't mean you only need to use it for straight lines. You can make waves with this brush too, like this.


This is perfect for making those background waves.


I didn't really do this design for i had it made on the salon, but the brush that was used on this is striping brush.

THE FAN BRUSH


Fan brush can be used to clean the surface among other things.


The top pictures would be to show to make random "flowing" stripes in just a couple of strokes & the 2nd one is how to use it in picking up glitters/pigments. You tap it straight on to your wet polish for that added bling!

I didn't use a fan brush in this nail art but i should have just used it because the end result would just be basically the same.


The grasses on the ring finger is made with a fan brush.


These are just the basic use for the brushes but you don't need to limit yourself to these designs with each brushes. Heck, you can even do flower petals with a striping brush! Just explore these brushes to figure out the different uses.

To be able to see my nails art easily you can click on my FB NAIL ART ALBUM. It would be easy for you to browse through my past designs with blog links on each pictures for reference.

I'll continue with another post to talk about the other brushes like the flat & angled brushes. I actually cut my nails a few days ago so they're really really short now but i don't mind. I am enjoying my shampooing experience because i can get to massage my scalp as much as i can unlike before. LOL!

I just hope that it will grow long by christmas time because i would like to don christmas design on my nails this holiday!

It's going to be my birthday this Sunday. I can't believe how fast time flies.. I'm already 27!
Wow! Where did all the years went? haha!

Anyway, hope that you'll have a happy weekend!
Jaa ne~!
^_^

ps:
Product presented as samples. I did not receive any monetary compensations. Opinions posted are mine alone & not influenced by the company.

Tuesday, October 11, 2011

Body Recipe Face Cleansing Cream Review + update on the body recipe hair remover...

I hate cleansing creams!
The only ones i can use to remove make-up are cleansing water & oils, lip & eye make-up remover & cold cream. I'm glad that i can use cold cream, anyway, when you think about it cold cream is so thick it doesn't get easily absorbed to your skin as easily as other cleansing creams that has thin consistency.

My skin reacts horribly to cleansing creams. It makes my skin go all red & dry afterwards, leaving me with a painful, burning sensation.
My mates during my make-up workshop can attest to how red my skin can be when i used cleansing creams.
*sigh*

So maybe you're wondering, why the heck did i ever get myself a cleansing cream to think that i have a sensitive skin?!
Wala lang! Feel ko lang! hahaha (No reason at all! I just feel like it!)
XD

Seriously, i used the Body Recipe Milk+ with goat's milk facial mask (when it was still available) way back in college. I like how it can easily get my blackheads out & as far as i remember i didn't suffer from any bad effects so i just decided to leave it to fate. hehe

But i'm actually glad that i have tried this because i think of all the cleansing creams that i have tried this is the only one that i had the least reaction with. That is a good thing, mind you, because i have tried a lot of cleansing creams already, even the ones that are marketed as organic & all-natural. I just have the same reaction to each & every one of them.

What makes this cleansing cream different is that i did not suffer suffer from adverse skin reaction (though there is still some redness here & there but the after-effect of this is smooth & soft skin. I can't believe it! My face just seems soft afterward.
Sugoi!

Enough with that & let's go to the product...


with Goat's Milk!


I'm sure you all know the benefits of milk on the skin. But how is goat's milk different from cow's milk?
I'll let you know!


Did you see how small the ingredients list is?
Let's talk about goat's milk a bit.

Goat's milk is best suited for sensitive-skin. In fact, it even soothes eczema! Why?
Goat's milk particles are smaller than cow's milk which makes absorption a lot easier (whether topically or orally), because of this, you get the benefits faster. Goat's milk also contains AHA (Alpha Hydroxy Acid), which exfoliates the skin.

Widely known for its moisturizing ability and gentleness, goat milk products owe their natural ability to gently cleanse, soften and heal skin to several chemical properties of goat milk. - excerpt taken from everything goat milk.com

With that said, i guess you already have an idea how beneficial goat's milk is to sensitive individuals, im not just talking about those that got sensitive skin but those who are lactose intolerant as well since goat's milk can  be a good alternative for you!

On to the product once more...
I like how this has a double lid.


Just to make sure that the product is kept fresh & for hygienic purpose too!

Here is how it look like...


It looks thinner than the traditional cold cream. It's this consistency that makes me go "uh-oh" because it means that it is easily absorbed by the skin.

It's easy to remove face make-up with removers, ne? The real test is in the eye make-up!
Can this withstand the test of waterproof liquid liners & mascaras?
Just take a look at the picture....


I'm happy to say that it was able to remove stubborn liners & mascara. yay!
You just need to massage it for quite a while.. it will do the job.
Then wipe it off with wet tissue.

I said that it was able to make my skin soft & smooth after use,ne?
I am really surprised that it did! That was the least result that i was expecting. I'm just after removing my make-up but the added benefits are well appreciated! Well, it has lactic acid (also AHA) so it exfoliates the skin... goodbye, dead skin cells, hello new skin!

It was able to do the job of cold creams (& more) in just a fraction of the price!
This is only Php 46 for 25g.

I don't know if there was just an error before when i bought the small tub of cold cream on the drugstore because i paid Php 179 for it. I didn't even notice it because it doesn't have a price tag. I just knew it when i looked at the receipt. Oh,well! a little goes a long way for cold creams anyway,ne?

I said that i still had a bit of skin reaction,right?
It's not bad...really!


Only a bit of redness on the nose area & also the left cheekbone but that's it. When i use cleansing creams, my whole face would turn all red. Just like a bad case of sunburn!

This is the first cleansing cream that i have used that i could actually abide with. I will not say that i did not suffer from the burning/tingling sensation but since this is somewhat cool/refreshing i don't mind using it.

PROS:

  • locally available/made
  • cheap
  • removed my make-up completely
  • made my skin feel soft & smooth afterward
  • great packaging
  • not greasy
CONS:
  • i suffered from redness
  • burning/tingling sensation
  • has a strong scent (but disappears later on)
Will i buy it?
Maybe...
I would definitely buy it if it didn't make my skin red, but the benefits is something that i haven't experienced with other removers so i'm still undecided.


Well then, if you're not like me & likes cleansing creams as make-up remover then this is a nice product to try!
^_^

Now, on with the update of the Body Recipe Hair Remover Cream.
I used it August 17, now it's October 11 already. I haven't shaved/waxed my legs ever since so you have to expect that i have a man-leg already. haha!


I can't believe that i went for 2 months without removing my hair!
Tsk!

Anyway, this is almost the same with shaving with a little bit of difference.
When i shave my leg hair, i can already feel the stubble after a day or two. After a week, it will have visible stubble. After two weeks, it will grow longer & let me tell you, that prickly feel from the hairs that were cut by the razor is annoying as hell! This is how shaved hair looks like when it grows under microscope.


That's what makes the hair remover cream different from shaving. Since this will completely dissolve the hair, it won't give you that straight cut on the hair. It would somehow make the ends softer, though not as fine as waxing. Hey, this is painless unlike waxing! haha!

Another good thing is that this would give you less ingrown hair!
How's that?!
Main reason why i quit shaving is because of ingrown hairs.... tsk tsk tsk!

I still prefer waxing though!
XD

Well, with that, hope i'm able to answer your questions about it.

Have a great week,ladies!
^_^
Jaa ne~!

ps:
Products presented as samples. I did not receive any monetary compensations. Opinions posted are mine alone & not influenced by the company.

Thursday, October 06, 2011

Upcoming posts....

Some of the things that i have here are what i bought & what i received that i will be making a post about one of these days.

Let's start with the Ever Bilena Pro longwear lipstick....

Ever Bilena Pro longwear lipstick - Php 155 each

I never knew that Ever Bilena had already upped their lippies. They released their Pro lipsticks. I think they have 10 shades..based on what i remember. I only saw the pro longwear but Maggie made a post about the pro lipstick with shimmer HERE.

I'm not a fan of shimmers so i just choose something that has the least bit shimmer but would still be flattering. I got the Polish shade. I have only tried it once & it's ok. I even tried applying it on my lips without any lip balm & it didn't give me that tingly feel unlike the first time i tried applying MAC's mac red on my bare lips.

Review to be posted after a couple more tries...

Then when i went to SM Manila, for the sole intention of buying Etude House' Bubble Hair Color (which unfortunately is out of stock..as always!) i also dropped by the department store & saw these premium brushes by Marionnaud.

angled/brow brush - Php 119
concealer brush - Php 99

I bought the concealer brush (though i still have their regular concealer brush) & angled brush. I just needed an angled brush but i couldn't resist buying the concealer brush as well. I am liking the premium version of their brushes. The handle is quite sleek because it has that velvety feel!

Me likey a lot~!

Next is the Eyeko Line & Shine Duo Color Pencil for Eyes in Electric Purple & Plum


It's so cute~!
Again, review to be posted after a couple of tries.

Then BornPretty sent me a couple of stuff to try again...


Their nail care kit. I have been using this ever since i got them & i have to saa that i am liking it so far...especially the strengthener!

Then a brush set...


I have promised before that i will be doing a post about how to use the brushes. It's just that i can't decided how i will do my post. If i will put them all in one post or i'll make a separate post per brush.. but that will take a long time. I have to decide first..hehe

They even included some Hello Kitty nail decal!


kawaii~!
^_^

Arigatou, Jayce!

Last but not the least, just a little while ago i received the package from Milk & Cookie because i won their giveaway!


yatta~!
Thanks,girls!

It really made me smile when it was even delivered straight to my house.. haha!
This is the 2nd time that package was delivered straight here...
yay!

I know i'm lagging behind in posts again,girls. Please bear with me because i have a lot of things on my plate & it's hard to juggle my time. I'll try to update my blog every now & then. You can keep in touch with me on my FB if you just want to drop a message.

I thank you all for showing support & love. I am really happy that i have loyal readers like you. It makes me feel cherishes every time i receive love messages whether it's on my email or on facebook.
*hugs*
You, ladies, are the only reason why i keep on blogging. Thank you so much for the love!

Minna-san, honto ni arogatou gozaimasu!
^_^

Wow!
2 posts in one day...haha!

Hope you all will have a great day!
Jaa ne~!
^_~

Food Spot: Hana Restaurant in Little Tokyo

I met together with Lea again last monday for some girl bonding time. We decided to eat lunch at Little Tokyo.

First spot on the rosters of restos there is Hana.


The resto is actually pretty small, but it has that real japanese feel to it.


It even has that nice sushi bar!


We were just talking while waiting for our orders. We ended up with almost the same order, tempura udon, but the waitress suggested if i want soba just to make it different & i said ok.

Tempura!!!!

There's really a difference when you eat tempura at an authentic japanese restaurant compared to ordinary japanese fast foods. Tempura in regular fast foods are just fried shrimp covered in batter. Tempura here is way way beyond those bland ones that you order somewhere out there.

Hana's tempura is somewhat sticky on the inside, which compliments the refreshing taste of the shrimp. You can really tell that they used fresh shrimps! I have never been a fan of shrimp dishes all because i can't really tell the taste of it from other seafood, but this time, i was able to fully savor the taste of the shrimp!

It's juicy & a bit sticky on the inside but crispy & light on the outside. Ah.... i have to go back if only for their tempura! It gave me a taste of what seafood heaven is like!


Mine is Soba...

I have never tasted Soba this good!
If you are hesitant in trying out japanese noodle dish, start out with this one. I'm sure you'll love it!
Especially for filipinos since the soup base is actually sweet, not too sweet though. Just enough to give your taste buds some sweet tender loving!

The soba is firm yet soft.
Unlike other noodle dishes that i've tried where the noodles are overcooked it just crumbles with the touch of your utensils. It doesn't have any strong taste so it compliments the soup base really well. I just hope that put in a couple slices of kamaboko. I like kamaboko!

I didn't put the tempura in my soba because i don't want to drench it with the soup. I rather like it crispy!


Hers is Udon...

I just also tasted her soup & compare to mine, the udon soup base is not as sweet as mine. I guess it compliments the udon better with the soup base as being savory better than sweet.


banana parfait - Php 180

One of the classic japanese dessert!
I was actually looking for pudding on the menu but since they don't have it so i just copied Lea's order too.hehe

I thought that it's just one of the usual sweet treats that you can order from common dessert shop. Actually, it almost is. The only difference is in the ice cream that they used. I think it's a vanilla flavored home-made ice cream! The texture is really different but i think that's what made it quite special!

Unfortunately, it was drowned with the big dollop of whipped cream & choco syrups but it's still nice to know that it complimented everything perfectly.

The bar for my taste of japanese food has just been raised when i dined at Hana!
Oh, one more thing, Hana is known for their takoyaki.

I tasted their takoyaki the first time i dined there together with Walter. It's good!
Well, im not a fan of ginger so i didn't really like it because of the Beni Shoga, but it's way better than the takoyaki that you buy at the mall. I guess next time i buy takoyaki, i'll just ask them to hold off on Beni Shoga. hehe

We also went to Teppen to buy some groceries... as if i didn't make a stop at Choto Stop for my furikake fix..hehehe

furikake - Php 80 each at Choto Stop

I could live with furikakes alone! hehe
I'm not sure about the shiso furikake though. That's the first one that i've opened. I like sesame leaf but this shiso furikake is quite overwhelming.. hmmm...

On to what i bought at Teppen....

seasoned laver (kim) - Php 45 each ( i bought 5 packs)

I love love love Kim/Gim!
I actually prefer this over Nori. 
I just can't describe it but it's more delicious...

 instant noodle - Php 25

I'm sorry but i don't know what kind of noodle this is. I think it's still ramyun... just not spicy.
Unlike the Shin ramyun that is soooooooooooooo spicy it makes my ears itch, makes my face red, makes my eyes teary & makes me sweat tons!
LOL

Almond Pepero - Php 39

Yes, it's only Php 39!!!!
Compare to Almond Pocky that you can buy at SM for double or sometimes even triple the price, this one is only for less than a dollar! I actually got 3 boxes but i gave it to my brothers. hehe

Then finally, as if the banana parfait wasn't enough. I asked Lea to also try out their ice creams. She bought an Ice Cream Sandwich, while i got the Double Bianco!

Double Bianco - Php 55

It's not named as Double if it isn't double!

What you see there is the sweet vanilla ice cream generously slathered with thick strawberry syrup, but underneath is a nice surprise! A sorbet! The tangy taste of sorbet compliments the sweetness of the vanilla ice cream!
^_^

I am one happy & full lady!

hahaha!
Thanks for the pic,Lea!
At least hindi na ko mukhang sako dito!
LOL

I'll make a haul post tomorrow.
Hope you all will have a great day,ladies!
Jaa ne~!
^_^

Sunday, October 02, 2011

Collagen by Watsons Hydrating Facial Gel Preview

Sorry for not being able to blog for a week, i have been so busy with my new schedule.
Lots of students... isogashii, isogashii! (busy, busy)
But it's good... i have to make sure i have enough money to invest on my make-up kit anyway.

I have been using this for almost 3 months now so i guess it's high time i do a review about it. I'm sure you have seen this on the aisle of facial moisturizers in Watsons. I initially bought it because at that time my skin is feeling a little bit dry because i temporarily switched to a different soap.

Since this one has hyaluronic acid & is cheap so i thought to myself, why not? What have i got to lose?
I bought it, been using it since mid-July, & im glad that it didn't broke me out so i used it regularly. I'm glad because even if it has dimethicone, it didn't give me a bad skin reaction.

Yay!
I hope that i'll be able to overcome my problems with silicones.

This will just be a pre-review. I figured that it's better to do a pre-review then do a post later so that it'll be easier in the end.


This is what it says....


I'm sure most of you have heard of collagen. You see it in most anti-aging skin care. I think that it's better to start using collagen earlier rather than at a later age. 
Moreover, by the age of 25, collagen levels would start deflating about 1.5% each year. This is the reason why the skin gets wrinkly and nonetheless, old. -by collagencreams.org
What exactly is a collagen?
Collagen.org gave an easy definition of what it is.
Our skin is made mainly of collagen, which is a protein. More than 80% (dry weight) of our skin is made of collagen. There are three major parts to our skin: collagen, elastin, GAGs, Glycosaminoglycans. 
Collagen is a main structural protein found throughout our body. Collagen provides the strength our tissue and organs require while elastin provides the ability to stretch and recoil.
Just like what they said, it provides the strength our skin requires to keep it firm & smooth. It's like thin fibers underneath which supports the skin. Take a look at this picture. Those white strands are collagen.

pic taken from pchi-china.com

As we get expose to the sun's damaging rays, the collagen in our skin begins to degrade. That's when you start seeing those fine lines on your skin. That's why most of anti-aging creams these days have it because it enhances the production of collagen beneath the skin therefore promoting a vibrant & younger-looking skin.

But keep in mind that this doesn't work instantly,ok?
I remember reading an article before saying that you can just feel the effect of collagen creams (or most topical products) after 6 months of continued use.

What, with all the hype about collagen you can take them in several forms like as topical creams, as injectables, & also as supplements.

Now that you have an idea about the wonders of collagen, let's get to the product itself.


It's packaged in a big tub, so you have to use a spatula every time you use it. It's in gel form (as what it says).


I was expecting that this won't be heavy on the skin since it's in gel form, but it's a bit heavy & sticky. So don't get a big scoop when you use it. You can get away with just a small amount (just the amount that you'll be able to get if you dip the tip of your finger). It will go a long way! It will make it easier to be absorbed by the skin rather than slathering a think gunk on.

Just apply it how you put your regular moisturizer & wait until it sets before you add another product (if you like to layer on different products). You can either apply this as your last regimen, that is if the other products that you do use are way lighter than this.

I like that the expiration date is included at the bottom so i'll know when to ditch it.


As of now, i am liking it so far, but have not seen/feel any obvious effect. As what i said, it might take more than 6 months before i'll be able to see any results. But currently, i find it an OK product.

One thing that turned me off of it is the scent, it has this weird scent that i find a bit disturbing but it just grew on me later on that i don't pay attention to it like before, anyway, the scent will disappear later on.

I have to say that this is quite cheap!
I think i bought it for only Php 150, more or less ($3).
To think that it is already 100g, you get a big amount of product for what you pay for!
*update*
I went to Watsons today & saw that they are having a promo for this.. it's Buy one get one free for only Php 219.
^_^

PROS:
  • locally available
  • affordable
  • has hyaluronic acid
  • large amount of product (it's full to the brim)
  • one tub could last you for a long time (when applying, less is more)
  • really moisturizing! (best for dry skin, but i am able to use this even if i have combination skin)
CONS:
  • no spf
  • heavy & sticky on the skin (less is more)
  • has dimethicone (silicone)
  • somewhat strong scent
  • packaging - have to use spatula pa!
  • only available in Watsons (obviously)
I'll let you all know what i think about it once i'm finished with this tub. Currently, i'm halfway done with it!
^_~
No bad reaction so far!

Hope you all will have a great October!
This is my birth month....
I hope that this will be a lucky month for me.

Have a great week,hunnies!
Jaa ne~!
^_^

Monday, September 26, 2011

A cute start this week!

Guess what made my weekend so happy?!


My very own personalized clay miniature!!
Kawaii~!
Remember my post about Aiyoh's crafts?
Lookee HERE
I said that i asked her to make me something & it just arrived!

A friend from long ago drew this pic of me & i have been using this for a long time. Sadly, we lost contact. He saw a picture of me wearing the same dress, with my headphone on. He then drew my hair like that because he said my hair is wild...how true! mine is 'un tame-able" LOL!


But every time i see this pic i really remember him.
Addam, hope you are doing ok.
^_^

I asked Aiyoh if she can make me a memento using this & she said yes. I am so happy with the pics that she sent me informing me of the progress... especially on the hair. It's the exact replica of my favorite avatar!


Mitte~
Look!
The details of the hair is awesome!
Sugoi!

Since i can't use it as a cellphone charm & much as i would like to, i can't. I'm already in love with my Japanese doll & Rillakuma charm. She suggested that i have it made as a pen holder so to make sure that my hair won't break or something. I can't bear the thought of something happening to my "thiamere charm" so i yes said.

She then asked me what's my favorite color aside from pink & i said black, so she added black roses.


OMG~!
I'm in heaven!!!

I'm so happy i could fly~!
Isn't this just the cutest thing that ever graced my blog?!

The best thing, this only costs me Php 180. Seriously?!
*faints*
I am really expecting that price only for the charm itself, not the pen holder, but look at what i got.
And, No, it's not a "presyong kaibigan" (price for a friend). This is her regular price.

You're too generous,Aiyoh!!!!
Aiyoh-san, daisuki!
I love you,Aiyoh!

Now i have something that's totally mine!
It's more than just personalized, it's definitely ME!
The only one in the world!

If you are looking for something unique to give to your love ones, then i highly highly highly recommend Aiyoh's crafts.
Do i still need to tell why?!
The pictures said it all,ne?

You can visit her store HERE
Say hello to her facebook HERE
Text her at 09152841675

I'm telling you, you'll be very happy with her works.
I am & I will be the next time i avail her services.

Make sure you include her in your list of stores to visit,ok?
You won't be disappointed!

Something to also make so happy i could dance is that i won Benefit Philippines' facebook contest!
I was shocked when i saw my FB notification that they commented on my photo entry. 
Thank you, Benefit Philippines!
I really can't wait until you open your store!

Well, looks like my September will end in a really really good way!
Except for a tiny mishap because my debit card is damaged & i can't withdraw money until i have it replaced, but that's nothing since i have 2 big reasons why i can't wipe the grin off my face.

The start of this week is rainy, so make sure that you bring in your umbrellas with you, Hunnies!
Have a good week!
Jaa ne~!
^_^

Saturday, September 24, 2011

Beauty Angel Turn Up Long Mascara Review

Have you tried fiber mascaras?
Or are you scared of using it for fear that those fibers would somehow poke your eyes? always resorting to false lashes when you want to have longer-looking lashes?

Well now, you won't have to!
I was able to try a lengthening & volumizing fiber mascara without the "fibers"!
Sounds confusing?

When i posted the Etude House Dr. Mascara Fixer, i mentioned a fiber mascara that i was using. Well, this is it!


KKCenterhk.com is nice enough to let me try out this mascara.
It's housed in a gigantic tube, much like Fiberwig. There are several colors that you could choose from, i just choose a pink one, but they have blue & green as well. I think the only difference is the color of the packaging but they have same formula.


Honestly, at first i wasn't impressed with it but as i used it every now & then i changed my mind. This is definitely a keeper!

Let's start with the wand...


Looks so ordinary.. no fibers at all!
Told you, this doesn't have very obvious fibers so you won't need to worry about poking your eyes while applying.

I'm already saying in advanced that fiber mascaras are heavy. When i say heavy, it could weigh your lashes down therefore uncurling the lashes that you worked hard to curl... dame da.. not good!

tip:
There are 2 ways to make sure that your curls will stay.

  • You either use a clear mascara after curling. Just like hair gel, once you put it on, it will keep your hair place. Same rules apply to clear mascaras...
  • You can apply heat to make sure it will stay longer... think of curling iron. Using a heated eyelash curler or heating your ordinary curler with a hair dryer could also work as well.
I mostly just use a clear mascara (or in this case the Dr. Mascara Fixer) to make sure that my lashes will stay curled for a long time.

Picture time...
click for your reference..


That's only two coats! I'm already quite satisfied with it.
I think it looks nice already!

I have been a fan of fiber mascaras because it is the only one that elongates my puny lashes giving me that feathery look that i've always wanted. But let me tell you one thing why i sometimes get annoyed with fiber mascaras. Most often than not, those tiny black fibers could result to fallout which looks like it's flaking. There were even times when i would just feel like something is in my eye which makes me very uncomfortable.

I have never felt any fibers from the mascara on my eye since this one doesn't have an obvious fibers on. Yay!

The best thing that i like about this is that since this is watery, you can have achieve well-groomed, uniform-looking lashes easily. Again, this takes a while to dry so you can take your time fixing how your want your lashes to look. You can run a lash comb to separate each lashes, or clump them together to have that falsies effect. You can't do that with fiber mascaras now, can you?

Another thing that i like about this is that since this a fiber mascara, you can easily take it off by just using water! But since i am using a waterproof primer underneath, it's pointless, but if you use it alone, removing it is just a breeze!

Now, one thing that turns me off the first time i used it is that it has a weird scent. It has this chemical-scent that i find a bit disturbing. It will go away later though, at least it's not something so awful that will give me a migraine. I'm ok with it since it disappears in time & not really overwhelming.

Another thing that makes me go meh! on this is the drying time. It doesn't dry as long as high end ones. Those waxy, good-for-nothing, "uncurling", mascara from most western cosmetic brands that i've tried dries forever. Well, this is not like that, fortunately, but this still takes a while.

Just make sure that you don't rub your eyes while this is drying,ok?
But once this is dries, it's really dry. No flaking or smudging!
Yay!

Those are my issues, but this is nevertheless, a great mascara.
It's a keeper in my book!

As always, i'll leave the price to you.. it's sold for $12.10 at KKCenterhk.com.

PROS:
  • funky & cool-looking packaging (you can choose diff colors)
  • no obvious fibers so no fear of it poking your eyes
  • buildable
  • lengthens & "volumizes" the lashes
  • no smudging & flaking (once it's dry)
  • can be removed very easily!
CONS:
  • takes a while to dry
  • disturbing scent
  • could weigh the curls down (use either of the method that i mentioned)
  • available online (but they offer free shipping worldwide!)

I would put this on my products-to-try again list!
If ever you buy something at KKCenterhk.com make sure you include this in your shopping basket,ok?

Have a great Saturday,hunnies!
Jaa ne~!
^_^

ps:
Product sent as sample. I did not receive any monetary compensation for this post. Opinion shared is personal view & is no way influenced by the company. Use at your own discretion.

Thursday, September 22, 2011

Weekend Nails:Black Lace Sticker

A quick post!

I'm glad that you all like my weekend nails on my last post. I also like it..haha!
I had searched high & low for black lace stickers & im just glad that La Una Loca Nail Art have those. It's my go-to store for my nail art needs.


What i like about this lace sticker is that it is flat.


Unlike the usual 3d stickers that protrudes, this one doesn't so it really sticks to your nail & won't be "lifted" very easily. 2 coats of top coat to seal it in will do the job. Compare to the usual stickers, you have to use like 4-5 top coats, but it will still be removed very easily. This one lasted on my nails really long!

This design is really easy!
Sorry, the pic at the bottom (with the dots) looks different because i had to redo the tutorial & now i can't find that specific lace pattern that i used here... so gomen ne.


I leave the choice of colors to you.
I used blue, yellow & green as my dots, but you can just use 1 or more colors depending on how you want it to look! I just figured that since my base is black,i'll just go for bright, fun colors rather than just one.


You can visit Lynette's page if you are interested in this kind of lace stickers. I bought mine for only 3pcs for Php 100.

Hope you all have a great day,ladies!
Jaa ne~!
^_^

Believe in B.liv's Dump Off Drawn! I do!

I was contacted by B.liv weeks ago to try out their products. I have been so lazy in applying any skin care products lately that I can alrea...