
Honestly, this design took a long time to finish.
It didn't help that i don't have a tripod with me & i am also watching an anime the time i did this so it resulted to an hour. hahaha!
This design will require a steady hand plus a really thin detailing brush. I'll talk about the tutorial later on , but let's go with using acrylics first.
3d designs would require different shades of 1 color. I love blending colors so even if i took a while finishing this design, i enjoyed making it.
The unique thing about blending colors is that you can't get the same color as what you had before. So if you are working on a big canvass, it's better to mix a big amount of color then just store it in a plastic jar.
Since we are only doing nails, we can go a long way just using pea-size amount of acrylics, but you have to keep in mind that it dries fast. So having an atomizer/water sprayer is a must. It will keep your acrylic wet & pliable so you can take your time getting the hang of it without worrying about it drying. You have to spray a fine mist of water to your palette every now & then to make sure that your acrylic is still workable.
Let's get to blending colors.
I want to achieve 2 different shades of pink so i will work with white & red.
Use a different brush in blending the color. Scoop a small amount of the white acrylic near the colors you would be working with like in the picture... I did 2 sections since i need 2 shades of pink.
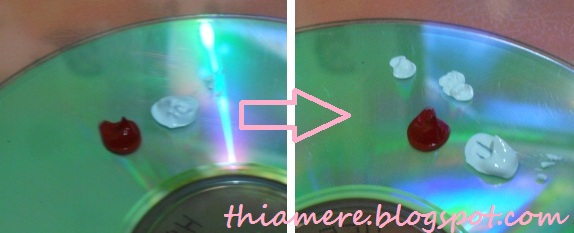
Get a little amount of the main color (RED) then mix it with the first section like so...

Then bring in the shades that you have blended next to the remaining white section then i continue blending, bringing little amount of my pink to the white for a lighter shade.

I find that this is better rather than by getting separate white & reds each time i want to achieve a different shade. You can achieve different shades of colors by doing this, lining them next to each other for a closer comparison.
Now that we got that out of the way, i just made this collage so to make things easier. Click it to be able to view it better.
I applied the colors from white going darker to the center, which is the opposite of my leaves from light to dark.

I also blended light green acrylic with white to have different shades for the leaves.
I finished it off with Swarovski from BornPretty, the perfect way to glam up this design!
Don't forget to seal it with a thick top coat to keep the rhinestones.
Hope you'll be able to try this design!
Have a great weekend,hunnies!
Jaa ne~!
^_^
ps:
Giveaway still ongoing, click HERE to join.


12 comments:
Lovely nails there ^^ so pretty.xx
awww...
thanks,sweets
^_^
tnx so much sis.. copy..hehe.. ill try this one.. finally have my own acrylic set.. :) hihi
Super girly and pretty, pang wedding day din to!!! :)
Wow, that is so cute and pretty! Love floral designs. =D
(Thanks for entering my giveaway! Good luck)
This is super cute!
patingin ng mga masterpieces mo ha!
^_^
thanks,sis!
^_^
yes, flowers do reminds us of happy occasion,ne?
thanks,hun!
^_^
hope you could try it sometime
thanks!
^_^
ang galing mo!
thanks,sis!
^_^
Post a Comment