I'm slowly getting into blogging mode little by little again. Too many classes & things to do now that christmas is already underway. So, to keep my blog alive for the meantime i'll do some polish swatching starting with my very own fanken polish that i call as Purple Fantasy.
I suck at creating names..i know. That's like one of my weakness!
This was a part of my latest holo frankens that i posted before.
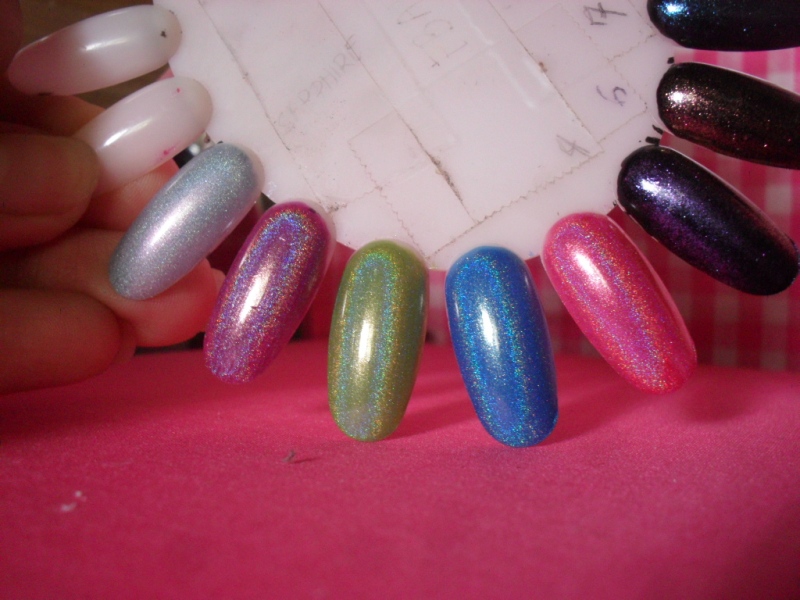
Anyway, here is the picture...
Since this is holographic, taking a picture of this is almost next to impossible so i had to do it under the sun... which is think was still not able to capture the beauty of it.
tsk tsk tsk
Ok, here's another one....
gaaahhh!!!
That's a F-A-I-L!
*sigh*
Blurred on purpose so to see the holo effect.
My camera just can't capture the full glory of it but it's really pretty!
I love this shade so much i made 2 bottles of it!
I'll be swatching the other 3 holo frankens that i made together with this some time soon.
^_^
On the other hand, i would also like to give you, guys, a heads up about the Holiday Launch photos of SM Accessories. This would be a good reference if you are already prepping up what accessories would be perfect for your choice of dress this holiday. Just a couple more days before December... you have to also remember what would be your get-up on the special day.
Let's start with the gorgeous Anne Curtis for the Emerald Empire for those who would be wanting the cool color of green for the holiday season.
First let me say, that i'm not really that much into greens before.. but lately, i am loving the color!
My polish hauls the past couple of days has been more into greens! I won't do haul posts anymore because i think i'll just end up posting unnecessary info on my blog.. TMI! lol!
Ok, enough about polishes....
Love the bangles! I have to check SM out for that one. I sure wish they would fit my big wrist! lol!
Ladies, you also have to make sure that your guys are accessorized the way you are! So here is Richard for Urban Glam.
Our men needs to also be in fashion,no?
This next collection is just so vampy elegant! Perfect to finish up the usual little black dress.
I have to check this one out. I also have my black dress & i have to find the perfect accessories to dress up myself.
Love Georgina's fierce make-up!
I wish i can get away with this look.hehehe
Blue Royale collection for that perfect blue/perfect dress that would be able to spice up your wardrobe
Will be sharing a couple more pictures for my next few posts to come.
I have to definitely get a few accessories for my holiday get-up!
But i have to go shopping first!hahaha
Make sure you drop by at SM for your accessories,ok?
^_~
Oh, & make sure you check out their Twitter account. You might never know what you may find there..
How does 100k grand to celebrate the holidays?!
I wanna win too!
Well, there you go. Tomorrow i'll post another polish swatch.
Have a happy day!
Jaa ne~!
^_^
Showing posts with label franken polish. Show all posts
Monday, November 26, 2012
Thursday, November 15, 2012
Franken Polish:holographics + get to know the SM Accessories ambassadors
I do hang out at instagram most of the time & a dear friend tagged me about my workstation. At that time it was a mess but still decided to take a picture of it anyway. As i did so, i just felt like making holographic polishes when i caught a glimpse of my spectraflair so i made 4!
Actually it's more like 5..hehehe
My camera is just not cut out for capturing holographic polishes but i did try... I don't want to sound arrogant or something to that effect but my polishes look way better than the pictures. hehehe
I didn't even dare watermark it for fear that doing so may somehow affect the quality of my already-poor-image. I haven't named them yet though. I would have to think of a name. Y'all know that i suck at naming. hehehe
It's so difficult to take pictures... i don't want to tweak my settings just to improve the quality because i feel that i will be cheating not just you but also myself...
I made a short video to show how they look like... but i didn't realize that if i uploaded it on youtube its gonna look darker. :(
it's like a waste of time...
Then i made China Glaze GR8 even "greater" by adding spectraflair on it so now i already call it GR8TR. It's the one on the left, the right yellow holo was made by a very dear friend & she calls it Fever.
Again, my pictures suck but they look awesome in person!
As soon as i can get more spectraflair i might make a few bottles to sell for those who are interested in getting holographic polishes specially here in the Philippines. What do you think? Will anyone be interested in buying a bottle? You know how it's almost impossible to buy holographic polishes here.
Or if not, then maybe just a holographic top coat.
This is the difference of the 2 Spectraflair grade that i was able to get. The one in the middle is better than the left one,no? The middle one looks almost like OPI DS Shimmer!
Here is a short video to see it better...
I love frankening polishes!
^_^
On to the other hand....it's almost time to unveil who are the SM Accessories brand ambassadors!
By this time around, they have already been revealed on the event itself, but i wasn't able to go. boo hoo!
Tomorrow, ill tell you all who they are if you haven't guessed yet.
Actually it's more like 5..hehehe
My camera is just not cut out for capturing holographic polishes but i did try... I don't want to sound arrogant or something to that effect but my polishes look way better than the pictures. hehehe
I didn't even dare watermark it for fear that doing so may somehow affect the quality of my already-poor-image. I haven't named them yet though. I would have to think of a name. Y'all know that i suck at naming. hehehe
left to right: violet,green,blue & red
It's so difficult to take pictures... i don't want to tweak my settings just to improve the quality because i feel that i will be cheating not just you but also myself...
I made a short video to show how they look like... but i didn't realize that if i uploaded it on youtube its gonna look darker. :(
it's like a waste of time...
Then i made China Glaze GR8 even "greater" by adding spectraflair on it so now i already call it GR8TR. It's the one on the left, the right yellow holo was made by a very dear friend & she calls it Fever.
left: GR8TR right: Fever (not my franken)
As soon as i can get more spectraflair i might make a few bottles to sell for those who are interested in getting holographic polishes specially here in the Philippines. What do you think? Will anyone be interested in buying a bottle? You know how it's almost impossible to buy holographic polishes here.
Or if not, then maybe just a holographic top coat.
left to right: franken-fine linear holo, franken-scattered linear holo
OPI DS Shimmer
This is the difference of the 2 Spectraflair grade that i was able to get. The one in the middle is better than the left one,no? The middle one looks almost like OPI DS Shimmer!
Here is a short video to see it better...
I love frankening polishes!
^_^
Have you tried making your very own mix of polishes?
On to the other hand....it's almost time to unveil who are the SM Accessories brand ambassadors!
By this time around, they have already been revealed on the event itself, but i wasn't able to go. boo hoo!
Tomorrow, ill tell you all who they are if you haven't guessed yet.
Hope you are enjoying your evening!
Jaa ne~!
^_~
Jaa ne~!
^_~
Monday, October 08, 2012
Franken Polish:Lilac Upbeat
Another short post..
I wanna share my latest franken polish that i decided to call as Lilac Upbeat.
A lilac jelly polish generously smothered with colorful hexagon glitters of different sizes & a light smattering of colored flitters too!
I haven't really used this yet because i don't feel like applying nail polish for now but i have been frankening polishes for the past couple of days. I mostly just do holo topcoats though.
I just feel like making bottles of holographic topcoat. Holographic topcoat can make your most hated creme polish into something really fun & funky!
Well, that's it~
^_^
Have a happy evening,ladies!
Jaa ne~!
^_~
^_^
Have a happy evening,ladies!
Jaa ne~!
^_~
Thursday, August 23, 2012
BFF Challenge:Movies
This week's theme was chosen by Alyssa.
Let's talk about movies!
I'm sure most of you like to watch movies. I'm not a frequent movie-goer but i do watch movies every now & then. i have lots of movies that i like but every time someone asks me the question "what is your favorite movie?" the first thing that will pop on my mind would be Moulin Rouge.
I love it~
If you love romance movies then you have to watch it. That's it!
I do not have an idea how i'll go about making a nail art about Moulin Rouge so i tried looking for pictures. As i did, i just saw the lovely combination of black & red so i also made a franken polish inspired by it. I'll show the nail art first.
I just had to draw the windmill.
Moulin Rouge is not Moulin Rouge if not for it,no?
I love the elephant scene so i just decided to do a part of it where it overlooks the city, hence the heart.
This is how my thumb looks like.hehe
The design are just accents, but what i am really liking in this is my base polish.
This is my franken.
I call it as dark pixie.
Originally, it is Moulin Rouge but i can't use the name for polish because there's already something like that. I was thinking of Cancan but in the end i just had to change it too so i just opted for dark pixie.hehe
I love how this sparkles under the piercing rays of the sun!
The dark magenta jelly makes this polish stand out. It's so dark it almost looks like black,no?
But it's really magenta.hehe
Here's a close-up of it.
I must make more of these polishes, they look really pretty!
You can check out these ladies doing the same challenge with me:
Until this saturday for the next BFF Challenge.
Have a great day,ladies!
Jaa ne~!
^_^
Thursday, July 05, 2012
Franken Polish:my midnight holo polishes
Just a short post...
I have been receiving countless of questions about how i made my midnight fantasy. I'll be sharing my formula for my very own franken...
Kireii ,de sho?
Everyone loves holo polishes!hehe
Just look at that holographic goodness!
Anyway, enough about those pics & let's go to the real deal.
Orly Space Cadet + BSJ Polish (OMG!im sorry but i don't know the shade because it doesn't have a sticker). They should be added with the same equal amount. I kept on adding both polishes even though it looks like Space Cadet doesn't have much.
I know it's difficult to get your hands on these 2 polishes but you can make my Midnight Tryst. The only difference is that Fantasy is almost golden while Tryst is just a couple of shades darker but they are both gorgeous! These are my to-go polishes!
I used Ebalay 009 as my base & i just added spectraflair on it! You can purchase Ebalay HERE.
This is how the base looks like with black polish underneath.
You can just add a couple drops of black polishes on the bottle to achieve that almost-space-cadet look.
Swatch as you add black polish so that you won't over do it, then add spectraflair!
You can buy Spectraflair from Lori over on Facebook.
I'll talk about Spectraflair on my next post so keep tuned,ok?
Have a great day,hunnies!
jaa ne~!
^_^
Wednesday, June 27, 2012
Rainbow Favorites Challenge:YELLOW
Day 3 of the Rainbow Favorites Challenge... so we are on the third color of the rainbow-YELLOW!
My favorite is still my Island Cocktail franken.
I'm pretty partial to this just because im not that much on yellows & glitters the time i made this but this had been my favorite ever since.
I think you could understand why,right?
I applied 2 coats of this without any top coat. See how shiny it looks like on its own?!
Me like this so much!
^_^
I don't even need to put on any additional design on this just because this looks beautiful by itself already!
So,what do you think about my choice?
Have a happy Wednesday!
^_^
Jaa ne~!
Do check out these ladies who are doing this challenge together with me:
9ml universe
atlcatsmeow
Captivating Claws
Fancy Phalanges
Fe's Nails
Follow the Yellow Polish Road
Football and Fingernails
Fresh Air & Fashion
Happy Nails
iHeartPrettyPolish
Jolien's Kingdom of Polish
Kelly's Kolors!
Lacquer Dreams
Lacquer or Leave Her!
Liesl Loves Pretty Things
Light Your Nails!
Manicurity
My Life In Polish
nailpolish is alive(:
Nail Polish Lane
Nail Pron
Nubbin Nails
Of Color n Music
Passion for Polish
Polish and Such
Sincerely, Obsessed with Polish
So You Think You Can Paint
The Rantings of a Nail Polish Hoarder
To Polish or Not?
Thursday, June 21, 2012
Holographic Top Coat!
Yes! I am finally able to make my own holographic top coat without making it look cloudy. Finally!
Here is the swatch
After much experimenting im glad i was able to finally make one. I hate it when i cant appreciate the color of my base because the holo top coat is cloudy.
I'm not sure but i think i could make a couple more of it & maybe sell some for those who wanted to have a holo top coat (this is for philippine-based buyers only). What do you think?
Hope you all will have a good day!
Jaa ne~!
^_^
Sunday, May 13, 2012
Weekend Nail: Customize Framed Nail Art
In my case, i choose a butterfly design so i call my design as Framed Butterfly. An easy-to-do nail art!
This design is yours to personalized. You can basically do any kind of designs that you want! You can use decals or stamps or freehand design. The choice is endless!
Mostly i do my nails on my own now, unlike before where i have to take pics every step of the way. If you notice, whenever i post my picture tutorial i just compile them in 1 picture to make it easier & also to save space. So, you may see a different design/color on the tutorial picture compare to the finished work. It also shows how you can customized any designs that i have made on your own personal preference.
The key to make this nail art stand out more is to choose contrasting colors. Though in this case, i wasn't able to since i just decided to make do with what i have on my nails when i did it. I used my Midnight Fantasy as a base.
Gosh,i love holo polishes! haha!
Don't we all?
Click the picture for a bigger image.
1. Start with your choice of base. This time i choose a pink holo base (my own franken too). You can choose glittery bases too! I'm sure it's gonna look fab!
2. Make a wide rectangle (for long nails or square for short nails) with your choice of frame color. Choose one that is in contrast with your base color, or any color you prefer.
3. Once your rectangle (or square) is ok, then apply the color outside the shape to make a frame like in number 3.
4. Apply your design. I choose a Hello Kitty decal just because my base is pink. You can use decals, stamps, fimo or freehand design on the rectangle. Just make sure that you don't crowd your design near the frame.
5. In my case, i painted swirls on the edge of my shape. If you are not confident enough in doing swirls by hand, you can just put dots (on the edges of the frame or on the frame itself), big or small lines (vertical or horizontals), hearts, etc. Again, it's your choice. This is entirely up to you.
6. Then of course, make sure you apply top coat!
Voila!
Your very own customized nail art!
You don't need to be a professional to do this, with a nail art pen & decals, you can have professional looking nails in no time!
This is a cute nail art this Mother's Day,no?
Happy Mother's Day to all moms out there!
Have a happy celebration!
Jaa ne~!
^_^
Saturday, May 12, 2012
Franken Tip:cleaning polish bottles
I know i promised that i am going to make a frankening tip post, but it feels like there are lots of things that i wanna say but don't seem to know where to start. I could end up creating a chaotic & confusing post if i will be putting it in just 1 entry. I decided to have a series of post so that i'll be able to explain things better & with pictures to accompany it for better understanding.
I would like to start first with bottles.
I know it's not that exciting compare to the frankening process itself but this one is important too. You might be roaring to start frankening but if you don't have bottles that you could use for your frankening so what's the point,ne? Don't throw your clear polish just so you could get the bottle. There are lots of uses for a clear polish in frankening.
This post is how I clean my bottles. Maybe there are other ways too but this is the one that worked for me. Start first by inspecting your stash. Look for polishes that you think you would likely throw out because they're either too old or had dried.
You need to have an acetone & polish thinner/solvent. Acetone to get rid of the bulk of polish & thinner for the remaining polish. Let's get on with it!
Pour a sufficient amount of acetone on the bottle then let it sit for a couple of minutes/hours (depending on how old the polish is) then shake vigorously!
If there are some patches of polishes stuck at the top part of the bottle (like mine!) then let it sit upside down for quite sometime to loosen it then shake again. Continue shaking until there's no polish on the bottle.
You can throw the acetone away if you want to, but since i have lots more bottles that needed cleaning, i just pour it on another bottle. I have lots of bottles to clean! You can use the acetone until it thickens.
Then time to whip out your polish thinner/solvent!
When you're done with the acetone, your bottle will have that cloud-ish appearance that's why we want to finish cleaning it with a solvent.
You can buy a dropper/pipette at a drugstore.
I have a lot of dropper but this is the one that i have on my table for now.
Get a small amount of it & transfer it on the bottle. Just like what you did on the first step, you shake the bottle to get rid of any remaining polish residue.
See?
Just when you think that you have taken everything out the first time, you'll be faced with these tiny globs of polishes.
Repeat the same procedure until you have removed everything! I have to do 2 or 3 more thinner cleaning for this bottle, but you get the gist, hehe
There you go!
Now you are armed & ready for the frankening addiction! haha!
Maybe i'll talk about bases for the next FT post.
^_^
Have a great day!
Jaa ne~!
^_^
Friday, May 11, 2012
franken polish:jawbreaker (NOT!)
I made this one just a few minutes ago & this is a late addition to my Yummy Sweets collection. You can check out the rest of this collection HERE.
I thought that the ecru one is my favorite of all, but i just had to change it to this!
This one is really pretty!
It's a white matte with a sweet dose of multicolored round glitters with a few touches of hexagons too!
I'm glad that this turned out really really well!
^_^
*edit*
Well, i was informed by my nail art groups that there's another polish called jawbreaker. I guess i'll just have to change the name then.
On a sad note, i broke my masterpiece!
waaaahhhhh!
TT_TT
I told myself that i would be keeping this intact but accidents do happen sometimes.
*sniff*
I just have to do better the next nail art,ne?
Gambarimasu!
Have a nice day!
jaa ne~!
^_^
Thursday, May 10, 2012
franken polishes:sweet collection
w00t! w00t!
I'm on a blog roll! That is, nail blogging roll. hehe
I've been so into nail stuff so you might have noticed a lot of nail related posts. I'm going crazy excited these days, i guess it's because the only thing that cheered me when i was sick last week was my nails so i'm giving them apt attention now. haha
Anyway, thanks,ladies for all the compliments about my latest nail art. I'm so happy that you all like it. It makes me feel very motivated to try do another one. I'm actually challenging myself to do another difficult freehand design after a week. I hope that i'll be able to do it though. XD
So, this post would be about my franken polishes.
I made 4 new polishes that i don't have any names yet. However, i will be sticking with dessert or sweets just because i think these colors do remind me of food.
I'll start with my favorite of all~
It's an ecru jelly with a generous serving of multicolored round & hexagon glitters.
I'm leaning towards the use of latte, cappuccino or milk tea for this one.
Inspired by Revlon's Whimsical.
Baby blue jelly topped with multicolored round & hexagon glitters. The difference with the 1st is that this one got more of holographic glitters compare to colored ones.
I'm thinking of Frosted Cupcake for this one.
Baby pink jelly with a dash of purple & silver round glitters. It also has holographic flitters together with a few sprinkling of star glitters too. The thing that made this unique is that this is a matte finish! haha!
Then last but definitely not the least.
Bright yellow jelly concocted with a healthy dose of multicolored glitters. A friend said that it has that butter-y goodness on it! Yum!
So, what do you think about my yummy sweet collection?
Name suggestions are highly appreciated!
Have a happy day,girls!
Jaa ne~!
^_^
Friday, April 27, 2012
Franken Polishes again~
Frankening polishes is just so addicting!
I have been frankening the past couple of days & i've come up with a couple of neat polishes. I'ma share some of them with you.
I call this Bewitching Hour.
This is a dark teal jelly with lots of flakies & glitters.
I originally wanted to make a dupe for Deborah Lippmann's Ray of Light (which i think is like Orly's Fowl Play) but as i was taking a look at my inventory, i saw my teal jelly polish so i just decided to go for teal instead of navy blue. I just can't resist making it darker & put in a few drops of Kleancolor Chunky Bluebell with other flakies too.
Love how it looks on the bottle,ne?
I am so addicted to flakies so you can expect more of them! haha
Then next is my Paradisco polish.
Unfortunately, it doesn't look good in pictures.
I have taken like 57 picture of this but i can't seem to capture the true beauty of it. It's a deep red jelly loaded with lots of glitters! I used hexagons, flitters, stars, chunky & fine ones too! Talking about glitter bomb!
Next is my Lemon Spritzer
This is a different twist on my Island Cocktail.
I just used a different base since i can't find San San's Soleil Canary Glow anymore.
Then my nameless polish...
I originally was planning to name this as "Disco Lights" since this is a clear base with lots of hexa & fine glitters. It looks really pretty in the bottle because you get to see the play of colors when the light hits it. The only thing is that i wasn't expecting that my hexa glitters tend to crush/shatter on application. I was a bit surprised when i saw those white flakes but i'm still happy. This is a successful failure,ne?
I was thinking of the name "All Hail the Fail" but it won't fit my label since it's too long. hahaha!
Still thinking of a name though.... hmmm.
*edit*
I got great name suggestions from my nail art group.
How about 'crushed gems'? or 'crushed crystal'?
I can't decide between the two.
Finally, for those who are curious about the Spectraflair that i got, here is the difference between the 2.
SF14 is finer than 35 so you get a rather fine linear holographic effect as opposed to 35. I prefer the 35 though just because it has a rather obvious holo effect than the other. It is just not that obvious here but you'll see it in person.
Hope you all like my creations.
^_^
Have a great weekend,y'all!
Make sure you join my giveaway.
Click HERE to join.
Subscribe to:
Comments (Atom)
Believe in B.liv's Dump Off Drawn! I do!
I was contacted by B.liv weeks ago to try out their products. I have been so lazy in applying any skin care products lately that I can alrea...
-
I was contacted by B.liv weeks ago to try out their products. I have been so lazy in applying any skin care products lately that I can alrea...
-
For all of those who have read my "how i broke the break out cycle" post, i'm sure you know that i use Likas Papaya Soap asid...


