Showing posts with label nail stamps. Show all posts

Thursday, December 13, 2012

how i get rid of lint on my stamper~

I'm just a newbie in nail art stamping.

I have tried it before but i really can't get it to work for me. It's either i won't be able to pick up the image which happens like 80% of the time or the image will not be complete. I think i have already developed my arm muscles trying to make stamping work for me but it doesn't seem to work at all that i decided to just ditch it & just concentrate on freehand manis.

I have been encouraged by my friends to try nail art stamping once more but the thought of putting much effort without gaining anything at all is just not appealing (of course!). hahaha. I don't really have any plans in doing nail art stamping that is until this....


& this...


...arrived at my doorstep.
Image Plates, baby! hahaha

The IPs were a very sweet surprise because it was something that i wasn't expecting when we had a meet-up together with my sweet "nail art lover" friends. They highly recommend that i try out the XL stamper because it will surely make stamping fun & easy for me so i decided to go ahead & try stamping again.

& they were right!
hahaha!
i can't believe that i am now stamping with ease!


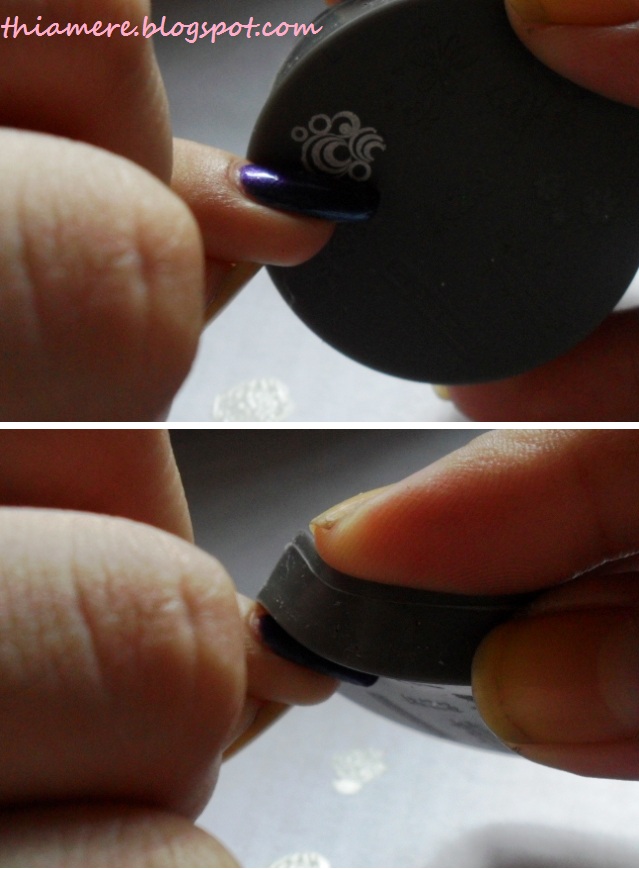
Index & pinkie were stamped images while middle & ring were still hand painted by yours truly.
It's so nice to be able to see stamped images on my nails!
Finally!!!!
hahaha

Ok, enough with that...
i know you can see how exhilarated i am.
I am still practicing stamping until now but there's one thing that i am hating when i do this.
The lint!

Since i would have to clean my plates, stamper & scraper every now & then with cotton soaked with polish remover, there's no helping wit the lint from the cotton being transferred to the plate or stamper then on to my nails. argh! It just ruins the whole process.

I am familiar with lint rollers,of course, but i think that the best way to remove lint completely off a surface is if you use something sticky to lift the lint out. So an adhesive tape is the best tool for removing those pesky lints.


So, here's what i do...
I'll cut up a nice long strip of tape...


Then i usually get rid of too much stickiness off of it by pressing my fingers on the end so that the oils on my finger would transfer to it. It will make the removal of it later a lot easier.


Then roll the ends so that you can stick it to a smooth surface, or even on your working table, where you can easily reach it after every stamp.


Then time for stamping...


Once you have transferred the image on your nails & would want to clean your stamper, then you just have to stamp it on the tape...


... & all the remaining dirt will stick on to the tape!


Easy as pie!
Less effort than cleaning the stamper with cotton balls or spraying it with acetone then brushing it off. In this process, you're sure to get rid of all the remaining lint from wherever you might have gotten them.

Look!
Clean stamper all ready to be used again.


Isn't that super easy?!
Now that i've shared my technique, time to go now.
On to more stamping practices for me. hahaha!
Now i understand why lots of people get addicted to stamping. lol

Hope you all are having a great day!
Jaa ne~!
^_^

ps:
by the way, if you wanted to get the same stamper that i have, go check out Myonline Shop.
She got loads of nail art items! If you are new to stamping like me & would want to enjoy the experience all the more, pls get the XL Stamper. I love love love it!

Oh, & this is not a sponsored post,mind you.
^_~

Tuesday, June 07, 2011

How to use ENAS Nail Stylist Soft Nail Stamp

Nail stamps had been the much raved & loved by nail art enthusiasts. I haven't really tried Konad but i have tried other nail stamps & for some reason i can't get them to work for me. I'm having a hard time picking up the design & transferring it to my nail. That's why my respect goes to those who do nail art by stamps too. It's not as easy as you think it is,ladies!

I have had this product for quite sometime & have been testing it since then. I think it's time for me to share my thoughts after owning this for months now.

ENAS Nail Stylist Nail Stamps which i think stands for Easy Nail Art Stamp, based on the research that i made beforehand.


Feel free to read the description at the back.... that is if you can fully comprehend it..hehe!


Once you open it you'll see the silicone stamp...


I actually thought that it has a lid or something to just protect it from scratches or dirt, but i'm wrong.

It's not that big though...


The naming of the stamp is on the middle.. i got A3 & A23

Since this is made of silicone, it is a lint-magnet!


I have to clean it every time i want to use it... i clean it by pressing a sticky tape on it to lift off the lint. I find it works better than using a polish remover for cleaning it.


You use it by applying the polish directly on the stamp... like so..
look at my poor yellowed nail from the stain T_T


You get rid of the excess polish by pressing it on a paper. I prefer to remove the silicone before i use it, but you can use it with the "shell" on though.


Just continue pressing until you get rid of the excess polish. Excuse how messy this looks because i am taking pics while stamping at the same time... not an easy feat to accomplish! hehehe


I find that letting the polish stay on the stamp for a couple of seconds before you stamp it on the paper works better because it allows the polish to become tacky therefore making it easier to adhere on the silicone. If you stamp it on the paper as soon as you put the polish on, it would just give you a thin finish on your stamp.. you can just do it again though, add a second layer or even a third until you are quite satisfied with how opaque it is already.

Wait again for a couple of seconds before you stamp it on your nails for it would dry a bit so that when you put it on it wouldn't rip apart. Applying it while the polish is still wet would just be a disaster. I am having a hard time explaining the process but just trust me in on this, you have to wait for it to become tacky so that the design would be intact. You'll end up ruining it if you keep on pressing it & applying pressure.


This is how it looked like.. Again, sorry if it looks messy but looking at how it was on the stamp & how it is on my nail, they look exactly the same,right?


If you wait for it to become tacky, you would be able to have the design intact... so patience is a virtue when it comes to using this. Unlike the usual nail stamps where you have to do it lightning fast just to pick the design up, this one is the opposite. Drying time of polishes differ from each other of course. It just depends on how fast/slow the polish your going to use on how long you're going to wait until it becomes tacky. If it's a fast-dry polish then do it fast & just add a second/third layer depending on how opaque you want it to be.

One more good thing about this is that you can actually use different polish in just one design. You can click HERE on how you can do it. It's possible but it definitely ain't easy! First time i tried it took me almost 10 minutes to have a decent colored design. It's frustrating when you want a specific color in just 1 spot. Again, it is possible but it is hard (for me)!

Mostly it will depend on the stamping polish that you are using. I am just using an ordinary polish i guess that's why i'm having a hard time for it work. Maybe if i am using the stamping polish meant for this product then it might make my work a lot easier.

I just don't want to do it again for i don't feel like spending more minutes than i have to outside of my room because it's freakin hot! The tutorial on the website looks easy though. I just hope that it will really be as easy as it looks once you used the proper stamping polishes.

Compare to image plates, where you have to clean everything almost every scraping, this one is not as high maintenance. You can easily take the excess polish by stamping it on paper or by just having a sticky tape near you to stamp the dirt/lint off.

Let's summarize...
PROS:

  • no need for a separate scraper & stamper, it's all in 1 convenient design
  • no need for polish remover in cleaning the excess - easy-cleaning
  • it's possible to have different colors in 1 image
  • lots of designs to choose from
  • can be used over & over again

CONS:
  • more expensive than image plates
  • lint-magnet
  • no lid/protection for the image - be careful when storing
  • might not be available everywhere - available online
  • will take a while in getting used to it
Will i buy it again?
Most probably...I'm not a fan of stamps to begin with so i am still half-hearted when it comes to this, but i have to admit that this is 1 of the best way to achieve a professional-looking nails!

I bought it at My Online Shop.
I'm not sure where you can buy it in other countries, but your best bet i to check out EBAY.

Have you tried this?
How about the traditional type of nail stamps?

Hope you all will have a good day,hunnies!
Jaa ne~!
^_^

Friday, April 15, 2011

late haul post~top coats!

I've been rummaging through my files when i came across these forgotten pictures. I've been meaning to post this but then i guess the time just got the better part of me. I ordered 2 top coats & the soft stamps a month or two ago. I have tried stamping but not the soft stamps & i am mighty curious of the soft stamp because i have read some not-so-good reviews of it.


I bought 2 ENAS stamps, the infamous Seche Vite Top Coat & China Glaze Matte Top Coat. The seller is kind enough to include some freebies~! Yay!


I have tried it & it's not that bad... I will make a separate posts of everything i have. I like the soft stamp though it will just take a while in getting used to... Heck! Even the original nail stamps get a while in getting used to using it!


I like how this Matte top coat makes my favorite green polish mattified. It gave it an edge!

For those who are interested, i purchased it HERE.
^_^

By the way, who said that short nails can't have funky looking nail design?


I had these last week & i freakin' love it!
So are the people who kept on saying that i have gorgeous nail design!

This isn't a decal, it's a free hand design.
^_~
Want me to make a tutorial for this?

Hope you all have a great friday,hunnies!
Jaa ne~!

Believe in B.liv's Dump Off Drawn! I do!

I was contacted by B.liv weeks ago to try out their products. I have been so lazy in applying any skin care products lately that I can alrea...