Showing posts with label glam works. Show all posts

Friday, October 26, 2012

Glamworks Permanent Hair Dye Color in Medium Brown

I tried coloring my hair once again after several failed attempts.

I know that it's really hard for me to change the hair color unless i have it bleached but you can't blame a woman for trying especially if there are already several white hairs peeking every now & then.

I'll not go into the woes of aging.
You'll just know what im saying about once you start seeing the natural signs of aging coming at you slowly but surely.

On we go to the product review...
I saw this when i was walking along the aisle of Watsons & was surprised with how cheap it was. It's only Php49, which is more or less $1. I even told my self that with this price, it sure will just ruin my hair. It may end up making my hair all brittle & dry & will smell as bad as... the durian fruit. hehehe

Y'all know how i hate the smell of hair colorants.

Well,i'll tell you first hand that this product is not as bad as what i thought it was. Just read on to know what i think about it...


It comes in 3 shades... black, dark brown & medium brown.


Feel free to read the description & ingredients.
Just click it to enlarge the image


This is what's included in the kit.
The solution & 2 plastic gloves.


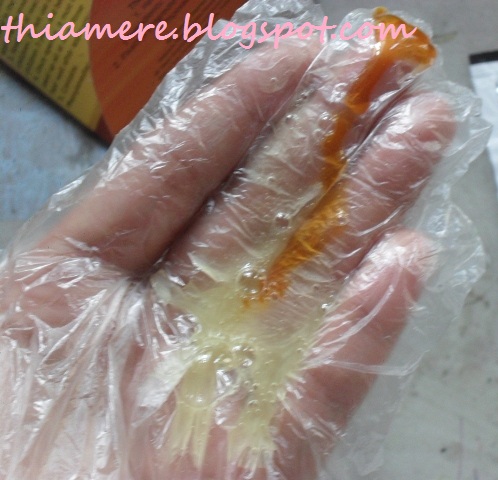
The pack contains the shampoo & the fixative, separated inside so when you pour it in your palm.
When you squeeze it on your palm you'll end up with 2 products & you'll have to mix them together before you start massaging it on your hair.


Directions:


Since this is a shampoo, there will be bubbles on it.
I think the process is just like how bubble hair dyes pretty much work except that this one needs more work because this is not foamy to start with so you'll have to massage it more than bubble hair dyes.


They provided a picture at the back..though it's not really helpful to start with because how the heck can that color be dark?


Sorry,i don't have before pictures, but anyway it's not hard to imagine how my hair looks like prior to application because i told you that i have a jet black hair (which is a pain to color without having it bleached).

Here's the after picture...


Hmm... well, there's a tinge of brown somehow, methinks.. or am i just fooling my eyes?
Ok, another picture taken outside...


uh... yeah, i think there's a teeny tinge of brown.. somehow.

The effect is not that obvious on me because i said that my natural hair color is really very dark but i believe that there is a slight color change. For a product that is only Php49 each, this is more effective than Etude's Bubble hair dye imo.

Since this is just a shampoo, you would have to deeply condition your hair afterwards so you have to buy a good hair mask together with it. One more thing, it says that it's ammonia-free but i still smell the scent of ammonia. If you weren't bothered with the scent of ammonia when you use bubble hair dyes then you won't have any problem with it.

PROS:

  • really affordable - Php49 only
  • locally available
  • easy to use
CONS:
  • limited shades (3 shades only)
  • there's a lingering scent of ammonia (of course!)
  • could leave your hair dry (so you have to condition after)

I want to really say that it works because i think it does it's just that since it's hard to show you the effect, i'll leave it up to you. I would suggest that you try this if you are on a budget though. What's there to lose?

By the way, i used 2 packs on my hair because i have a really long hair. I applied this on dry hair though. I've been reading the whole pack to see if there is a mention about the application but i can't find any mention so i just decided to apply it on dry hair. Maybe it will work better on wet hair?

Make sure that you check the ingredients list to see if there is any/one of the ingredients that you are allergic to.

If you have any questions, feel free to leave it on the comment box & i'll get back to you asap.

Hope you all will have a great weekend!
Jaa ne~
^_^

Thursday, September 27, 2012

how to:DIY hot wax kits

Long time no blog!
hahaha!
i have been out of blogging because of classes & at the same time you all know that i have camera issues. I'm supposed to get it over & done with but because of little things that come up every now & then having my cam fixed had been one of my least priorities now.
*sigh*

Anyway, im always on facebook though.
I'm glad that people still read my blog even though i don't update it every now & then
Thanks for the support,hunnies!

Now, let's get back to regular programming... or blogging in this manner.
hehehe

I have received tons of questions about hair removal.
I have used several ways of hair removal, just not laser procedure though. I personally favor wax strips but i make sure that i keep creams & razors, aside from my strips & kits, for an easy & fast hair removal.

This time, i'll be focusing on hot wax kits. I'm sure you have seen wax kits on the department store every time you pass by the depilatory section. I think this had been a staple among depilatory products out there because it is really affordable & effective.

Hot wax, based on my experience, is by far the best way of hair removal. It's warm enough which makes the pores open up so you can really get to the root of the hairs easily. You don't have to go over the same skin area again & again unlike cold wax strips. But this is also the most painful way for me. hehehe

The heat makes me feel the pain a lot more because it makes the skin a bit sensitive. Some people say the heat relaxes them. I can't imagine how you could relax while pulling out body hairs!

I'll be featuring the kit from Glam Works for this post but i have tried others like Epillin & they basically works the same so no need to be a stickler when it comes to choosing brands if you decided to try DIY hot wax kits.


Me thinks the color of this wax just looks so pretty,no?
Ok, since i am featuring this green wax, you might as well know how the packaging looks like anyway...


The the description at the back says:


When you do hot wax, it's better if you have a wax strip like this, so that you won't scorch yourself trying to remove the wax off your skin.


Wax could be pretty messy & painful to remove if you don't use strips.
Warm wax would be malleable on which you won't be able to pull it off your skin easily. It will just stretch like mozzarella & will make the experience really painful & messy in the end.
Cooled wax will crack as soon as you remove it. Instead of you being able to pull it in one clean & easy sweep, you'll be forced to remove it little by little & you'll just end up pulling your skin again & again which will result to a very painful waxing experience.

Just trust me in on this.
I had experienced it.

Ok, now let's go to the procedure.
This is how i do mine. Every person has their own preference, it's just that this is how i like to heat my wax.

Most people just pop the wax in the microwave for it to melt. I haven't really tried it because we don't have microwave here. I would have to go to my parent's house just to microwave something.

A friend says that she puts it over a candle & wait for it to completely melt.
I have tried it.
I will not advise that procedure because having a direct fire contact will cause the wax to be really hot (that if you are not careful in keeping track of the temperature would end up with you burning your skin) instead of just warm & tolerable. You also risk ruining the whole batch of wax because exposing it to extreme temperature will lose its effectiveness.

So what i used to do is i try to simmer water on a pan, then i'll submerged an upside down pyrex bowl  on the pan then i put in the tin wax on top of the bowl (or bottom literally). I do not let the tin touch the bottom of the pan because it will just come in contact with the wax & again, it will just make the wax really hot & end up ruining it.

I let the water touch the bottom of my tin & the heat will just melt the wax. This is a good process for me but i find it quite tiring because i have to make sure i monitor the water & often times i turn the burner off because i can't let the water boil. If i leave the wax sitting too long it hardens a bit & i would have to turn the burner on again...

It works but it just takes a lot of work so i quit using hot wax for a time because i find it really troublesome to use.

Until i bought something that made my hot waxing experience a breeze!
Wanna know what it is?

Ta-dah!
An oil diffuser!
Yep!
I use it & it makes waxing a whole lot easier than before!

I add water at the top part of it, light my tea candle, put the tin of wax on top (make sure that the water touches the tin) & just wait for it to all melt away.


If you take a closer look at my top picture, you'll still see the candle burning as i took the pic. I find using diffuser easy just because i can regulate the temperature of my wax. I can remove the candle when my wax is  hot & melted & put it back on when it's beginning to harden & get gloppy.

Just remember that you put water in there, which means that it will evaporate later on so you would have to keep on adding drops of water as soon as it's almost gone.

No need for before & after pics. It does the job.
So i think it would be pretty pointless to show the hairy & hairless pic,no?
hehehe

It removes hair...period!


See?

Now, a few tips here & there when you use hot wax.
  • If you have a low pain tolerance, some says that taking a pain reliever helps (im not sure though)
  • It's better to do it right after taking a bath so that your skin is soft
  • You can powder your skin beforehand so that the wax will just adhere to the hair & not the skin.
  • Apply the warm wax on the skin, making sure you cover the area with ample amount of wax then put the strip. Applying the wax on the strip first won't work & will just end up as a hot mess.
  • Once you apply the wax, wait for a couple of seconds before pulling. The wax needs to settle & cool a bit so that it would stick together. 
  • Rub the strip on the skin, giving it a gentle pressure as you push it downward or following the growth of the hair. This would ensure that the hair will stick to the wax.
  • When it's a bit cooler, pull it from the bottom or against the grain of the hair growth. Do it in 1 strong pull. If you hesitate it will just hurt all the more. So go ahead & give your girl muscles a work out with this!
DIY wax kits are very affordable some could be quite tedious to use (like this as i first thought) but im sure you'll be able to find a way on how to make one work for you.

Hope you all are enjoying your day!
Jaa ne~!
^_^

Believe in B.liv's Dump Off Drawn! I do!

I was contacted by B.liv weeks ago to try out their products. I have been so lazy in applying any skin care products lately that I can alrea...