Showing posts with label born pretty. Show all posts

Thursday, December 06, 2012

Born Pretty White Matte Round Glitter Review

This entry is a way overdue post...
What am i thinking forgetting about this one when i mentioned before that i had come across this matte glitters?!
Better late than never,no?
hehehe

You all know that i love to franken polishes.
In fact, i like frankening polishes better than doing my nails these days. I can't even remember when was the last time i really did make a nail art.

I have been looking high & low for matte glitters. I have wanted to use it for making a unique glitter polish. I want something that will not bleed. So when i was given a chance by Born Pretty to try out their glitters i immediately choose this.


Isn't this unique?
So different from the usual glitters that you can see at the bookstores.


I think it's made from polyester which is why it will stay true to its colors & will not bleed.
I'm sorry but i do not have an idea what is the size for this one is but this picture might help.


They're a bit big.
Maybe you're wondering how it holds up if you are going to use it on a polish.

Well, this is a bit tricky though....
Of course, it won't bleed but then i think it's too thin that's why it ends up curling a bit.


See how they curl?
Hmm... I'm not really sure if i could use this for frankening but i may be able to use this for just creating nail arts like this one.


I have to say that i am liking this one.
Really easy but is so funky & very eye-catching!


I said that they are quite thin so you won't really have a problem with it once they are on your nails already. They won't stick out as much compare with other glitters. Just make sure that you seal it with a thick coat of top coat.

I'll try to use this in frankening once i got some more matte glitters that i can find. So the search for matte glitters is still ON.

If you are interested in this product, you can go over this LINK & you can use the code PRJ61 to get a 10% off of your purchase.

I'll try & use this glitter for some nail arts that i might be doing in the future.
Maybe something for this christmas..hmmm...let's just wait & see if i'll be able to have any idea about christmas designs.

Speaking of Christmas, how are your holiday preparations going along?
Mine is doing pretty well hence i don't get to blog that much.
hehehe

Hope you all are having a great day!
Jaa ne~!
^_^

ps:
Product sent as sample. I did not receive any monetary compensation for this post. Opinion shared is personal view & is no way influenced by the company. Use at your own discretion.

Saturday, February 04, 2012

how to:nail art brushes part 2

If you missed my first post about how to use the nail art brush set, you can take a look HERE.

So, continuing with what i have left...

THE FLAT BRUSH


What i like about this brush is that it's very easy to apply polish/acrylic. Unlike brushes that is included in the bottle, flat brushes can make polish application a breeze. You have to try this in pigmented creme polishes, you can achieve a full coat with just a swipe or two with this. You can do flower petals too! Just lightly drag the tip on the surface.

As to flat brushes, you can also do one strokes with it. I'm not an expert when it comes to one stroke method yet. I have tried once though but not this brush. hehehe

One thing that i like about this is that it's great for removing/cleaning excess polish! Since it is flat, it can easily go to the crevices of your nails to remove any lingering polishes! Just dip the bristles on your polish remover then go around the sides of your nails to clean it up.

THE ANGLED BRUSH


You can do flower petals with this brush like the filbert brush but I prefer using it for one strokes though. I think that this is easier to work with for one strokes rather than flat brushes.


You can take a look at Tartofraises' video for a how-to for this design HERE.

This is also a great tutorial from her!

THE DOTTING TOOL
Now, this is one of my favorite!
This is one of the easiest but versatile nail art tool that you can use. Depending on the tip of it, you can make large to tiny dots. I have used dotting tools countless of times on my nail art tutorial & i have to say that it's so versatile, it's not just simply for making dots! You can do all these designs using this.
Here are a couple of nail designs that i made using a dotting tool. This is a very easy design to do, i promise!~
This is one of my favorite dot designs.
Another favorite of mine! I adore contrasting colors!
Making heart designs are a lot easier with dotting tools rather than brushes, believe me!
Now, the next time you see a dotting tool, don't just think of dots designs,ne? There ya go. Hope you find this post somewhat helpful! If you want to get the same set of brushes that i have you can order it HERE. You can use the code at the left sidebar of my blog for an additional 10% of your purchase. Again, if you haven't checked my first post about nail art brushes, then go HERE. Have a great weekend everybody! Jaa ne~! ^_^
ps: Product sent as sample. I did not receive any monetary compensation for this post. Opinion shared is personal view & is no way influenced by the company.

Wednesday, February 01, 2012

How to grow strong nails the BornPretty way~

This is one post that really took me months to decide on how i'll go with it. I have to make sure that i cover any grounds because i don't want to mislead people with my post.

My readers would often think that i always shave long beautifully-manicured nails when they see me. I remember someone greeted me while i was browsing the mall & when she asked if i am 'thiamere' & i said yes, she said she's not too sure because i have short & bare nails. hahaha!

Well, i do love donning on nail art but it doesn't mean that i always have long nails. I guess that maybe you'll be surprised when i tell you that i suffered from weak nails too. Well, it wasn't as weak as how it was before but i had my time. Then there was also a time when they would just chip very easily... grrrr!!!!

So, i know,ladies, how it feels when you want to grow long nails but it just won't cooperate. But don't fret! You can do something about it. I had it before (& sometimes i still do) & i was still able to grow my nails long,ne?

This is the only 3-care-system that i have ever used because i'm not a fan of those. I have been using this for more than 3 months, though not regularly.


Presenting the 3 system manicure-pedicure kit! This is available at BornPrettyStore.com
According to the website:

3 pcs Nail Art manicure kit
White-soften tool- It soften the dead skin and make the dead skin throw away easily.
Pink-under-oil added caluium-it is used to smoothen brighten and preserve nail, adding ca. on the nail lustering the nail.
Yellow- Nourishement oil- unique essential oil, irrigate nail and the skin around it. Make skin more greasy and much brighter.
All these 3 bottles will make your nail much more healthy and beautiful.
net weight: 114g
Perfect for both professional and home use!

Let's start with the Cuticle Softener:


I don't really push my cuticles. But when there would be times when i have dry cuticles, i would sometimes trim it using a nipper but i don't cut it too short. I have read that cutting it short (almost to nonexistent!) could possibly make dirt/germs enter the layers. I buff my nails to smoothen the nail plate to make polish application easier but i don't do that often.

When my cuticles needed grooming/trimming that's the time when i would just use this. Can you see how little product i have just used? It's because i don't often do it. You only need a little product because it is easily absorbed. It would dry faster than any ordinary liquid cuticle remover but this is way better because it makes the cuticles really soft in just a matter of minutes!

Then the Cuticle Oil!


I prefer to apply cuticle oil/cream after cleaning my nails & before the strengthener.

Now, i have to admit i don't use this cuticle oil very often just because i have a cuticle oil that i really like but it doesn't mean that this is bad. It works just the same but i, just not a fan of oil-products on a bottle packaging because i'm clumsy. I always end up tipping the bottle when i'm applying it. I prefer those squeeze bottle that has a long tip for easily dispersal.

Cuticle Oil/Cream provides moisture that your nail needs to prevent it from breaking. You will know & see the difference of nails that has been using cuticle oil as to nails that doesn't use any at all. I only apply polish every weekend (sometimes i don't even do my nails at all!) but i make sure that i apply cuticle oil everyday. Actually, make that every night. I massage the oil on my nails in a circular motion so that it would be easily absorbed.

Last would be the Calcium-based Nail Strengthener


This is the one that i have been using a lot ever since i received this.

Now, let me say a little bit about calcium-based strengtheners. I'm not an expert when it comes to ingredients like this so i'm just basing my opinion based on what i've read,ok?

A lot of people said that calcium is the main component of nails & bones. So when you think about it, to have strong bones & nails you need to intake calcium. I guess that's also the reason behind calcium-based strengtheners. I have tried them & let me just say that i don't think it makes a difference from non-calcium-based ones. I read this article before that said about a study conducted from women who took in calcium but doesn't have any changes at all. Again, i don't think it makes a difference whether a strengthener is calcium-based or not.

Nails, in fact, are made of keratin strands. I'll just ask you to click that article to take a quick look about nail strengtheners.

If your problem is weak nails, then nail strengtheners are your best friend. I have pretty weak nails before. I can't grow them as beautiful as i do now because i can easily bend it from the edge of the plate. Constant application of nail strengtheners made my nails a lot stronger.

I'll honestly tell you, i don't think that this product made a big difference on my nails because i have been a user of nail strengtheners ever since. I just continued my routine but just a different brand so i can't really say that this worked for me.

If you suffer from week nails like i did before, you have to get a nail strengthener. What i like about this is that it dries really fast! It could dry in a matter of 15 seconds (with a really thin application!), how cool is that?!

Now, let's do a little summary of this system...
PROS:

  • affordable (the whole set is only $6.55!)
  • smells good (only the cuticle oil & softener, you know how strengthers smells like..)
  • can be bought easily with free shipping worldwide! Click HERE
  • the bottles are big!
CONS:
  • not available locally

With everything that i have said, do i recommend it?
I guess yes. It's pretty affordable & they have free shipping. You can also use the code that you see at the left sidebar for 10% discount!

Did they work?
Of course, they did! But just like what i said, i have been using cuticle oils & strengtheners even before i got this so i didn't notice any change. On the other hand, if i didn't notice any change it means that this is good because it was able to maintain my nails like before... to think that i was using LUSH Lemony Flutter as my cuticle cream! I like the softener, it's my favorite among the lot!

I still think that you get your money's worth for this provided that you will stick to the regimen. As what i said before, there is a difference to nails cared for with cuticle creams/oils & strengthener compare to ones that wasn't even cared for.

So, tell me, what are the products that you use for your nails?
How do you take care of them?

Hope you all are having a great day!
Jaa ne~!
^_^

ps:
Product sent as sample. I did not receive any monetary compensation for this post. Opinion shared is personal view & is no way influenced by the company. Use at your own discretion.

Friday, October 14, 2011

how-to:nail art brushes + acrylic painting Part 1

Sorry for not being able to blog regularly. I think i have been apologizing over & over again because of my lack of updates. I hope that you'll be able to forgive me with this post. My long overdue post about nail art brushes.


This 15 pc. brush set is from BornPretty.

It has a pretty good selection of brushes in making different designs. It got detailing, liner, fan, angled, filbert & dotting tools. According to the website it has:
3 drawing tools
7 painting tools
2 liners
1 dotting tool
2 fan brushes for nail art effect


I seriously can't understand why there is a need for 2 fan brushes though. i'd rather have another filbert brush to go with this set.

I prefer acrylic as my medium all because it's easy to work with. You can easily wipe it out when you made an error (provided that it's still wet). Unlike polishes where you have to redo everything once more. I have received tons of questions if it's ok to use the acrylic sets that painters use.

I, myself, use acrylic sets like that. I think as long as you put on base coat, it won't harm your nails. I have even tried using it as my base color & nothing happened on my nails.

note:
Make sure that you do not get the acrylics on the ferrule or you'll risk the bristles of your brush splaying out. Getting the debris out of ferrule is not an easy task. You'll end up ruining your brush when it splayed out, especially for detailing brushes! Just dip the bristles half-way on the acrylic & make sure you clean it after every use.

Let's start by prepping up first & what you need before you start playing with colors.


First of all, you have to remember that acrylic dries fast. It is water-based so you would need to spritz water on it every now & them to keep it easy to work with. So you would need an atomizer filled with water (mine is really small...see that small orange bottle?) to keep it pliable.

Then of course, something that you can use as a pallet. I just use old CDs. Something to wipe your brushes with... kitchen towel or tissue & of course your jar of water to clean your brushes.

Now that we got that out of the way let's go to the brushes...

My favorite brush of all...
THE DETAILING BRUSH


This is the most versatile brush of all because you can make specific designs with this.
Detailing brush has fine tip so that you'll be able to maneuver it easily. I mostly use this on my nail art tutorials. Here are some of the designs that i did using this brush. Just click the title of each picture to see the step by step tutorial on how to make that design.


You just need to have steady hands when doing detailed work, well, since acrylic can be easily removed with wet wipes, you can practice the design as much as you want on the surface without worrying about it.


You can do lines easily with this brush too...
even dots!


You can also use your polish as your medium, just make sure that you will not get the polish into the ferrule... same goes with acrylics.


If there is one brush that i would recommend that you buy, it would be this. You can also use artist brushes. In fact, my favorite detailing brushes are craft brushes. Sizes would vary of course, just go for the smallest ones, which i think is 3/0, if my memory serves me right.

You can do a lot of designs with detailing brushes!
Love love love detailing brushes!

THE FILBERT BRUSH


This is a very nice brush to make flowers with.
Please refer to this illustration on how to make flower petals.


You just need to lay it on the surface then drag it either towards you or going out.
See the 2 different flowers using this brush?
Cute,huh?
^_~


This is one design that i made using a filbert brush.

THE STRIPING BRUSH


Striping brush have flat ferrule as opposed to detailing brushes that has a round ferrule.
So, what designs can you make with it?
Basically, you use it to make stripes!

Of course, it doesn't mean you only need to use it for straight lines. You can make waves with this brush too, like this.


This is perfect for making those background waves.


I didn't really do this design for i had it made on the salon, but the brush that was used on this is striping brush.

THE FAN BRUSH


Fan brush can be used to clean the surface among other things.


The top pictures would be to show to make random "flowing" stripes in just a couple of strokes & the 2nd one is how to use it in picking up glitters/pigments. You tap it straight on to your wet polish for that added bling!

I didn't use a fan brush in this nail art but i should have just used it because the end result would just be basically the same.


The grasses on the ring finger is made with a fan brush.


These are just the basic use for the brushes but you don't need to limit yourself to these designs with each brushes. Heck, you can even do flower petals with a striping brush! Just explore these brushes to figure out the different uses.

To be able to see my nails art easily you can click on my FB NAIL ART ALBUM. It would be easy for you to browse through my past designs with blog links on each pictures for reference.

I'll continue with another post to talk about the other brushes like the flat & angled brushes. I actually cut my nails a few days ago so they're really really short now but i don't mind. I am enjoying my shampooing experience because i can get to massage my scalp as much as i can unlike before. LOL!

I just hope that it will grow long by christmas time because i would like to don christmas design on my nails this holiday!

It's going to be my birthday this Sunday. I can't believe how fast time flies.. I'm already 27!
Wow! Where did all the years went? haha!

Anyway, hope that you'll have a happy weekend!
Jaa ne~!
^_^

ps:
Product presented as samples. I did not receive any monetary compensations. Opinions posted are mine alone & not influenced by the company.

Wednesday, August 31, 2011

Pearls for your nails~

I always think of pearls as something very elegant... It's something that could compliment any fashion get-up, of course it also includes the nails. I have already talked about Swarovski Rhinestones before & i love it to bits! BornPretty was kind enough to let me try this pearls because i have planned on making bridal nail art & i always associate pearls with weddings.

That's why i can't accept the fact that here in the Philippines we have this superstition that brides can't wear pearls on their wedding day because it would mean that the woman will be crying a lot of times on her married life...
T_T
That makes me want to cry already!

Moving on, faux pearls like this is one of the best way to glam your nails up for special occasions.


This pack has 10,000 pcs of faux pearls... i think i won't be able to use all of them unless i do something crazy, but this could easily last me for a long, long  time!


This is how they look like up close...
Use it like how you use a rhinestone, make sure you top it off with top coat to seal it in place,ok?

I have made a bridal nail art using this pearls & i have received tons of compliment!


What design is the one in middle?

Just make sure that once you open the pack you transfer it in a container or in this case, a ziplock bag.


One pack is for $7.10, which again contains 10,000 pcs. Isn't it cheap?

You can order it HERE
By the way, BornPretty offers free shipping worldwide so this is really cheap! If you do order this, make sure you also include the Swarovski Rhinestones because it's one of the best that i've tried!!!

Use the code that you see on the left sidebar of my blog for a 10% off your purchase.

I'll try to do a better bridal nail art design someday,ok?
Hope you all have a great day!
^_^

ps:
Product sent as a sample. I did not receive any monetary compensation for this post. Opinion shared is personal view & is no way influenced by the company.

Monday, July 25, 2011

your nail deserves the best!

I love nail arts... most likely you, my reader, also has a passion for nail arts as well.
Kaya nyo nga binabasa blog ko e...LOL! (That is why you are reading my blog.)
Why not,right?
We use our hand to gesticulate & having an awesome-looking nails definitely adds up.

Rhinestones add an extra oomph! to the nail design. For those who have been using rhinestones, i know that the issues when using it is that that they lose their luster once you applied top coat... Am i right?

Not all rhinestones are like that,mind you...
There are some rhinestones that i have tried where they will still retain their luster with a top coat it's just that when you remove it & the polish remover touches it then it loses its luster so you will have to throw it away already. But that's a good rhinestone already!

The rhinestones that i have tried often belongs either in these 2 categories:
A - looks dull when you applied topcoat (the bad type)
B - doesn't lose luster when you apply top coat (the good type)

I have gone through a couple of rhinestone wheels but "ditching" them in the end because they fall in the former category. They will lose their luster so it's not good when using it in nail arts but i still keep them in case i would have something that i want to decorate like my scrapbook or when i make some handmade hairclips, they are perfect!

But not for your nails...
You apply rhinestones because you want to have your own nail blings but this type is an utter failure!
*rolls eyes*

It's pretty hard to look for the ones in the latter category.
I'm just lucky that i was able to own a couple of rhinestones like so.

Now comes Swarovski flatbacks....
I'm pretty sure you are all familiar with Swarovski. There is something about Swarovski that sets it apart from other common glass crystals. If you own some jewelries that got Swarovski you'll know how shiny it is... just imagine that on your nails!

It's marvelous!
Look at this picture.... I'm sure you know what is the Swarovski there,right?


It's very obvious! It is the bottom left one, of course.
Can you see the luster in it as oppose to the usual resin rhinestone?

This is how it looks like with a very thick blob of top coat on...


See how the other resin ones pale in comparison to the luster of this Swarovski rhinestone?
Doesn't it speak for itself already?

Add the fact that this Swarovski from BornPrettyStore is, according to their term, described as "foiled back" which i gather uses foil as their backing to ensure that they have superior glitz, glamour & shine, just makes it too irresistible!


See the back?
I know that most rhinestones just have that smooth shiny back, this one is really just like a foil!

One major advantage of Swarovski rhinestones over ordinary resin rhinestones is that Swarovski is reusable!
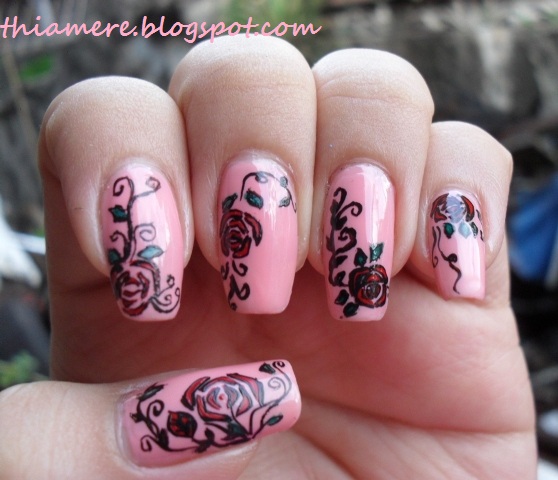
You don't believe me? Well, take a look at my nail art...


See that rhinestone at the ring finger?
I already added 2 coats of top coat in it but you can still see how shiny it is! There is really something different about it... once light hits my nail, it just shines! This rhinestone adds bling to my somewhat boring color,ne?

I'll make a tutorial for this nail art maybe next week, i just want to get this post about Swarovski over & done with first... hehe

Anyway, the main point of this is to see how it looks like after i removed it.


This is it after i submerged it completely in my polish remover, i swirled it around to completely remove any remaining top coat on it...

So, i'll let you guess...
What do you think is the one that i have used & submerged in polish remover? The other one is just new
Is it A or B?


They look the same,right?
It is actually A that i have used but there is no obvious difference between the two!

This is just a proof that you can reuse this rhinestone over & over again. It could even last for a lifetime with proper care & maintenance.

This is definitely a good investment as opposed to continually new set of resin rhinestones every now & then.
I know what you are thinking... "It's expensive! I don't have the money to buy that".
Let's do a little comparison, shall we to see how this fares with the regular rhinestone set available online & the ones that i have seen being sold in our local stores...

A set of rhinestones in a wheel being sold locally is priced somewhere from Php 150-300 per wheel.
Let's just go for the cheapest which is Php 150 & convert it to $3 (this is not counting if what you are getting is actually an A rhinestone (the bad one) or the B one (the better).

It has different colored stones, which would enable you to mix & match depending on your nail art for that day. Then again, this is just for one time use.

The Swarovski on the other hand is $7.27 for 144 pieces.
It is reusable & the luster of this rhinestone is amazing!

I know that it is quite steep but then you are paying for a very high-quality rhinestones & you can reuse it over & over again. It would prove to be cheaper in the long run! If you love rhinestones & have that bling in your nails then this is a good investment. Once you bought it you won't have to buy any rhinestones ever (if you take good care of it)! You'll be hooked with how awesome this looks on your nails!

If you want your nails to be all glittery & sparkly, then use the best rhinestone & it will definitely add that OOMPH! & more!
hahaha

BornPretty has different assortments of Swarovski rhinestones from different colors & sizes. I know for a fact that this store has the cheapest Swarovski flatbacks because i made a research months & months ago. That is why, if you want to try this head on over to their website to take a look.

You can use the coupon code that you can see at left side of my blog for a 10% off.

Hope you all are enjoying the day,sweeties!
Jaa ne~!
^_^


ps:
product sent as a sample. I did not receive any monetary consideration for this post. Opinions shared is personal view & is no way influenced by the company.

Believe in B.liv's Dump Off Drawn! I do!

I was contacted by B.liv weeks ago to try out their products. I have been so lazy in applying any skin care products lately that I can alrea...