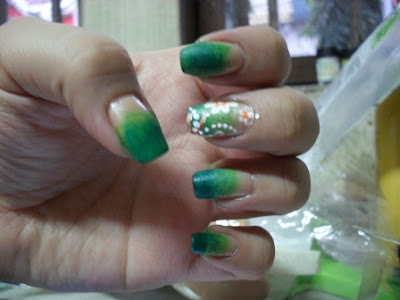
So to welcome the season, i decided to do a gradient green nail design with a hint of warmth on it.
Excuse the dry-looking cuticles, ladies.
I did this last night & i haven't cleaned the edges yet & there are still excess top coat at the edges especially the middle nails for i have to make sure that i seal the rhinestones in places.
I just bought a new set of acrylic paints because i don't like the consistency of my old acrylics anymore. They are already a bit dry, though i can still use it to paint but it's hard for nail designing. I'm glad that i saw a set that has 18 colors. It's a lot cheaper compare if you are going to buy them separately.
I haven't used acrylics that much when i do my nails for i prefer nail polishes, i guess i just had this thinking that anything that is used for painting should only be used in canvasses. LOL! Though i know that in some salons they use acrylic paints in nail arts. So why not practice with acrylics now! My nails are my canvas, albeit a really small one!
I decided to so flower designed nails for i haven't had any luck when it comes to flowers. I have only received 2 bouquets of flowers for my entire 26 years of living... How pathetic,huh? That's also the reason why i don't like Valentines... you can ask Sis Pammy why. XD
I guess that's why i don't usually do intricate flowery design. I'm still basically a beginner when it comes to flower designs, except for those flower dots. Sorry if this design looks messy (-__-")
For those who are also a beginner in flower designing, Let's all do our best!
Watashi mo Gambarimassu!
\(^_^)/
It's also been a while since i did gradient nails so i decided to do a green gradient underneath. Sponging method is really so easy to do. Let's start with the tutorial!
Materials needed:
- base & top coat
- base color - optional - you can even go for bare nails since this will have a gradient tip
- sponge
- dotting tool
- nail brushes - pointed filbert brush & liner brush - optional
- acrylics - titanium white, orange, phthalocyanine green (light green & viridian hue is optional)
- rhinestones - optional
1. After base coat, apply your base color. As what i said, this is optional, you can just skip it but since my nails have a very bad nail stains (i'll let you know why after a couple of days) so i need to apply a nude nail polish to cover it up.
2. Then load up your sponge with green acrylic so you can start sponging. Start with the lightest color first, in my case, it's the light green. If you don't have a light green acrylic, then just make your own by mixing titanium white & phthalocyanine green. Adjust the color until you achieve a light green. Sponge your own at about 3/4 of your nail.
After the light green, i applied the viridian hue (again, feel free to mix your own color, it's juts a tad bit darker than light green, so just add a bit of phthalocyanine green on your light green mixture). After that would be the phthalocyanine green alone at the edge
Sponging tip:
When you apply the acrylic on your sponge, press it first on a paper so that the acrylics would be distributed evenly... continue pressing until you get the desired color. You don't want a big glob of acrylic sitting on one side of your nail because the color concentration would be too high in that area. It's better to start a soft wash of color & just work your way in compare to starting with a heavy color.
I prefer make-up sponge when i do the sponging method because it's dense enough to achieve a not-too-obvious sponge holes compare to the usual sea sponge that has a lot of holes on them. But the sea sponge design is also good, it's just that when i want a real gradient look then i go for make-up sponges.
3. Then using the pointed filbert brush, we will have to make flowers. Dip the tip in titanium white acrylic.
Now, when you work with acrylics & this rule applies to all brushes as well, Just use the tip as much as you can. If you get the acrylic on the ferrule, it would be hard to remove it. When it dries inside, it could affect the density of your brush. I have destroyed a good number of brushes when i was still painting all because i can't remove the remaining acrylics left on the ferrule. I'll do a separate post about it when i talked about nail art brushes.
4. With steady hands, make flowers on the side/middle/top/edge of your nails like so...
Just be random. What makes this nail design fun is that you're not bound by a specific design since all of your nails has the same base & you have the same colors in every nails so you can just have fun with the flower & dot placements!
5. When the flowers are done, we can add a bit of warmth on it using the orange acrylic. just apply it on the inside of the flower.
6. Then add dots using a dotting tool
7. Finish it off with rhinestones that you put in the middle of the flowers & your favorite top coat of course!
There ya go!
I am actually digging the gradient green. My flowers still look like a disaster, but i'm sure with practice i'll be able to make it better. I still have a long way to go.. mada mada!
Hope you like it.
Have a great Sunday!
Jaa ne~!
^_^
^_^
ps:
Giveaway still ongoing, click HERE to know how to join.


12 comments:
I love your mani design hun..Absolutely love the way you combine those 3 colors into one design..Can't wait to see more from you soon..
Love the gradient effect! :D
Stunning! absolutely gorgeous!
/Hugs!
http://spellbindingnails.blogspot.com/
Very pretty! :)
you are absolutely creative! it's so spring-themed! :) do something summer-y, too :D
Pretty pretty flowers :D.
great job sis! looks really pretty :D
Your flowers are really gorgeous! I can't believe it when you said you're not that good pa? ANOKABA? hahahhaha Very perfect for spring! SOOO NICE!
Gorgeous nails!!! I could never have the patience for this, but yours look great!
you are getting better and better at your nails! Love the spring look you did, looks like some pretty vines in a garden!
Wow!!! I wish I also have that talent!!! Love the gradient effect and the flowers are so pretty!!!
cute! it looks like your just painting :D
Post a Comment