Showing posts with label nail art-prints. Show all posts

Thursday, June 07, 2012

the best nail patch that i've tried!!!!!

I hate nail patches!
But that was before, now i am loving this certain nail patch that i've tried.

If you have tried nail patches, you'll know how it could only last for mere hours. How awful is that?!

Remember the post that i made before about the nail foil patch?
It was so hard to apply yet it didn't even last for more than a day! Definitely not worth buying & trying!

So when Jessie Rhee of Dress Up Ur Nails contacted me & asked me to try out her nail patch, i was in doubt. I frankly told her that im not in awe of nail patches. I'd rather do my own nail art than be bothered (by cutting the patches that doesn't even fit my nails) by it.

I asked her if her product can withstand an everyday wear & tear & she said that it does. I asked her that as a consumer & not as a seller, by the way. Since she said that it does, so i said 'ok,let me try your product then'. Though i honestly still have doubts over it. I'm quite hard to please because my standard is a bit high. But let me tell you, this nail patch blew me away!

It lasted for a week!
I think it can even last for another week if i just didn't get tired of it. I took it off with it being intact. No chip or tear! Seriously!

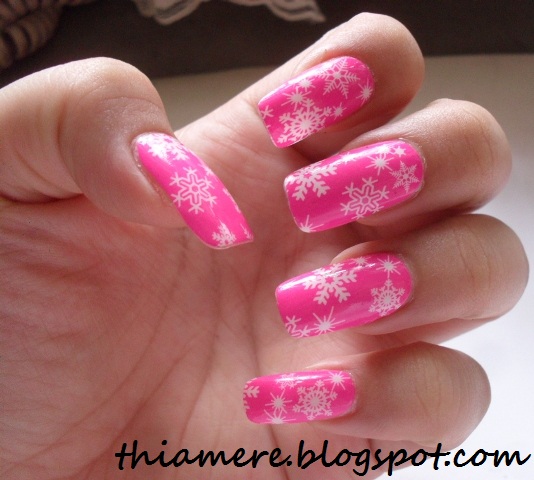
The design looks cute,huh? This design is Snow Pink!
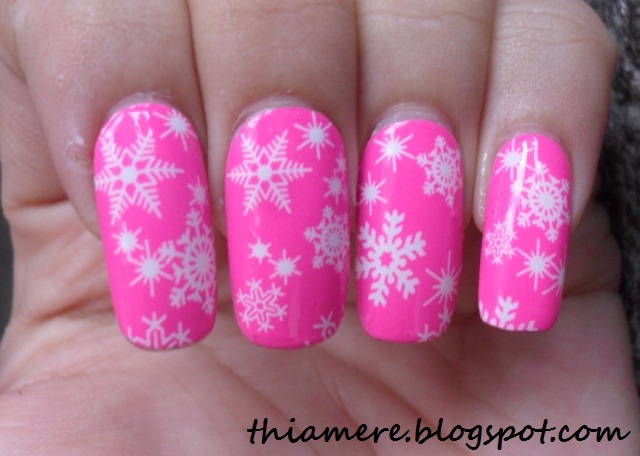

I really like it!
Lots of people kept saying how cute my nails are the whole time i had these on. I never let one design stay on my nails for more than 2 days (unless im sick or the effort that it took me to make a design makes it worth keeping) but i happily kept this patch on not just simply for testing purpose but because it's so cute!

Anyway, i'll tell you my experience....
This is how it looks like.


This is the back, with the instructions...


Then the patches itself.


Yep there are 16 individual patches in all, the purpose for that is you can choose what fits your nails best. I told you that the patches that i've tried were awful just because they're all in the same sizes so i have to painstakingly cut them one by one.

But in this case, you can choose what fits your nails best.
Plus, one good thing about this is that it doesn't end with you using the whole patch for your nail, you can maximize it & use the remaining stickers to make a french tip!


See?!
Isn't that getting more than what you pay for?!
Just think about it, one set could yield you like 3 full uses for all ten nails.
A-all ten nails with whole patches
B-just use them on your tips for a funky french tip
C-play around by donning whole patches with french tip alternately

Since this is a sticker, you don't have to worry about nail stains!
Yay for that!

It's very easy to apply too! Click for bigger image.


1. Make sure that the nail is clean & free of oil or dirt.
2. Choose a patch that fits your nail.
3. Pinch the edge of the patch where it ends so you can dislodge it.
4. Peel it off the plastic backing. Make sure you don't touch the back of it to prevent any oil from your fingers transferring on it.
5. Lay it on the middle of the nail like so.
6. Carefully stick it on one side of your nail, making sure that there are no air bubbles trapped. It could affect the longevity of it.
7. Do the same on the other side. Make sure you DO NOT STRETCH THE STICKER!
8. Fold the remaining sticker on the edge of your nail like so.
9. Gently file the excess away. the keyword is GENTLY file it.
10. Then you're done! You could apply top coat if you want to, but it's ok to skip it too.
You can also watch this video if you want to see it in real time.

I applied top coat just once, when i applied it. Oh, i didn't put top coat on my thumb though. I said i had it on for a whole week & they're still good.
I'll show you...

Day 3:

Day 5:


Day 7:


I spilled polish on it when i was frankening that's why it has that ugly dark patch but as u can see, it's day 7 already but it still looks nice!

This is on my left hand, on my right hand it was still the same!
It's just that my right nails are short so i didn't take a pic of it but it's my dominant hand & the patches was still intact! Sugoi!

It was able to withstand my everyday activities like washing dishes, cutting vegetables, drumming my nails on the wall/table, scratching, etc. I'm not sure if this could last if you'll do heavy hand activities like washing clothes but if it's simple household chores, it would last.

I highly recommend this!

Now, one thing that might turn you off is the price.
It's a bit expensive. It's sold for Php 489 each. But these are highly quality stickers. Unfortunately i don't know from material its made of, Jessie said that it's a korean nail patch. I don't have an idea at first what is it but when i have seen for myself what it is, i knew that these are not one of those cheap stuff that you can buy anywhere. This is unique!

I had these stickers that my korean student gave me before & it's made of the same material. It's actually on my monitor & i can take it off & put it back on whenever i want to. It's like plastic & silicone. You can stretch the material to fit your nails. But don't stretch it too much,ok? hehe
You don't wanna stretch the design.

If you compare it with Sally Hansen Salon Effect, i think this is still better for the reason that i stated above. You could maximize it because it would allow you to be able to use it in different ways. Can SH patches do that?

PROS:
  • quick - just minutes away from awesome-looking nails!
  • easy - just stick it on & you're good to go!
  • long-lasting - the picture speaks for itself,ne?
  • no stains - goodbye,yellow nails!
CONS:
  • expensive at first - but worth your money!
  • might not be available internationally - Jessie, do you ship internationally?
  • it has that funky naphthalene smell upon opening the package - it disappears later on

Will i buy it? Yes! No questions about it!
Will i recommend it? I do! two-thumbs up!

I would gladly spend Php489 for these patches. I can vouch for this product & how effective & easy this is!
Definitely worth your money! If you want to try nail patches, pls try this, you won't want to try other patches anymore, that's for sure! I also have Romantic Lace Nude but i'll be keeping it for now. I kinda missed doing nail arts but if im in a hurry, I know i will be reaching for it!

They have an ongoing promo now:

**BUY 1 nail patch, GET FREE 1 heartshaped nail file + 1 cuticle pusher
**BUY 2 nail patches GET FREE 1 Black Nail file + 2 cuticle pusher

Do check out these patches! It's gonna take you only minutes in having that glam-looking nails!
Click HERE to take a look at different designs that she has.
By the way, when you open the packet you'll see a strip of sticker on it, you'll use it to seal the packet. ^_~

Have you tried nail patches?

Have a great day,ladies!
Jaa ne~!
^_^


ps:
Product sent as sample. I did not receive any monetary compensation for this post. Opinion shared is personal view & is no way influenced by the company. Buy at your own discretion.

Thursday, May 20, 2010

Weekend nails: zebra nails with a twist

Another nail design post..

i'm trying to catch up with my posts even though i know that half of my readers are not even aware that i have began blogging again because im having some issues about posting. I can't use draft.blogger.com easily. There are some times when i can't upload pics...
-__-"

i think i have to revert back to the old dashboard
*sigh*

But you know im beginning to get annoyed because of the problems that im encountering in blogger.
(-___-")

Ok, on to the nail design

I sported this look when i took a vacation last weekend. I just decided to have a different nail design & was doing some random nail designs when i experimented on this one. I think it looks pretty nice..


Things needed:
  • base color of your choice
  • brush with thin bristles/nail art pen (i used an artist brush 3/0)
  • black nail polish (for making stripes)
  • glitter polish
  • base & top coat

Let's start:
  • As usual, start with a base coat. Let it dry then apply your base color. I chose silver base color this time.


  • As soon as the base color is dry, apply a strip of glitter polish like so...


  • Once is enough, it will serve as a guide on making stripes so you know where to stop. you can just reapply later on if you want it more glittery.


  • Take the brush then dip it into a black nail polish (or just a black nail art pen if desired)


  • Then make small random lines. Take your time, it doesn't have to be perfect, that's the key in doing a zebra print design. The more random it is the better.


Then if you want to add more glitters then do so! Don't forget to use a top coat to make your art last longer.


And with that, you can flaunt your new nail design. I can assure you that this is a very fun nail design & it will make you stare at your nails for sometime.

I made a video for those who want to see how i paint the stripes on


Hope that you'll try this design!
Have a great friday, mina-san!

Jaa ne~!
^_^

Wednesday, May 05, 2010

Weekend nails: Plaids and prints

I wasn't able to post the weekend nails post last saturday for i was out but i was able to do my nails back then. I saw this design like months ago & was only able to do it now that my nails are longer. Lately, i find having long nails a nuisance because i always have to type & having long nails makes typing a bit harder for the nails get in the way.This is the main reason why i haven't posted a nail art post for like months...

So this time i made sure to update my nail art post...Again, this is not my original design but i think it looks so nice and easy.


I actually just did the combination of pink & black (my thumb nail) ,but so that you would have an idea of some color combination, i did a couple.

Materials needed:
  • nail art pen or just a brush with thin & long bristles
  • nail art sticker (optional)
  • nail polishes (of course!)
Let's start with the tutorial:
-As always, base & top coat are applied before & after...

  • Use a neutral polish as your base color


  •  Then make side french tip like so..i used pink...feel free to pick your own color ^_~... When it's dry, it's time to start putting the plaid print


  • You can either use a nail art pen or just a brush with thin bristles to make some lines. In this case,i just opted for a brush. It's an artist brush that i bought at Deovir..sorry about the blurry pic,i did not notice it (Sakura Brush - 3/0)


  • I'm sure you know how a plaid print looks like. so we are going to create a print like that. You don't need to hurry in creating the lines. Doing so will make your hands shaky for you put pressure on it. Just take it nice & slow.

  • I made a couple of color comparison for reference, but i actually prefer the pink & black. What do you think is a good color combination?

  • You can leave it like this if you want a simple one, or you can add some designs at the side. You can make some flowers or add some small nail stickers.


This design is not hard, but it will require a steady hand in doing so. Hope you'll try this design sometime.

Have a great day,y'all!

Jaa ne~!
^_^

ps:
I won't be much active on the blogosphere though for i have a couple of things that i have to do. I will still be reading posts tough i may not be commenting as much as i did before. Hope to be back asap.
^_~

Saturday, January 23, 2010

weekend nails: swirly & funky

At last!
After weeks of not doing a nail art post, i'm able to make one. Sorry girls, lately, im digging the simple one-color look or the 'cracked nail-look' so i didn't do nail arts.

I decided to do a funky but easy-to-do nail look.


Im sure for those who got nail pens, will have an easy time doing it. For those who doesn't have pens, it's ok. Just use a brush with a very thin bristles to make the swirls, it might be hard but with patience im sure you can do it!

Things needed:
  • base color of your choice
  • nail art pens
  • rhinestones
  • base coat
  • top coat
  • glitter polish (optional)

This is an easy do. Let's start:

  • Start by applying a base coat & the base color for your nails. You can opt for an opaque one if you want to.


  • Pop the cap of the pen, then test it first prior to application to make sure that nothing is blocking the opening of your pen. You can test it on a paper towel.


  • Once you already got the grip, start making swirls on your nails. Apply it randomly.


  • The more random it is, the more fun it will look. I even made some half-swirls at the sides.


  • Red all done, now it's time for the different colors. I only have 3 nail pens....


  • with white swirls added


  • with black swirls added


  • Since i still have some space left, i just filled it with random swirls.


  • You can stop if you want to. It already look pretty as it is. But since i have some rhinestones that i don't use, so i decided to put some. If you don't have rhinestones, you can just make some random dots on it.


There ya go!
Don't forget to top it with a clear/glitter polish & a top coat to make your art last longer. Tell me if you did a version of this nail so that we can see the contrast of colors.

Hope y'all have a great weekend!

Jaa ne~!
^_~

Sunday, November 08, 2009

Weekend Nails:Leopard print

I promised that im going to do a tut for the leopard print that i sported a couple of days ago. I used yellow base on that one. This time i did a brown & white (white for a snow leopard print). What's fun about this design is that it doesn't have to be uniform, so it's easier than it looks.

I actually like how different my ring finger looks among them all. It gives it that edge.

Let's get started.

These are what i used in making this design:
The black thing at the top of polishes is the brush that i used for lining the edge of the print.

  • Start with clean nails that already has a base. Then apply the base color. I did the white so that you would see it clearly compare to the brown (original color).

  • Then put some random streak of brown on the nail. Again, it doesn't need to be perfect.

  • Your brush should have thin bristles, the thinner it is, the better you can draw lines. My brush is a bit big because i can't seem to find my smallest brush. Dip it on the black polish...

  • Then carefully apply black around the brown streaks that you made. It doesn't need to be a perfect circle. Leopard print are very random, you can just create half a cirle, also apply the circle outside the brown itself. Just have fun with it!

  • Voila! Just wait for it to dry before you top it with a clear/glittered polish then a top coat.
Now that you know how to make it, it's time you make one!

Hope to see your leopard nails!

Have a nice sunday!

Jaa ne~!
^_^

Believe in B.liv's Dump Off Drawn! I do!

I was contacted by B.liv weeks ago to try out their products. I have been so lazy in applying any skin care products lately that I can alrea...