Showing posts with label eyelook-orange. Show all posts

Sunday, January 23, 2011

eyelook: dark smokey orange look for oriental eyes~

Smokey eye make-up has always been pretty tricky for me since i have a semi-monolid so often times those lid colors just doesn't show up, no matter how bright they are, when my eyes are just relaxed. I feel like it doesn't suite me so if ever i do eye make-up it's just a soft wash of bright color plus lots of mascara... that's it. So i stopped doing smokey looks but as what i said, when i watched Nana, i just feel like doing a smokey look.

Speaking of Nana, i have watched a lot of dramatic, slice-of-life type of anime, but this is the only one that really made a big impact on me. It's beautiful in a way that it flawlessly showed how fickle/tough/sensitive/hard/immune/courageous/nosy/caring, etc a woman can be. The impact it made is so big that my curiosity led me to watching the movie & read the manga. Heck, i've downloaded the songs already, put it on my player & have been playing it over & over already.... up to the point that i have already memorized the lyrics! what the heck?! (-__-")

Anyway, let's go back to the main topic, i feel like if you make me start on Nana, i can go on forever raving about it. LOL!

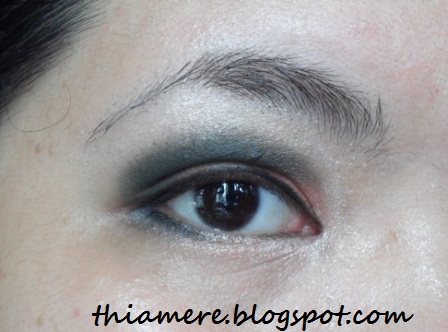
This is the look that i had the other day


Let's do the tutorial for the eye make-up. Oh, i deliberately did the winged eye make-up, as you can see, having a sharp winged eye make-up can make the eyes look smaller. So if you want a rounder eye make-up don't wing it. Just round it up, like how i did in the tutorial.

These are the colors that i used...


Just look for any colors that you might have had.

I mostly start my eye make-up by highlighting my brow bone. I know that for some girls, they do the highlighter last, it's just based on your own preference...


Then pat the lid color starting from the inner corner of your eyes going out. Fill up 2/3 of your lid area.


Then put the green eyeshadow at the top part of your lid color & also at the remaining 1/3 of your outer lid area. This would give a green wash on amidst your dark shadow.


Apply the dark eyeshadow using a blending brush. Make sure that you tap the excess powder on your brush for you don't want to overpower the green color. It might look darker here, but not in real. I guess my camera washed the green color. That's why it's a must to have as little dark eyeshadow as you have on your blending brush.


Using a clean blending brush, blend the colors rounding it upward, not going out. Blending it in a round, upward motion would give your eyes a rounder look. Avoid concentrating the color on the side, do most of the blending at the top of the lid area.


Now if you want a winged, cat eye-look then feel free to blend it outward. If you want a really precise eye make-up like THIS, then you can put a sticky tape at the side of your eyes before you do your make-up. It would help give you a really precise slant-eyed look. Cat-eye look type of make-up always reminds me of Cleopatra...

Then don't forget to bring the color down on your lower lid area. I apply the highlighter at the inner corner, followed by a hint of orange & also the green color underneath the dark color.


If you apply eyeliner, i suggest that you do not wing it out, actually you can wing it out but try not to do a really long wing,ok? It would defeat the purpose of your "rounding" your eye make-up.


Finish it off with lots of mascara or false eyelashes. If you don a smokey eye make-up that's the time when you ought to have a va-va-voom lashes! It is a must to do so, so that it would open up your eyes.

I just did this tutorial in one eye though, but believe me that "rounding" it up would make an oriental eyes bigger compare to the usual smokey look tutorial that you always see being done by those that got deep-set eyes.

 Products used:
There ya go!
Next eyelook post will be the bluish purpler look that i did before.

Hope that you will all have a great week~
Jaa ne~!
^_~

Thursday, January 28, 2010

Minute Maid Contest Entry

Define FRESH looking...
What exactly does that mean to you? Most likely you will say very light make-up or almost a 'powder & lipstick only' look.

In my case, fresh-looking make-up means a look that will make me look good & feel good. Applying make-up makes me feel fresh for it covers the imperfections that i have...acne. It makes me feel confident to face the world all the while feeling naturally beautiful which is highly likely since my bout with acne is still on going.

With that said, this is my entry to Beautynomics & Minute Maid's contest.


I had a hard time thinking of how my entry would look like. I want it to be an avant-garde one but bf insisted that i just stick to simple look since it has to be 'naturally fresh'...

He said, i'll never go wrong with simple neutral looks because it brings out a woman's feature better than the avant-garde ones...He even choose the pics that i should post!
Well, he's a guy & im pretty sure he knows what he is talking about so here it goes...


The orange 'pulps' at the left side of my face is inspired by Minute Maid. I kept my face make-up subtle since I'm aiming to emphasize the eyes.


Aside from make-up, a smile would make anyone look great!


Here's a close-up of my eyes...


Again...Minute Maid inspired that's why i decided to go for an orange/coral-y color.

I dunno what the heck happened here..i guess the primer that i used made my skin looked sallow when i took it with flash. But at least it was able to get the details of my eye make-up so it's ok...

I really had fun rocking this look. Im not exactly a fan of orange look, but i think i can get away with this.

It was very challenging for me covering my acne marks without using BB Creams. Yes! I stopped using BB Creams already. It's just aggravating my acne.

Final photo to show how much i had fun!

It's that obvious,huh? hahaha!

These are the list of products that was used in this look.

Face:
  • primer - Avon Simply Pretty Fresh Radiance Make-up Pink Glow
  • foundation - Neutrogena Fine Fairness UV Compact in Natural Beige
  • concealer base - ELF Studio Concealer Palette
  • concealer powder- Everyday Minerals concealer in Intensive Medium
  • cheeks - The Body Shop Roseflower blush in Pink
  • highlighter - Eyeko Cream
  • finishing powder - Guerlain Les Meteorites in Beige Chic
Eyes:
  • primer - ELF Minerals Eyelid Primer
  • eyeshadow base - Fashion 21 Eyeliner pencil in Pearl
  • eye lid color - Hard Candy in Butterscotch
  • eyeshadow & pulp - Make-up Masala pigment in Tuta
  • eyeshadow crease - Lancome eyeshadow in Couture
  • highlight - Everyday Minerals pressed powder in Fairly
  • inner eye corner highlighter - Benefit Gilded
  • mascara - Maybelline Volum' Express Cat-Eyes Mascara
  • liquid liner - Fashion 21 liquid eyeliner in black
  • pencil liner - Ever Bilena eye pencil in blck
  • faux lashes - Kinepin eyelashes
Brows:
  • ELF Studio Eye brow Kit in Dark
Lips:
  • Nivea Lip balm in Strawberry
  • MAC Lipstick in Blankety
Show us your fresh-looking makeup!
click HERE for more info about the contest.

By the way, i used the Bedazz blending brush when i did my eye make-up & i freaking love it! It blends really well! Review will be up soon!
Holla at me if you want me to do a tut on this eyelook.

Hope you will have an awesome day!

Jaa ne~!
^_~

Monday, September 07, 2009

Eyelook: Sunset

Just a quick & short tutorial...

I was playing with my palette last week & i came up with this look. I was actually looking at a sunset painting & it just inspired me to do an orange look.
Let's start with the tut:(sorry for the crappy pics -_-")
  • Same with what i usually do, line 4 colors on your lids like so.
I've numbered the colors on the pic below, with 1 as the lightest & 4 as the darkest.

This is the matte & satin palette
  • Then blend the colors like so...blend the 1 & 2, then the 3 & 4.....
  • Now blend the 2 colors to have that gradient look.
  • If you want to deepen the color then add a black (just a little!) on the outer edge, like so.
  • Then continue blending until there's no harsh line anymore.
If you want a crease, then use a crease brush to further deepen it.
  • Line your eyes.
If you are going for the cat-eye look, then wipe the excess colors with a wet tissue going downwards. See the arrows that i put on the pic? Follow the wing of your eyeliner to serve as your guide.
Don't forget to curl your lashes & put mascara!
There ya go...a quick tutorial
^_^

Going for the cat-eye look. ^_~
Hope you like it.

Have a nice week,y'all!

Jaa ne~!

Saturday, May 16, 2009

Outrageously bright summer look

Summer, summer...HOT!

It's always summer here in the Philippines though..hehe

Anyways, i was experimenting on some makeup combinations & i came upon this one which i think suits the summer season...

It's simple...you just need 3 colors...
-yellow (preferably bright yellow)
-pink (again..use bright pink)
-orange (of course,it should be bright orange)

Line them like this:Then blend the colors to make it look like this:
The orange color..you can put it on the crease area. Just blend the orange one with a circular motion, then going straight up..at the top of the pink.

Keep on blending if you want a soft look...

Then line your lower lash line with the colors that you used on the top. If the top is yellow, use yellow directly below it...

Then apply liner...tight line it..whatever you want...then curl your lashes, put mascara & you're done! I didn't put liner on since its evening & im just experimenting...you can even see that im wearing my pajamas... XD

For people who love colors, then this would be perfect!
Brighten up the day with bright colors... XD
^_~

Believe in B.liv's Dump Off Drawn! I do!

I was contacted by B.liv weeks ago to try out their products. I have been so lazy in applying any skin care products lately that I can alrea...