Saturday, June 25, 2011

Weekend Nails:King & Queen of Hearts

A quick nail art tutorial post.
I changed my keyboard for now & i am having a hard time typing because the keys are hard to press & i have light touch so i can't blab as usual..
LOL


This design is not hard to do... believe me,hunnies!
Have I ever lied to you?
*puppy eyes*
LOL

I'll leave the choice of color to you. I just did it with the usual black & white but you can try others like blue & pink or yellow & red or purple & lilac too! It's only now that i thought of but gold & black is one of my favorite color combination!

You just need a dotting tool. As what i said over & over if you don't have a dotting tool then just use bobby pins or even a pen that doesn't have an ink anymore!

Dotting tip:
-The bigger the end of your dotting tool, the bigger the dots will be.
So if you want a small heart then just use a small dotting tool, empty pen end is one of the perfect way to create the smallest dots ever!

Let's get on with the tutorial:

1. Alternate your choice of base colors like how i did mine. I made a lunula again, but if you don't want to then it's fine. Let it dry.


2. Time to make the hearts. Just dip your dotting tool on the polish, make a simple dot then drag it downwards going to the center just like on the picture. Once done, use the other color on the opposite color.


3. You can leave it like this or you can add some blings on the lunula area (if you decided that you want to have a lunula). Clean the edges & don't forget your top coat!


See?
I told you this is quick!


Have a safe weekend,hunnies!
Jaa ne~!
^_^

Wednesday, June 22, 2011

Layout testing + thoughts on nail foil patch

I will be changing my layout & i'm still in the process of choosing the one that i will be using. I mostly favor dark layouts because dark layouts doesn't really consume much energy plus most white layouts tend to be so bright it hurts my eyes already. That's why i can't stare at my monitor for long if i do not wear my glasses.

Anyway, i'm still experimenting on what kind i'll be sticking with so don't be surprised if you drop by in my blog sometime & you noticed some changes,ok?

I've gone through some of my picture folders & i am overwhelmed by the products that i ought to be reviewing but haven't! OMG! I am slacking already! Blame that on my lack of free time. *sigh*

Have you tried the nail foil patch?
If you plan to, just skip it! It looks great,yes, but it's just not as worth as sticking with the original nail foils that you use with glue. Sorry if i don't have the picture of it when i bought it, just google it & you'll see what i am saying.

Look at this design...
Doesn't it look nice?


It does if only it lasted on me!
hahaha!

This nail foil patches are a biotch to apply (just because you have to painstakingly cut it to your nail shape exactly & also file it) & super easy to peel.

I applied it with a squeegee, just like the direction says, but it still didn't last on me! Take a look at the edges of my nails... especially the middle finger. It's about to peel off! To think that i just applied it 12 hrs before i took this picture! I took like an hour cutting the blasted patches but it didn't even last on me for a whole day?!

I filed it to remove the excess but the tip just look so dull!
*rolls eyes*

I tried applying top coat on it (Seche Vite, mind you!) but it just all the more peeled off!

Argh!
I just wasted my Php 100 on this!
LOL!

I won't buy this anymore no matter how great it looks. I'll just stick with my usual nail art the traditional way. Patches are over & done with for me!
hahaha!

Have a great day,hun!
Jaa ne~!
^_~

Tuesday, June 21, 2011

FB Giveaway Winner~!

I'm sorry i got delayed in announcing the winner.


Congrats, Sis Debbie!
^_^

Please email/message me your details within 48 hrs of this post.

Thanks for joining my giveaway!
^_^

Saturday, June 18, 2011

Weekend Nails:Hime-inspired pinks & dots

This is really a Hime-inspired nail art, except that i don't have the guts to put in lots of rhinestones or acrylic decorations. I'm not really a fan of nail art, you see, but that didn't stop me from lusting over those uber cute Hime nails. Hime, by the way, stands for Princess in Japanese. So it basically means Princess Nails! hahaha!

Basically, the point of Hime nails is to don a very girly-looking nail design so it's more of pinks & iridescent polishes. Love love love looking at deco hime-nails! I would love to try it for once but i have this habit of letting my hair loose so i keep on running my hands on  it every now & then. It would be very impractical of me to don a 3d nail art if i will keep on doing that,ne?


What's fun about this is that you can add more decorations based on your preference. I just added a small one by stamping that ribbon image then topping it off with a pink pearl.

You can add rhinestones all over the round edges of the nail (the lunula part) for that extra oomph!

This is not hard to do. The only annoying part is the waiting time... (-__-"). You know how impatient i get when i do my nail arts. I hate waiting for polishes to dry so i most often put Seche Vite already on my base color so i cut my waiting time in 90%!

By the way, these are my real nails. I hate using fake nails because they feel heavy.
^_~

Materials needed:


  • hot pink polish - i used The Face Shop's PK 106 (its freakin' awesome!love it!)
  • black polish
  • dotting tool/bobby pin
  • white polish for dotting (you can use pink if you want to)
  • top & base coat
  • sheer iridescent pink polish (optional)
  • stamping materials (optional)
  • rhinestones/glitters (optional)

1. Let's first make a very obvious lunula for that edgy-look. I applied a pink iridescent polish as my main base because i like how it reflects the light every time i move my fingers. Apply your polish at the base making a V-shaped indentation like the 1st pic. Then join the edges together by making a small curve. You can also do this when you are making french-tipped manicure. This is way easier compare to putting sticky tapes (if you don't have a french-tip sticker).


2. Using the same procedure, use the black polish to the top half of your nail like in the pic. Wait until it dries. Sorry for the mess...


3. Then add dots on the black part only using a white polish.


4. Decorate your nails on how simple/blingy you want it to be. As what i said you can put rhinestones or acrylic ribbons/flowers based on your preference. Then add top coat!


See?
This is not hard to do!

I hope you'll try & make this design as well because it's so fun to look at!

Have a great weekend,hunnies!
Jaa ne~!
^_^

ps:
I arranged the category of my nail art posts already. So it won't be hard to look for it. Feel free to check out the different labels of each. I classified it into their colors/designs. This certain nail design falls in the Nail Art-Pinks & Nail Art-Dots

Sunday, June 12, 2011

Weekend Nails:Rose Curlicue

 This is one of my most favorite flower design that i have ever made!


I spent a long time completing this design but it's so worth it because it's quite unique & looks so girly!

I used acrylic in this design. It's impossible to use polish to create intricate designs like this. Actually it's not really that hard to create this design. If you have a steady hand, you can do this too!

What's ironic about this is that i didn't use a nail art brush..i used my artist brush!


See the number of the brush?
It's 4/0... the tip of the bristle is very fine that it's possible to make very detailed line like this design.
Make sure you read the tip that i had at the bottom of the post if you are planning to do this design too.

Let's get on with the tutorial~!

1. Pick your base color... choose a light/pastel color to make your design truly pop!
I used The Face Shop's PK110 as my base. Sorry, i forgot to take a pic of it on my nail..hehe

 2. To make the rose design, lightly dip the tip of the brush on the red (crimson red) acrylic. Then make a small curved line like shown in the picture. You then, trace the red line using black acrylic to give it a well-defined look.


Here's a bigger & closer look so you'll see how the design of the rose is...


You don't need to be in a hurry. Patience & Steady hand is the key in making this nail art a success!


3. Using green (phtalocyanine green) acrylic, add some leaves if you want to. You also have to use black acrylic to define the shape of the leaves.


4. Last but not the least, using black acrylic, make some random curlicue design on the sides/top of the rose!


5. Apply top coat then sit back & admire your nail art!


You can just stick with one design if you want to. It's just that i prefer to have different designs on each nails just for it to look edgy! hahaha!

I love this design!
Too bad that my left hand can not make such detailed work like this so it's only my left nails that has this..LOL! In time, my left hand would be able to make detailed design too.. i just wonder when would that be?! hahaha!

Anyway, i hope you are enjoying your weekend!
Jaa ne~!
^_^


Nail art tips:
-If you are doing thin lines it's better to just dip the tip of your bristles on the acrylic, not dipping half of the whole bristle..just the tip!
-You can wet your acrylic with water if you find the consistency of it too thick for your liking. Adding water will make the acrylic thin so you'll be able to work with it easily.
-If you find your acrylic drying, just add a spritz of water on it. What's great about acrylic is that you can just wipe it away/rinse it with water if you made a mistake.

Thursday, June 09, 2011

MAC Talk: Creme D' Nude & Speak Louder

I am so excited today because i got 2 new MAC lipsticks. I woke up extra early just so to be able to be take it home with me as early as possible & start swatching. I have heard so much of these shades & had high hopes for them. Well, at least one of them is really great, but not the other one.


Yep, Speak Louder & the much raved about Creme d' Nude.
Speak Louder is L-O-V-E!
I am in love with this lipstick! I'll tell you more about it later.

I have said before that finding a good nude lipstick is hard because what works for one might not work for the other. That is exactly the same with Creme d' Nude. I have high hopes for this lipstick which seems to be well-liked by a lot of girls. Sadly, it just doesn't work for me.


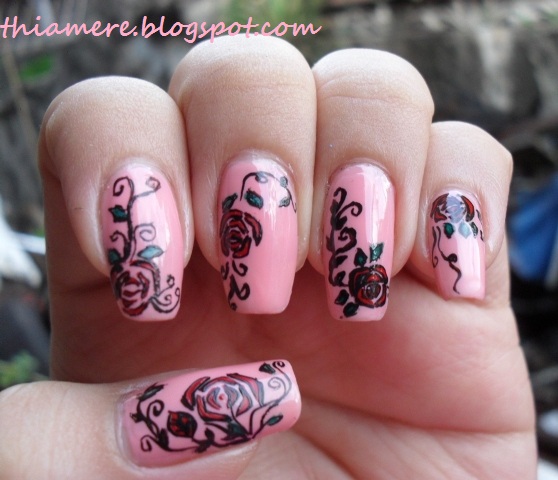
The obligatory swatch...hahaha! That's just one swipe each.


This is how it looks like on my lips...


I think Speak Louder can suit most skin tones. It is a perfect go-to lipstick. If you are not yet bold enough to don red lips, then go for a pink one! It's actually a bit hard to really capture the beauty of this lipstick, MAC defines it as "Clean Poppy Blue Pink" though i don't know what the heck poppy blue pink means.

I know the poppy flower, but i thought poppies are somehow reddish or yellow/orange-ish?! What's with the "clean" word? I mean, i know there's dirty white... is there a dirty pink? Isn't it classified as old rose?! Anyway, whatever the description is, i would just classify it as a bright pink. It's very wearable that you can don it from day to night!

It can give you an instantly brighter look! You don't believe me? Let the picture speak for itself...


This is me without any make-up on my face. I just swiped this on my lips twice & i'm all done!
Yes, my acne is gone now!
I still have a few marks & blemishes left, but i can now go out without applying any foundation on! I am soooooo happy!

Going back, see how Speak Louder made me look almost-ready to brave the world without bothering to apply any other make-up.

Now, Creme d' Nude is a different story...


It gave me that cadaver-look! Eeeekkkkk!!!!! What the effffff???!!!!!

Pardon the pose, i tried taking a picture of it while smiling but it just made me look so fugly that i tried other poses so that it won't look half as bad with the smiling one & this is by far the "best" among the ugly bunch..hahaha! Anyway, what you are looking at is the lipstick,isn't it? XD

I read that this is perfect for NC20 & since i am a NC20 so i got myself one, but then it's one of the worst move that i made in buying lipsticks! This would only be good for those that doesn't have pigmented lips. My lips are quite pigmented, using this alone will result in it looking patchy & awful. I applied lip concealer underneath to show the true color & it's so muted that it even "muted" my lips out!
LOL!

MAC described it as "pale muted peach beige", i agree with the description. It's a pale peach beige that muted my lips out making me look like i don't even have lips for it washed it out! Definitely not for me! The only way i can make this work for me is if i'm going to top it off with a colored gloss, but since i'm not really a fan of gloss as starters, the chances are quite dim.

I said before that i love Dazzleglasses but i don't see myself buying another one to be used exclusively together with Creme d' Nude! *sigh*
Blankety is still THE nude lipstick for me.

These are my first Cremesheen finish & i am liking it. I love Amplified Cremes & also Satins but since i like the texture of Speak Louder, i think i would have to look into Cremesheens more. No more nude shades from Cremesheens or Lustres. I have tried it & it just doesn't work on me. I'll just go into deeper/brighter colors only.

I'm not sure if i am going to keep Creme d' Nude or just add it up on my blogsale though.

Anyway, at least Speak Louder made up for the disappointment that Creme d' Nude caused me. It just made me 10x prettier with it on!hahaha!

Next lipstick on my list now is Pink Nouveau then NARS Schiap...
I have to find the best pink shades!
I think my wallet is already cringing in fear already because of my plans..LOL!

Hope you are enjoying your evening/day,guys!
Jaa ne~!
^_^

Tuesday, June 07, 2011

How to use ENAS Nail Stylist Soft Nail Stamp

Nail stamps had been the much raved & loved by nail art enthusiasts. I haven't really tried Konad but i have tried other nail stamps & for some reason i can't get them to work for me. I'm having a hard time picking up the design & transferring it to my nail. That's why my respect goes to those who do nail art by stamps too. It's not as easy as you think it is,ladies!

I have had this product for quite sometime & have been testing it since then. I think it's time for me to share my thoughts after owning this for months now.

ENAS Nail Stylist Nail Stamps which i think stands for Easy Nail Art Stamp, based on the research that i made beforehand.


Feel free to read the description at the back.... that is if you can fully comprehend it..hehe!


Once you open it you'll see the silicone stamp...


I actually thought that it has a lid or something to just protect it from scratches or dirt, but i'm wrong.

It's not that big though...


The naming of the stamp is on the middle.. i got A3 & A23

Since this is made of silicone, it is a lint-magnet!


I have to clean it every time i want to use it... i clean it by pressing a sticky tape on it to lift off the lint. I find it works better than using a polish remover for cleaning it.


You use it by applying the polish directly on the stamp... like so..
look at my poor yellowed nail from the stain T_T


You get rid of the excess polish by pressing it on a paper. I prefer to remove the silicone before i use it, but you can use it with the "shell" on though.


Just continue pressing until you get rid of the excess polish. Excuse how messy this looks because i am taking pics while stamping at the same time... not an easy feat to accomplish! hehehe


I find that letting the polish stay on the stamp for a couple of seconds before you stamp it on the paper works better because it allows the polish to become tacky therefore making it easier to adhere on the silicone. If you stamp it on the paper as soon as you put the polish on, it would just give you a thin finish on your stamp.. you can just do it again though, add a second layer or even a third until you are quite satisfied with how opaque it is already.

Wait again for a couple of seconds before you stamp it on your nails for it would dry a bit so that when you put it on it wouldn't rip apart. Applying it while the polish is still wet would just be a disaster. I am having a hard time explaining the process but just trust me in on this, you have to wait for it to become tacky so that the design would be intact. You'll end up ruining it if you keep on pressing it & applying pressure.


This is how it looked like.. Again, sorry if it looks messy but looking at how it was on the stamp & how it is on my nail, they look exactly the same,right?


If you wait for it to become tacky, you would be able to have the design intact... so patience is a virtue when it comes to using this. Unlike the usual nail stamps where you have to do it lightning fast just to pick the design up, this one is the opposite. Drying time of polishes differ from each other of course. It just depends on how fast/slow the polish your going to use on how long you're going to wait until it becomes tacky. If it's a fast-dry polish then do it fast & just add a second/third layer depending on how opaque you want it to be.

One more good thing about this is that you can actually use different polish in just one design. You can click HERE on how you can do it. It's possible but it definitely ain't easy! First time i tried it took me almost 10 minutes to have a decent colored design. It's frustrating when you want a specific color in just 1 spot. Again, it is possible but it is hard (for me)!

Mostly it will depend on the stamping polish that you are using. I am just using an ordinary polish i guess that's why i'm having a hard time for it work. Maybe if i am using the stamping polish meant for this product then it might make my work a lot easier.

I just don't want to do it again for i don't feel like spending more minutes than i have to outside of my room because it's freakin hot! The tutorial on the website looks easy though. I just hope that it will really be as easy as it looks once you used the proper stamping polishes.

Compare to image plates, where you have to clean everything almost every scraping, this one is not as high maintenance. You can easily take the excess polish by stamping it on paper or by just having a sticky tape near you to stamp the dirt/lint off.

Let's summarize...
PROS:

  • no need for a separate scraper & stamper, it's all in 1 convenient design
  • no need for polish remover in cleaning the excess - easy-cleaning
  • it's possible to have different colors in 1 image
  • lots of designs to choose from
  • can be used over & over again

CONS:
  • more expensive than image plates
  • lint-magnet
  • no lid/protection for the image - be careful when storing
  • might not be available everywhere - available online
  • will take a while in getting used to it
Will i buy it again?
Most probably...I'm not a fan of stamps to begin with so i am still half-hearted when it comes to this, but i have to admit that this is 1 of the best way to achieve a professional-looking nails!

I bought it at My Online Shop.
I'm not sure where you can buy it in other countries, but your best bet i to check out EBAY.

Have you tried this?
How about the traditional type of nail stamps?

Hope you all will have a good day,hunnies!
Jaa ne~!
^_^

Monday, June 06, 2011

Time for a Blog sale~

I was just looking at my make-up kit & saw that i have some unloved products. They are great, it's just that since i'm not into make-up anymore, i feel like they are just being wasted sitting on my kit. I have been asked countless of time if i wanted to become a make-up artist & I had answered hundred of times too that i don't have a plan.

Actually i only have a handful of products on my kit. Those that i personally use are the only ones that i keep. I usually give some away or in this case do a blog sale because i don't see the need for keeping a big collection if i'm not going to use it.

Anyway, head on over to my BLOGSALE PAGE to take a look at my items.

Make sure you also join my FB Giveaway too~
^_^

Saturday, June 04, 2011

Weekend Nails:Lonesome Flower

I have been wanting to don yellow nails for a couple of weeks now but since i hauled a lot of polishes last week i wasn't able to. This week i tried to go for yellow polish but for some reason i find it quite boring so i just decided to just put a single flower to break the monotony of it.


Sorry about the poor lighting because i did this late afternoon. I finished this when the sun had already set so i just took a pic of it inside the house. This is very quick to do. The top coat made the brown acrylic look dull because it's still wet but when it dried it already looked glossy.

This is one kind of flower design on which nail polish is better used rather than acrylic. Though i used acrylic in this tutorial for i wasn't at home at that time, only my acrylic kit. This is quite easy so even if you are a beginner when it comes to doing nails arts, you can do this.

Let's start with the tutorial:

1. Choose your own base color... in my case,, it's yellow.


2. With your dotting tool, the smallest one, make a flower. you can do this by just dragging your dotting tool inward to create a petal as soon as you lay it on the nail surface. You can put your flower anywhere, i just put mine on the side since i still want my polish to show.


3. Then to create the stem & leaves, use your detailing brush. I used green acrylic but i think you can just a green nail art pen if you have it.


4. With brown polish/acrylic apply it using short strokes so that it would have an uneven look so that it won't look too cartoon-y.


5. Finish it off by applying an orange dot in the middle of the flower.


Apply top coat & you're done.


A quick nail art to end the week.


Hope you are enjoying your weekend!
Jaa ne~!
^_^

Thursday, June 02, 2011

My Favorite Youtube Guru Ever is...

Lisa Eldridge!

OMG!
This lady is an icon in my book!


I am subscribed to a lot of youtube videos but her video is the only one that i look forward to! I get really excited every time i see her video on my list. All her videos contain tips & tricks that is quite easy to follow even for those who are not make-up artist, a true wisdom mine! Guru is definitely a word that you can use to describe her!

I love her make-up looks, that graces almost all famous magazines! That's why i was doubly happy when i knew that she made a youtube channel. I watched her first videos & has watched it all over again lots of times!

If you haven't watched any of her videos, do yourself a favor & start watching the first videos that she did... especially the BASICS. It's really very helpful! Head on over to HER CHANNEL & i'm sure you'll be hooked!

Actually i only visit my youtube to check if she has uploaded new videos, if not then i just close it again.
hahaha!

I love her new video about the dramatic liner. I would love to recreate it but i fear that i would just murder her masterpiece.hehehe

Make sure you check her out,ok?

Hope you are enjoying your evening/day.hunnies!
Jaa ne~!
^_^

ps:
hope that you could answer the poll on the sidebar for i want to change my layout. i'm gathering ideas as to what kind of change my readers would want.
my facebook giveaway is still on going. head on over to my facebook page to find out more.

Believe in B.liv's Dump Off Drawn! I do!

I was contacted by B.liv weeks ago to try out their products. I have been so lazy in applying any skin care products lately that I can alrea...