I already have a gradient blue look...as well as gradient purple, but i have not yet combined blue & purple. It's actually a good combination since they almost belong in the same family color so it's easy to combine the two.
For those who are having a hard time blending colors, this is an easy way to have a well-blended, gradient look without having to go to make-up school just to learn the basics of it. I was once at a loss on how to achieve that gradient look & i even considered going to make-up school just to achieve it! LOL I'm serious though!
I have done a couple of gradient looks already & if you are quite familiar with how i do it, i use 4 colors which makes blending the colors really easy. The key, of course, is to have a good blending brush. If you are on a budget then just get the ELF blending brush. I love it! I have a couple of blending brush but ELF is the one that i reach whenever i do my eye make-up. I actually have 3 of those!
Let's let the pictures do the talking now...
These are the colors that i use. If you don't have the 88 palette just pick any colors that are almost the same with these...
Line them up like how i did. By the way, make sure that you got a good primer underneath & a sticky base so that your eyeshadow will really stick. Apply the colors in a patting motion so that you will be able to pack more colors on your lid.
Blend colors 1 & 2 first. It's easier to work with the lighter colors first. If you feel that you don't have enough colors to work with, then feel free to dip your brush to get more color. Click the pic if you want to see it better.
Then blend 3 & 4 together. At this stage, you can slowly bring the purple at the top part of the lid so that the top part of the blue has a hint of purple on it.
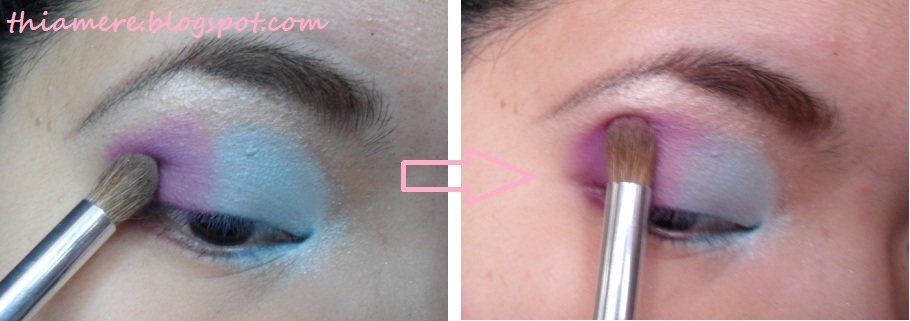
Now's the time to blend the 2 colors together...
After a couple of blending motion, you'll be able to have this look.
Believe me when i say that this tutorial is dummy-friendly. I am a living proof that even beginner's like me can achieve a well-blended look! You might be needing more colors than necessary but it is worth it!
So, of course, you would have to bring the colors down on your lower lash area... Apply the colors how the way you did it at the lid area. A good angled brush will do the trick!
Then get rid of all the fall-outs & excess colors that you have to polish off the look!
Now, this is the hardest part of all... eye-lining! I'm not that good in achieving an equal-looking eyeliner, but with practice im sure you'll be able to get the hang of it.
Did you notice how obvious the blue color at the root of my lashes are on the 1st picture? When you tight-line, make sure that after you apply it on your upper water line you also do feathery strokes going upwards like the 2nd picture so that you'll be able to fill the space where your lashes grow. Doing so will help make your eye lining perfect!
This is how it looks like after all the trouble of waterlining. It would look full & well-defined after mascara application. Oops, i didn't line my lower lash line though.
Since I don't have enough time when i did this tutorial so i did just one eye..hehe
Finish the look with your favorite lipstick. Since this is not really a dark smokey look so you can get away with using pinks & corals!
Whew~!
2nd make-up post!
Hope y'all have a good day!
Jaa ne~!
^_^
ps:
i used Mac Viva Glam Cyndi in this pic
^_^
Showing posts with label eyelook-blues. Show all posts
Monday, January 24, 2011
Tuesday, October 20, 2009
~eyelook: gradient blue~
I love blue...of all the colors out there, blue is the one that i prefer to actually play with & this is the look that i did last friday!
For those who are familiar with how i do gradient looks, this is as easy as pie. I used the 88 palette & Nyx White pearl as the color on the inner eye area. I numbered the colors that i used as follows: (the numbers below are supposed to be 3 & 4..sorry about the typo)
1 - Nyx White Pearl (use a white shimmery shadow to brighten the eye area)
2 - cyan eye shadow
3 - bright blue
4 - midnight blue
Now that you have an idea, let's get on with the simple tutorial:
I don't have to apply nude lipstick because i'll just be eating it away so i just put a lipbalm.

I'll be sharing with you what happened last friday on my next post.
That would be it..
Hope y'all have a nice week ahead.
Jaa ne~!
^_^
2 - cyan eye shadow
3 - bright blue
4 - midnight blue
Now that you have an idea, let's get on with the simple tutorial:
- Line the colors just like so...
Extra option, you can darken the crease by applying a spatter of black on it, then blend well, in my case i don't have to because i notice that darkening my crease stresses my asian eye all the more.
I don't have to apply nude lipstick because i'll just be eating it away so i just put a lipbalm.
I'll be sharing with you what happened last friday on my next post.
That would be it..
Hope y'all have a nice week ahead.
Jaa ne~!
^_^
Saturday, October 17, 2009
contest entry - Chicago Bears inspired
I had a fun day today. Birthday's sure are fun. Thank you so much for the well wishes. I haven't thanked everybody, but i will..hehe...I'll just make a post about what i did yesterday, but for now, this is my contest entry for JBreezybaby's contest. I just finished this look a little while ago & it's almost the deadline...ekkk!
I told her that im gonna join her contest. I have to say that it's pretty hard because i can't seem to get blue & orange work together..hehe
The contest theme is Chicago Bears color, since she is a fan of the Chicago Bears. Well, here goes my entry.
I just decided to do the logo since im not good at cutting the crease. hehe
A pic of the eye make-up

Maybe you're wondering why it's inverted...well, when i did this, i was looking at the mirror & i totally forgot that the reflection would be different in real life...ekkk!
-__-"
stupid me...
But since, i don't have enough time to do it again, i have no other choice..hehe
The right part of my face doesn't have the logo so i just applied a coral blush...
These are the products used:
^_^

Hope y'all have a great day!
^_^
Jaa ne~!
*excess:
i'll be announcing the winner of my giveaway as soon as i can...3 days max
I told her that im gonna join her contest. I have to say that it's pretty hard because i can't seem to get blue & orange work together..hehe
The contest theme is Chicago Bears color, since she is a fan of the Chicago Bears. Well, here goes my entry.
Maybe you're wondering why it's inverted...well, when i did this, i was looking at the mirror & i totally forgot that the reflection would be different in real life...ekkk!
-__-"
stupid me...
But since, i don't have enough time to do it again, i have no other choice..hehe
Purederm BB Cream
- 88 palette
- Coty finishing powder ( i just transferred it on the Everyday Minerals sifter jar)
- Nichido eyeshadow ( i dunno the shade..im sorry..hehe)
- Nyx megashine lipgloss in natural
- Ever Bilena eyeliner
- L'oreal Featherlash
- Shu Uemura Curler
- Nyx Ultra pearl mania in white pearl
- AS FOR THE BLUSH - i forgot to include the 10pc blush palette
^_^
Hope y'all have a great day!
^_^
Jaa ne~!
*excess:
i'll be announcing the winner of my giveaway as soon as i can...3 days max
Friday, September 04, 2009
~eyelook: bright blue~
Was playing with my palette yesterday so i decided to make a tutorial for those who like bright colors.
I haven't done a lot of blue looks....
We are gonna go for this look:
I love Lash Stylist! Look at my lashes..you can actually see them now...yipee!
Aside from this look, there is also one thing that i wanna point out here. It would be altering the shape of your eyes with makeup. Im pretty sure most of you have heard this or have even done it, but i'll still put it for those who haven't heard of this yet.
I'll point it out later, but for now let's go with the tutorial.
I don't consider UDPP as just an eyeshadow base. Its just a primer so that my shadows won't crease, though sometimes it still creases on me. I always use either a shadestick or just a plain 'ol chapstick to my shadows brighter & vivid.
Bring the highlight on the inner edge of your eyes so you would have that awake & bushy-tailed look. For a more 'im awake' look, apply white liner on the tear duct area. Then line the eyes...curl your lashes & apply mascara.
Now for the eye shape...looking at my eyes, do you notice any difference?
Left.....
Right....
.......................
No?
take a look again!
just a teeny tiny difference..
................

The left eye has a more 'cat-eye' look...why? look at the edge of my eye. I created a sharp edge, by wiping the shadows off, therefore 'elongating' the look, plus when i lined my eyes i winged it out. It lifts the eye by doing that..
Whereas the right eye is more rounded because the edge have a soft well-blended out look. Add the fact that i did not 'winged' my liner so it created a rounder look.
Another tip:
For a more cat-eye look, comb your lashes towards the outer edge of the eye. If you want a rounder look, comb your lashes upwards to open up the eyes making it look bigger & rounder.
But in my case, i did not comb it towards the outer edge because i dont wanna look weird. One eye is round & the other is not...
This is my current nail design. Inspired by an abstract painting that i saw randomly.
^_~

Well, that's it!
How about you?
Which eye look do you usually go for?
Cat-eyes or Round eyes?
^_~
Jaa ne~!
We are gonna go for this look:
Aside from this look, there is also one thing that i wanna point out here. It would be altering the shape of your eyes with makeup. Im pretty sure most of you have heard this or have even done it, but i'll still put it for those who haven't heard of this yet.
I'll point it out later, but for now let's go with the tutorial.
- Start with a primed eye area that has a good base. Apply the cyan on the lid area..like so
- Then apply cerulean on the outer part of the eye area...like so
Don't forget to also apply the same colors on your lower lashline so it won't look bare. Then top it off with a highlighter.
Now for the eye shape...looking at my eyes, do you notice any difference?
Left.....
Right....
No?
take a look again!
just a teeny tiny difference..
................
The left eye has a more 'cat-eye' look...why? look at the edge of my eye. I created a sharp edge, by wiping the shadows off, therefore 'elongating' the look, plus when i lined my eyes i winged it out. It lifts the eye by doing that..
Whereas the right eye is more rounded because the edge have a soft well-blended out look. Add the fact that i did not 'winged' my liner so it created a rounder look.
Another tip:
For a more cat-eye look, comb your lashes towards the outer edge of the eye. If you want a rounder look, comb your lashes upwards to open up the eyes making it look bigger & rounder.
But in my case, i did not comb it towards the outer edge because i dont wanna look weird. One eye is round & the other is not...
^_~
Well, that's it!
How about you?
Which eye look do you usually go for?
Cat-eyes or Round eyes?
^_~
Jaa ne~!
Wednesday, July 22, 2009
Grimm Fairy Tale contest entry
Another contest entry!
Tali of The Gloss Goss is hosting a contest...it's the Grimm Fairy Tale Contest...
I choose Snow White...
Although its not exactly my favorite of all the Grimm's Tale...but then this is just what i wanna do...hehe
We all know the story of Snow White, Disney popularized it when they made it. The thing about Snow White is that she is so naive that even if she have been 'threatened & endangered' by her 'stepmum', she still remain as pure as a crystal...
I choose the colors blue & white because i wanted to stress on the 'coldness' of the evil queen...which is blue (for me) & white for Snow White's purity....
Ok, so what's up with that?...Why say Evil Queen & Snow White?....
That's because i did the two!
I love villains....har har har!
that's why my most favorite of all the pic on this post is the first one...looks like some evil plan is forming on my mind...
Presenting the Evil Queen inspired look (my hair cooperated on this one..it looks so dry & brittle! -_-")
please ignore the acne marks
And the Snow White inspired look (that zit on my forehead looks hideous!)
look at the glitters! they reflect the light & have that green shine on them..how cool!
And so this is my entry!


If you look closely at my eyes, they might look like the same shades, but not exactly, the 'queen eye' is supposed to be a tad darker than snow white....& the shape is sharper by not rounding up the colors..unlike the other one.
The queen is just half past the crease, where Snow White is almost up until the brows which would actually give the impression of a rounder eye...
that is if you got even eyes...i have uneven eyes if you notice..hehe
As for Snow White, i put glitters on the lower eye area to make it brighter amidst the dark liner & crease.Darkness here would be the dark crease & the liner.....Sorry if the line in the inner eye corner is not straight...haha..it's hard to do it..this is my first time.
Things used:
I most especially love the lips...the dark lips...
the glitter gave it a flair!
I really had fun doing this & i would even love having this look on my face for a couple of hours...it's just a shame that i have a class & i have to use the webcam...
i can't have class with me looking like this..& to think that my students are just toddlers!
But it was really fun!
^_~
Tali of The Gloss Goss is hosting a contest...it's the Grimm Fairy Tale Contest...
I choose Snow White...
Although its not exactly my favorite of all the Grimm's Tale...but then this is just what i wanna do...hehe
We all know the story of Snow White, Disney popularized it when they made it. The thing about Snow White is that she is so naive that even if she have been 'threatened & endangered' by her 'stepmum', she still remain as pure as a crystal...
I choose the colors blue & white because i wanted to stress on the 'coldness' of the evil queen...which is blue (for me) & white for Snow White's purity....
Ok, so what's up with that?...Why say Evil Queen & Snow White?....
That's because i did the two!
I love villains....har har har!
that's why my most favorite of all the pic on this post is the first one...looks like some evil plan is forming on my mind...
Presenting the Evil Queen inspired look (my hair cooperated on this one..it looks so dry & brittle! -_-")
If you look closely at my eyes, they might look like the same shades, but not exactly, the 'queen eye' is supposed to be a tad darker than snow white....& the shape is sharper by not rounding up the colors..unlike the other one.
that is if you got even eyes...i have uneven eyes if you notice..hehe
- UDPP
- 88 matte palette
- Everyday Minerals - Golden Medium
- Everyday Minerals - Start to Finish Soft Bronze
- Everyday Minerals - Olive Fair
- Nyx Concealer in jar - Medium
- Covergirl Cheekers
- LA Colors Dual Blusher - Papaya/Nutmeg
- Chapstick
- Lancome Juicy Tubes - Fraise
- Ellana Lip Pot in Infatuation
- Ellana Mineral Shadow in Ethereal
- Glitter Shadow
- Elf Liquid Liner - Black
- Aido Eye Putti
- Ever Bilena Eyeliner - Black
- In2it Lip Liner
- set of brushes
- my mineral blush
- mini blue heart decoration
I most especially love the lips...the dark lips...
the glitter gave it a flair!
I really had fun doing this & i would even love having this look on my face for a couple of hours...it's just a shame that i have a class & i have to use the webcam...
i can't have class with me looking like this..& to think that my students are just toddlers!
But it was really fun!
^_~
Subscribe to:
Comments (Atom)
Believe in B.liv's Dump Off Drawn! I do!
I was contacted by B.liv weeks ago to try out their products. I have been so lazy in applying any skin care products lately that I can alrea...
-
I was contacted by B.liv weeks ago to try out their products. I have been so lazy in applying any skin care products lately that I can alrea...
-
For all of those who have read my "how i broke the break out cycle" post, i'm sure you know that i use Likas Papaya Soap asid...