Showing posts with label nail art tool. Show all posts

Thursday, June 07, 2012

the best nail patch that i've tried!!!!!

I hate nail patches!
But that was before, now i am loving this certain nail patch that i've tried.

If you have tried nail patches, you'll know how it could only last for mere hours. How awful is that?!

Remember the post that i made before about the nail foil patch?
It was so hard to apply yet it didn't even last for more than a day! Definitely not worth buying & trying!

So when Jessie Rhee of Dress Up Ur Nails contacted me & asked me to try out her nail patch, i was in doubt. I frankly told her that im not in awe of nail patches. I'd rather do my own nail art than be bothered (by cutting the patches that doesn't even fit my nails) by it.

I asked her if her product can withstand an everyday wear & tear & she said that it does. I asked her that as a consumer & not as a seller, by the way. Since she said that it does, so i said 'ok,let me try your product then'. Though i honestly still have doubts over it. I'm quite hard to please because my standard is a bit high. But let me tell you, this nail patch blew me away!

It lasted for a week!
I think it can even last for another week if i just didn't get tired of it. I took it off with it being intact. No chip or tear! Seriously!

The design looks cute,huh? This design is Snow Pink!
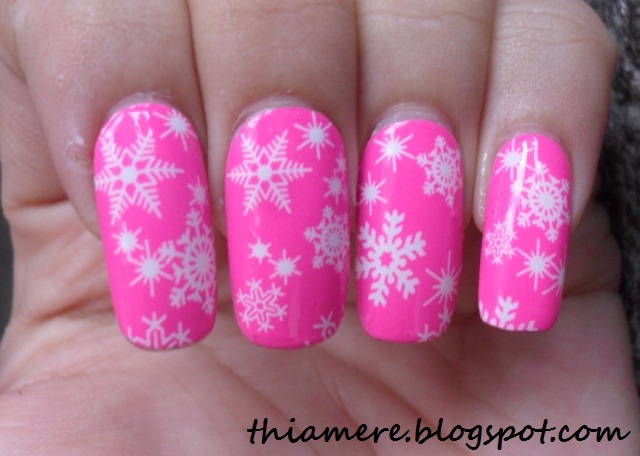

I really like it!
Lots of people kept saying how cute my nails are the whole time i had these on. I never let one design stay on my nails for more than 2 days (unless im sick or the effort that it took me to make a design makes it worth keeping) but i happily kept this patch on not just simply for testing purpose but because it's so cute!

Anyway, i'll tell you my experience....
This is how it looks like.


This is the back, with the instructions...


Then the patches itself.


Yep there are 16 individual patches in all, the purpose for that is you can choose what fits your nails best. I told you that the patches that i've tried were awful just because they're all in the same sizes so i have to painstakingly cut them one by one.

But in this case, you can choose what fits your nails best.
Plus, one good thing about this is that it doesn't end with you using the whole patch for your nail, you can maximize it & use the remaining stickers to make a french tip!


See?!
Isn't that getting more than what you pay for?!
Just think about it, one set could yield you like 3 full uses for all ten nails.
A-all ten nails with whole patches
B-just use them on your tips for a funky french tip
C-play around by donning whole patches with french tip alternately

Since this is a sticker, you don't have to worry about nail stains!
Yay for that!

It's very easy to apply too! Click for bigger image.


1. Make sure that the nail is clean & free of oil or dirt.
2. Choose a patch that fits your nail.
3. Pinch the edge of the patch where it ends so you can dislodge it.
4. Peel it off the plastic backing. Make sure you don't touch the back of it to prevent any oil from your fingers transferring on it.
5. Lay it on the middle of the nail like so.
6. Carefully stick it on one side of your nail, making sure that there are no air bubbles trapped. It could affect the longevity of it.
7. Do the same on the other side. Make sure you DO NOT STRETCH THE STICKER!
8. Fold the remaining sticker on the edge of your nail like so.
9. Gently file the excess away. the keyword is GENTLY file it.
10. Then you're done! You could apply top coat if you want to, but it's ok to skip it too.
You can also watch this video if you want to see it in real time.

I applied top coat just once, when i applied it. Oh, i didn't put top coat on my thumb though. I said i had it on for a whole week & they're still good.
I'll show you...

Day 3:

Day 5:
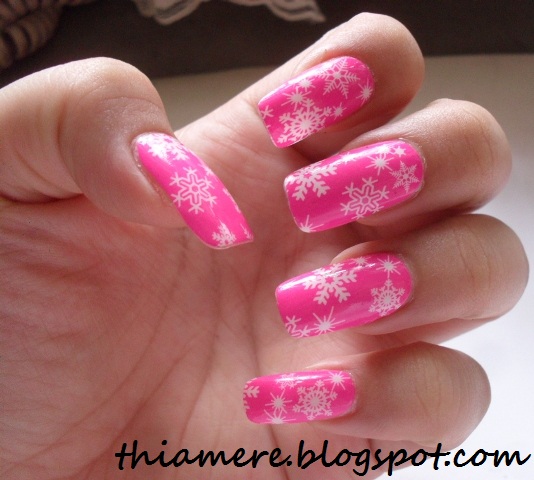

Day 7:


I spilled polish on it when i was frankening that's why it has that ugly dark patch but as u can see, it's day 7 already but it still looks nice!

This is on my left hand, on my right hand it was still the same!
It's just that my right nails are short so i didn't take a pic of it but it's my dominant hand & the patches was still intact! Sugoi!

It was able to withstand my everyday activities like washing dishes, cutting vegetables, drumming my nails on the wall/table, scratching, etc. I'm not sure if this could last if you'll do heavy hand activities like washing clothes but if it's simple household chores, it would last.

I highly recommend this!

Now, one thing that might turn you off is the price.
It's a bit expensive. It's sold for Php 489 each. But these are highly quality stickers. Unfortunately i don't know from material its made of, Jessie said that it's a korean nail patch. I don't have an idea at first what is it but when i have seen for myself what it is, i knew that these are not one of those cheap stuff that you can buy anywhere. This is unique!

I had these stickers that my korean student gave me before & it's made of the same material. It's actually on my monitor & i can take it off & put it back on whenever i want to. It's like plastic & silicone. You can stretch the material to fit your nails. But don't stretch it too much,ok? hehe
You don't wanna stretch the design.

If you compare it with Sally Hansen Salon Effect, i think this is still better for the reason that i stated above. You could maximize it because it would allow you to be able to use it in different ways. Can SH patches do that?

PROS:
  • quick - just minutes away from awesome-looking nails!
  • easy - just stick it on & you're good to go!
  • long-lasting - the picture speaks for itself,ne?
  • no stains - goodbye,yellow nails!
CONS:
  • expensive at first - but worth your money!
  • might not be available internationally - Jessie, do you ship internationally?
  • it has that funky naphthalene smell upon opening the package - it disappears later on

Will i buy it? Yes! No questions about it!
Will i recommend it? I do! two-thumbs up!

I would gladly spend Php489 for these patches. I can vouch for this product & how effective & easy this is!
Definitely worth your money! If you want to try nail patches, pls try this, you won't want to try other patches anymore, that's for sure! I also have Romantic Lace Nude but i'll be keeping it for now. I kinda missed doing nail arts but if im in a hurry, I know i will be reaching for it!

They have an ongoing promo now:

**BUY 1 nail patch, GET FREE 1 heartshaped nail file + 1 cuticle pusher
**BUY 2 nail patches GET FREE 1 Black Nail file + 2 cuticle pusher

Do check out these patches! It's gonna take you only minutes in having that glam-looking nails!
Click HERE to take a look at different designs that she has.
By the way, when you open the packet you'll see a strip of sticker on it, you'll use it to seal the packet. ^_~

Have you tried nail patches?

Have a great day,ladies!
Jaa ne~!
^_^


ps:
Product sent as sample. I did not receive any monetary compensation for this post. Opinion shared is personal view & is no way influenced by the company. Buy at your own discretion.

Saturday, May 12, 2012

Franken Tip:cleaning polish bottles

I know i promised that i am going to make a frankening tip post, but it feels like there are lots of things that i wanna say but don't seem to know where to start. I could end up creating a chaotic & confusing post if i will be putting it in just 1 entry. I decided to have a series of post so that i'll be able to explain things better & with pictures to accompany it for better understanding.

I would like to start first with bottles.

I know it's not that exciting compare to the frankening process itself but this one is important too. You might be roaring to start frankening but if you don't have bottles that you could use for your frankening so what's the point,ne? Don't throw your clear polish just so you could get the bottle. There are lots of uses for a clear polish in frankening.

This post is how I clean my bottles. Maybe there are other ways too but this is the one that worked for me. Start first by inspecting your stash. Look for polishes that you think you would likely throw out because they're either too old or had dried.

You need to have an acetone & polish thinner/solvent. Acetone to get rid of the bulk of polish & thinner for the remaining polish. Let's get on with it!


Pour a sufficient amount of acetone on the bottle then let it sit for a couple of minutes/hours (depending on how old the polish is) then shake vigorously!


If there are some patches of polishes stuck at the top part of the bottle (like mine!) then let it sit upside down for quite sometime to loosen it then shake again. Continue shaking until there's no polish on the bottle.


You can throw the acetone away if you want to, but since i have lots more bottles that needed cleaning, i just pour it on another bottle. I have lots of bottles to clean! You can use the acetone until it thickens.

Then time to whip out your polish thinner/solvent!
When you're done with the acetone, your bottle will have that cloud-ish appearance that's why we want to finish cleaning it with a solvent.


You can buy a dropper/pipette at a drugstore.
I have a lot of dropper but this is the one that i have on my table for now.

Get a small amount of it & transfer it on the bottle. Just like what you did on the first step, you shake the bottle to get rid of any remaining polish residue.


See?
Just when you think that you have taken everything out the first time, you'll be faced with these tiny globs of polishes.


Repeat the same procedure until you have removed everything! I have to do 2 or 3 more thinner cleaning for this bottle, but you get the gist, hehe


There you go!
Now you are armed & ready for the frankening addiction! haha!

Maybe i'll talk about bases for the next FT post.
^_^

Have a great day!
Jaa ne~!
^_^

Tuesday, March 20, 2012

How to: franken polish

Still on the franken polish subject, i have said before that i will be making a post on how to make your own franken polish. It's really very simple. The idea behind it is to just mix different polishes to come up with your own unique polish. This is a good way to put the polishes that you don't reach for anymore into good use. Who knows, you might be able to come up with something really unique (which most often happens!)?

I have several franken polish that i had shared with you. One of my favorite is my first franken called Midnight Fantasy & of course the last one, which i used to join a franken contest called Island Cocktail. Speaking of which, i am really grateful for all of those who had voted for me. As what i said on our nail art group, as long as i don't have a zero, i'm already happy. I'm so overwhelmed with the positive feedback that i have been getting because of my entry. So thank you again for the support, ladies!

Honto ni Arigato!
^_^

Now i'm going to share with you how i made this really cute franken polish using polishes that we have here in the Philippines.

This is one of my franken that i call Flakystein!


Kirei de sho?
Beautiful,right?

I'll give you better pics later so that you'll be able to appreciate its awesomeness! hahahaha!!!

On we go to the tutorial...
I used polishes that i bought here in the Philippines.


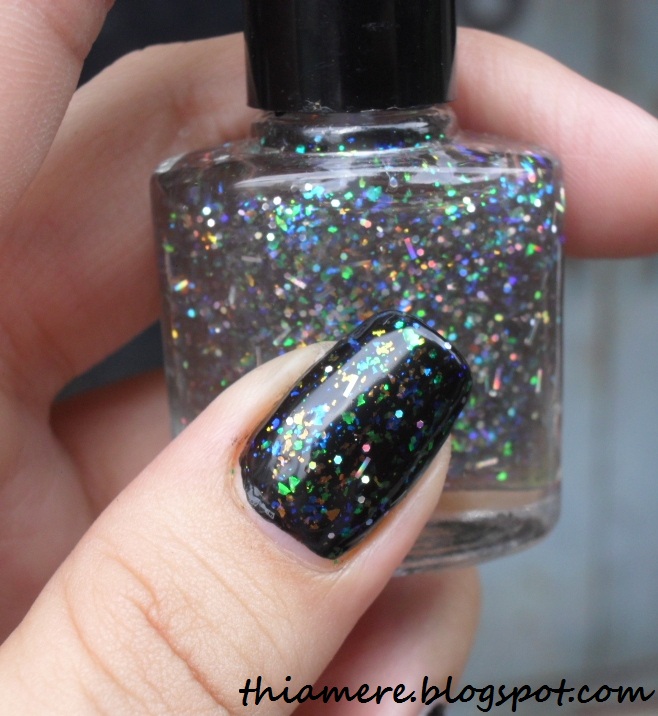
The 3 flaky polishes are 24k polishes that i bought at SM Fairview & the glitter polish at the far left is the one from Beauty & Butter. You can substitute any glitter polish that you have, or you can entirely skip it & it would still be beautiful!

Here are some pictures for a closer look.

This is called Pacific Opal.

Then my favorite, Rose Quartz.
Love this one! It changes from orange to green then blue depending on the angle.


Then Teal Glass.
Sorry, i didn't realize that i don't have a separate swatch for this.
You can just refer to the swatch that i had on the cap. It changes from green to blue.

So, i just mixed all 3 of them in an empty bottle like so...


Another important thing when you franken is to use stainless balls so that you will be able to mix them nicely.


Then you shake it vigorously!


Et voila!
You have your own flakystein!


Time for more swatches!
Flakies show best underneath a black base, but you can use other colors as well.


Blurred swatch so you can see the play of colors from the flakes & the glitters.


See the different array of colors?
It changes depending on the angle of your nails! By the way, i do not have a top coat but look how glossy it is!


Flaky polishes are L-O-V-E, ne?
My Galaxy Glam was also made from the 24k flakies.
I just added Spectraflair 14 to have that extra oomph!

There are lots of blogs out there that has a few tips & techniques when it comes to frankening. You can research more to know what finishes would suit what you have in mind.

So, now that you know how to franken polishes, be creative & start making your own!
I would love to see your own franken polishes too!

Hope you all are having a great day!
Jaa ne~!
^_^

Friday, March 16, 2012

Weekend Nails:Freehand lace design

Another nail art tutorial...
You know that i don't get to post much so i hope that this would be the start of my blogging streak again.

This is not a sticker so you can also don a lace design even if you can't find a lace sticker like the one that i have.


This is not really that difficult.
Though i have to say that making the half-circles are a bit of a challenge but with steady hands & a good liner brush you'll be able to make this design.

Let's start with the tutorial...

Materials needed:
  • black & white polish/acrylic
  • liner brush
  • dotting tools (you'll need the big & tiny one)
  1. Make 2 slanted lines to act as a guide on where you'll be filling it with the white color.
  2. Fill the top & bottom part with white, leave the middle part blank.
  3. Using a liner brush make tiny half-circles on the edge of the white polish. You can go for small or tiny ones.
  4. Let's finish the white part first. Ready your big dotting tool & dip it on black polish.
  5. Then make uniformed dots on the white part. Depending on your preference, you can put in more dots.
  6. Using the tiny dotting tool, you start putting dots on the outer part of the half circles like so.
  7. Make sure you also put dots on the other circle.
  8. Then to finish your lace, add 2 more tiny dots per circle on the inside (just at the edge of the white).
  9. Apply your top coat & make sure you clean the edge of your nail.
There!
Isn't this really cute?
I love how it looks like! I can't wait until my 'pare' would be able to see my nails. He always looks forward to seeing my nails every weekend. hehe


I am trying out the Tony Moly base coat & i am liking it so far!
No nail stains! Finally!!!!!
A base coat that is able to protect my nails~
I have to continue using it before i give my final verdict.

I said before that nail art is my accessory & it is indeed!


I feel like i can take on the world even without make-up as long as my nails are looking posh! hahaha!
Do tell me if you were able to make this design too,ok?

Have a happy friday,sweeties!
Jaa ne~!
^_^

Saturday, February 04, 2012

how to:nail art brushes part 2

If you missed my first post about how to use the nail art brush set, you can take a look HERE.

So, continuing with what i have left...

THE FLAT BRUSH


What i like about this brush is that it's very easy to apply polish/acrylic. Unlike brushes that is included in the bottle, flat brushes can make polish application a breeze. You have to try this in pigmented creme polishes, you can achieve a full coat with just a swipe or two with this. You can do flower petals too! Just lightly drag the tip on the surface.

As to flat brushes, you can also do one strokes with it. I'm not an expert when it comes to one stroke method yet. I have tried once though but not this brush. hehehe

One thing that i like about this is that it's great for removing/cleaning excess polish! Since it is flat, it can easily go to the crevices of your nails to remove any lingering polishes! Just dip the bristles on your polish remover then go around the sides of your nails to clean it up.

THE ANGLED BRUSH


You can do flower petals with this brush like the filbert brush but I prefer using it for one strokes though. I think that this is easier to work with for one strokes rather than flat brushes.


You can take a look at Tartofraises' video for a how-to for this design HERE.

This is also a great tutorial from her!

THE DOTTING TOOL
Now, this is one of my favorite!
This is one of the easiest but versatile nail art tool that you can use. Depending on the tip of it, you can make large to tiny dots. I have used dotting tools countless of times on my nail art tutorial & i have to say that it's so versatile, it's not just simply for making dots! You can do all these designs using this.
Here are a couple of nail designs that i made using a dotting tool. This is a very easy design to do, i promise!~
This is one of my favorite dot designs.
Another favorite of mine! I adore contrasting colors!
Making heart designs are a lot easier with dotting tools rather than brushes, believe me!
Now, the next time you see a dotting tool, don't just think of dots designs,ne? There ya go. Hope you find this post somewhat helpful! If you want to get the same set of brushes that i have you can order it HERE. You can use the code at the left sidebar of my blog for an additional 10% of your purchase. Again, if you haven't checked my first post about nail art brushes, then go HERE. Have a great weekend everybody! Jaa ne~! ^_^
ps: Product sent as sample. I did not receive any monetary compensation for this post. Opinion shared is personal view & is no way influenced by the company.

Wednesday, February 01, 2012

How to grow strong nails the BornPretty way~

This is one post that really took me months to decide on how i'll go with it. I have to make sure that i cover any grounds because i don't want to mislead people with my post.

My readers would often think that i always shave long beautifully-manicured nails when they see me. I remember someone greeted me while i was browsing the mall & when she asked if i am 'thiamere' & i said yes, she said she's not too sure because i have short & bare nails. hahaha!

Well, i do love donning on nail art but it doesn't mean that i always have long nails. I guess that maybe you'll be surprised when i tell you that i suffered from weak nails too. Well, it wasn't as weak as how it was before but i had my time. Then there was also a time when they would just chip very easily... grrrr!!!!

So, i know,ladies, how it feels when you want to grow long nails but it just won't cooperate. But don't fret! You can do something about it. I had it before (& sometimes i still do) & i was still able to grow my nails long,ne?

This is the only 3-care-system that i have ever used because i'm not a fan of those. I have been using this for more than 3 months, though not regularly.


Presenting the 3 system manicure-pedicure kit! This is available at BornPrettyStore.com
According to the website:

3 pcs Nail Art manicure kit
White-soften tool- It soften the dead skin and make the dead skin throw away easily.
Pink-under-oil added caluium-it is used to smoothen brighten and preserve nail, adding ca. on the nail lustering the nail.
Yellow- Nourishement oil- unique essential oil, irrigate nail and the skin around it. Make skin more greasy and much brighter.
All these 3 bottles will make your nail much more healthy and beautiful.
net weight: 114g
Perfect for both professional and home use!

Let's start with the Cuticle Softener:


I don't really push my cuticles. But when there would be times when i have dry cuticles, i would sometimes trim it using a nipper but i don't cut it too short. I have read that cutting it short (almost to nonexistent!) could possibly make dirt/germs enter the layers. I buff my nails to smoothen the nail plate to make polish application easier but i don't do that often.

When my cuticles needed grooming/trimming that's the time when i would just use this. Can you see how little product i have just used? It's because i don't often do it. You only need a little product because it is easily absorbed. It would dry faster than any ordinary liquid cuticle remover but this is way better because it makes the cuticles really soft in just a matter of minutes!

Then the Cuticle Oil!


I prefer to apply cuticle oil/cream after cleaning my nails & before the strengthener.

Now, i have to admit i don't use this cuticle oil very often just because i have a cuticle oil that i really like but it doesn't mean that this is bad. It works just the same but i, just not a fan of oil-products on a bottle packaging because i'm clumsy. I always end up tipping the bottle when i'm applying it. I prefer those squeeze bottle that has a long tip for easily dispersal.

Cuticle Oil/Cream provides moisture that your nail needs to prevent it from breaking. You will know & see the difference of nails that has been using cuticle oil as to nails that doesn't use any at all. I only apply polish every weekend (sometimes i don't even do my nails at all!) but i make sure that i apply cuticle oil everyday. Actually, make that every night. I massage the oil on my nails in a circular motion so that it would be easily absorbed.

Last would be the Calcium-based Nail Strengthener


This is the one that i have been using a lot ever since i received this.

Now, let me say a little bit about calcium-based strengtheners. I'm not an expert when it comes to ingredients like this so i'm just basing my opinion based on what i've read,ok?

A lot of people said that calcium is the main component of nails & bones. So when you think about it, to have strong bones & nails you need to intake calcium. I guess that's also the reason behind calcium-based strengtheners. I have tried them & let me just say that i don't think it makes a difference from non-calcium-based ones. I read this article before that said about a study conducted from women who took in calcium but doesn't have any changes at all. Again, i don't think it makes a difference whether a strengthener is calcium-based or not.

Nails, in fact, are made of keratin strands. I'll just ask you to click that article to take a quick look about nail strengtheners.

If your problem is weak nails, then nail strengtheners are your best friend. I have pretty weak nails before. I can't grow them as beautiful as i do now because i can easily bend it from the edge of the plate. Constant application of nail strengtheners made my nails a lot stronger.

I'll honestly tell you, i don't think that this product made a big difference on my nails because i have been a user of nail strengtheners ever since. I just continued my routine but just a different brand so i can't really say that this worked for me.

If you suffer from week nails like i did before, you have to get a nail strengthener. What i like about this is that it dries really fast! It could dry in a matter of 15 seconds (with a really thin application!), how cool is that?!

Now, let's do a little summary of this system...
PROS:

  • affordable (the whole set is only $6.55!)
  • smells good (only the cuticle oil & softener, you know how strengthers smells like..)
  • can be bought easily with free shipping worldwide! Click HERE
  • the bottles are big!
CONS:
  • not available locally

With everything that i have said, do i recommend it?
I guess yes. It's pretty affordable & they have free shipping. You can also use the code that you see at the left sidebar for 10% discount!

Did they work?
Of course, they did! But just like what i said, i have been using cuticle oils & strengtheners even before i got this so i didn't notice any change. On the other hand, if i didn't notice any change it means that this is good because it was able to maintain my nails like before... to think that i was using LUSH Lemony Flutter as my cuticle cream! I like the softener, it's my favorite among the lot!

I still think that you get your money's worth for this provided that you will stick to the regimen. As what i said before, there is a difference to nails cared for with cuticle creams/oils & strengthener compare to ones that wasn't even cared for.

So, tell me, what are the products that you use for your nails?
How do you take care of them?

Hope you all are having a great day!
Jaa ne~!
^_^

ps:
Product sent as sample. I did not receive any monetary compensation for this post. Opinion shared is personal view & is no way influenced by the company. Use at your own discretion.

Sunday, January 29, 2012

Spotted: Klik Dotting Tool

Another short & quick spotted post.
Yesterday, i dropped by Landmark Trinoma & saw the new nail art products from Klik. They are definitely upping their products by introducing these at lower prices.

Anyway, this dotting tool set only costs Php 54.75 (less than a dollar)!


Cute,huh?


These are the ends of both, then the dot sizes that it can make at the bottom pic. Just click it to enlarge it.


They have hexagon glitters, flakies & also nail art brush set! Based on what i can remember the glitters are sold in 4 kinds for less than Php 50, the set of 4 flakies for a little more than the glitters & the brush set for Php 150 (i think?).

When you drop by at Landmark make sure you take a look at it. Dotting tool is one of the most versatile nail art tool. Wait for my how-to post about designs you can make using it.

Hope you all are enjoying your sunday!
Jaa ne~!
^_^

Friday, October 14, 2011

how-to:nail art brushes + acrylic painting Part 1

Sorry for not being able to blog regularly. I think i have been apologizing over & over again because of my lack of updates. I hope that you'll be able to forgive me with this post. My long overdue post about nail art brushes.


This 15 pc. brush set is from BornPretty.

It has a pretty good selection of brushes in making different designs. It got detailing, liner, fan, angled, filbert & dotting tools. According to the website it has:
3 drawing tools
7 painting tools
2 liners
1 dotting tool
2 fan brushes for nail art effect


I seriously can't understand why there is a need for 2 fan brushes though. i'd rather have another filbert brush to go with this set.

I prefer acrylic as my medium all because it's easy to work with. You can easily wipe it out when you made an error (provided that it's still wet). Unlike polishes where you have to redo everything once more. I have received tons of questions if it's ok to use the acrylic sets that painters use.

I, myself, use acrylic sets like that. I think as long as you put on base coat, it won't harm your nails. I have even tried using it as my base color & nothing happened on my nails.

note:
Make sure that you do not get the acrylics on the ferrule or you'll risk the bristles of your brush splaying out. Getting the debris out of ferrule is not an easy task. You'll end up ruining your brush when it splayed out, especially for detailing brushes! Just dip the bristles half-way on the acrylic & make sure you clean it after every use.

Let's start by prepping up first & what you need before you start playing with colors.


First of all, you have to remember that acrylic dries fast. It is water-based so you would need to spritz water on it every now & them to keep it easy to work with. So you would need an atomizer filled with water (mine is really small...see that small orange bottle?) to keep it pliable.

Then of course, something that you can use as a pallet. I just use old CDs. Something to wipe your brushes with... kitchen towel or tissue & of course your jar of water to clean your brushes.

Now that we got that out of the way let's go to the brushes...

My favorite brush of all...
THE DETAILING BRUSH


This is the most versatile brush of all because you can make specific designs with this.
Detailing brush has fine tip so that you'll be able to maneuver it easily. I mostly use this on my nail art tutorials. Here are some of the designs that i did using this brush. Just click the title of each picture to see the step by step tutorial on how to make that design.


You just need to have steady hands when doing detailed work, well, since acrylic can be easily removed with wet wipes, you can practice the design as much as you want on the surface without worrying about it.


You can do lines easily with this brush too...
even dots!


You can also use your polish as your medium, just make sure that you will not get the polish into the ferrule... same goes with acrylics.


If there is one brush that i would recommend that you buy, it would be this. You can also use artist brushes. In fact, my favorite detailing brushes are craft brushes. Sizes would vary of course, just go for the smallest ones, which i think is 3/0, if my memory serves me right.

You can do a lot of designs with detailing brushes!
Love love love detailing brushes!

THE FILBERT BRUSH


This is a very nice brush to make flowers with.
Please refer to this illustration on how to make flower petals.


You just need to lay it on the surface then drag it either towards you or going out.
See the 2 different flowers using this brush?
Cute,huh?
^_~


This is one design that i made using a filbert brush.

THE STRIPING BRUSH


Striping brush have flat ferrule as opposed to detailing brushes that has a round ferrule.
So, what designs can you make with it?
Basically, you use it to make stripes!

Of course, it doesn't mean you only need to use it for straight lines. You can make waves with this brush too, like this.


This is perfect for making those background waves.


I didn't really do this design for i had it made on the salon, but the brush that was used on this is striping brush.

THE FAN BRUSH


Fan brush can be used to clean the surface among other things.


The top pictures would be to show to make random "flowing" stripes in just a couple of strokes & the 2nd one is how to use it in picking up glitters/pigments. You tap it straight on to your wet polish for that added bling!

I didn't use a fan brush in this nail art but i should have just used it because the end result would just be basically the same.


The grasses on the ring finger is made with a fan brush.


These are just the basic use for the brushes but you don't need to limit yourself to these designs with each brushes. Heck, you can even do flower petals with a striping brush! Just explore these brushes to figure out the different uses.

To be able to see my nails art easily you can click on my FB NAIL ART ALBUM. It would be easy for you to browse through my past designs with blog links on each pictures for reference.

I'll continue with another post to talk about the other brushes like the flat & angled brushes. I actually cut my nails a few days ago so they're really really short now but i don't mind. I am enjoying my shampooing experience because i can get to massage my scalp as much as i can unlike before. LOL!

I just hope that it will grow long by christmas time because i would like to don christmas design on my nails this holiday!

It's going to be my birthday this Sunday. I can't believe how fast time flies.. I'm already 27!
Wow! Where did all the years went? haha!

Anyway, hope that you'll have a happy weekend!
Jaa ne~!
^_^

ps:
Product presented as samples. I did not receive any monetary compensations. Opinions posted are mine alone & not influenced by the company.

Believe in B.liv's Dump Off Drawn! I do!

I was contacted by B.liv weeks ago to try out their products. I have been so lazy in applying any skin care products lately that I can alrea...