I love dots. If you have been reading my nail art posts you'll get to see that almost all of my tuts have dots on them. So same with what i did today.
 Time to let the pictures do the talking...
As usual, you can choose your own set of colors. But these are what i used:
 Blue
Blue- White
- Nude
- Hairpin or dotting tool

- Start with clean nails that has been coated with a base. Apply your base color, i choose a nude color so you'll see the contrast. Let dry


- Dip the hairpin on the chosen base color for the dot.
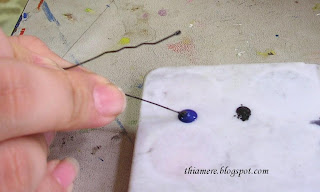 Press it randomly on the nail. You have to make sure that you press it hard so that the dots will be big.

 Let it dry.


- After it's dry then its time to make the smaller dot. Dip the hairpin again the other color, i have white with me.
 Then lightly touch the blue dots with the white tip. don't press it hard. You just want a little dot inside the blue to give it a flair.

 Let it dry

 Then apply a clear polish & a top coat!
 You need to have a steady hand when you put the white color because you want it to be at the center, but you can also have fun & just overlap the 2 of them!
You can also just use 2 colors. The base color can also be the one that will be used to top the 1st dot.
You can also go crazy retro by using pinks & yellows!
I will do some more variations of this design but for now this basic 2 tone polka dots can get us started!
You might be wondering if i have steady hands...well, not exactly. Im right-handed, so i can do my left nails better than the other. See this pic?

I can't get the white dots be smaller because i tend to press it hard since my hands are a bit shaky...Thy don't look a like at all!
But then, i still think that both are pretty!
There ya go...a simple & quick nail tut.
Hope you are enjoying your weekend, ladies!
Jaa ne~!
^_^


22 comments:
Ohh this is soooo cool! I love it! And you make it look so easy, but they look so pro!!! Gorgeous :)
enjoy the rest of your Sunday Thia, your nails look hot!
mare!
i really dont wear colors on my nails.
first,mr. w would not let me
second,i dont know how to put and maintain polishes on nails! hahaha!
but... this particular polka dot nail art of yours today catches my attention.
its super cute. its like pores! very intriguing to look at.
Wow, your nails are really cute ^^ I like them :3
very pretty!! thanks for the tutorial :D
super cute! sakto i need to change the polish on my nails haha.
What awesome nails! I'm still walking around with old chipping nail polish and crooked, uneven nails.>__<
love picture tutorial as always =]
You love polka dots; it's like an addiction to you! hahaha.
cute nails!!! i wish i could that too! <3
Oh so that's how to create polka dots. It looks fab but from afar I'd mistaken it for leopard print. Thanks for the tut! =)
It's really cute, dear. You're really good at it. :P
i love ur nails.... they're so cute. every time i see a girl's with perfectly painted nails, i get a bit jealous... i can never play with my nails because i have to keep them all short for playing harp...
seriously, how long does this take you girls... I can't do it! It takes me forever to put one layer of polish on my nails, so I don't even try to make these kind of artworks haha!
loves
I love the nails, they are so cute and cool!
hi sweetie! I love those dotty nails!! I always try to use a toothpick and it always kills my dots. ur tutorials have such good tips, think it's time for me to try ur cute nail tutorial out this weekend :) btw I love the face shop nail polish too :)
bilib talaga ako sayo girl pag NOTD ang galing galing moh hehe, sa paa kaya ko pero pag kamay di kaya ^_^
Thanks for such a cool tutorial. I love getting funky nailpaint but i don't have a very steady hand!...you did a great job there!
Glad you started nail tutorials again!
Lovely dots! I like the combination of blue and white too :) Looks cute!
Thats me again! Just wanted to say huge thanQ for all the sweet comments and support to me! Very do appreciate it!!
thanks so much for your comment! I recently bought a box of fake nails so I'm going to try to do some of the techniques I've learned from your site hehe!
The nail art is so pretty! Your fingers are pretty without nail polish anyway. You're blessed with long beautiful fingers. Mine look like a man's. Haha!
i should try this...so cute..can't wait!
miss reading your blog!
Post a Comment