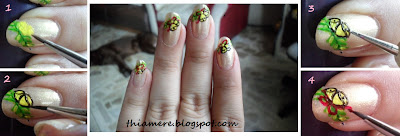
Far from weekend yet but i figure that i would post this already so that i would be able to make as much christmas designs as i can not only for me, but for you to choose as well if ever you also plan to glam up your nails this holiday.
I'm not really sure about this though.. i'm having a mixed feeling if i actually like it or not. I like it for it's something that you can look at only when you are looking at your hands when it's straight on, but not when you curl your hand (or when someone looks at your fingers). It's not that eye catching, but the color of christmas is there... Maybe it's better if i actually put glitter polish on the gold base before i painted the details it would be more catchy....
Hmm...
Anyway, on with the tut...
Materials needed:
- base/top coat
- gold polish
- yellow polish (or glitters/anything sparkly)
- green polish (dark green is better!)
- red polish
- black polish
- detailing brush
- dotting tool
1. On clean nails, apply base coat & also the gold base color. In this point if you want it more sparkly, add a glitter polish on top of the gold polish. Let it completely dry before adding any details.
2. Using any color that you want, apply a thin oblique line like in number 1. Apply leaves using the green polish like in number 2. It doesn't have to be of equal numbers. The point where they met would be where we would be drawing the bells so the leaves have to be bigger though.
3. In order to make the garland seem fuller, apply random green polish in between like in number 1 & also a few yellow strokes or even glitters or anything sparkly (number 2) for that extra oomph. Yes, my thumb is silver for i want to also see the combination with silver & let me tell you that it's not good. Stick with gold.
4. Now that your garland is all set, we have to draw in the details. Draw 2 irregular triangles on the mid lower part of the garland (number 1) using a detailing brush, the other should be big while the other is just small. Let it dry. I said irregular for it would just serve as a guide... i think in my case case it's more of yellow clumps than triangles..LOL
5. Trace the shape of a bell using a black polish (or brown if you want a less intense shape of the bell) like in number 2. Using your smallest dotting tool, add 2 dots at the bottom of the bell to act as the pendulum (number 3). To finish it off, using red polish draw a tie at the top of the bell to cover any imperfections that you might have made (number 4). Again, click the pic for a bigger image. You can add a small dot in the middle of the ribbon if you want to.
6. Top with your favorite top coat. All done~!
This is not really very hard as you may think. I guess doing freehand nail design could be difficult, but it is very rewarding. It is a good stress-reliever.
You would just need a steady hand & patience to do it, which is why my left fingernails always look better compare to my right fingernails because im right-handed. hehe
Now, i'm thinking of my next nail design..
How about Santa Claus? Dou?
We'll just see then.
Hope you all are enjoying your evening/day,sweeties!
Jaa ne~!
^_^
ps:
I did not win the Etude House Nail Art Contest, but i'm already happy because you showed support. I'm so happy that you appreciated & liked my nail designs. Thank you all very much!
Hontoni Arigato gozaimasu, minna-san!


9 comments:
Awww, hun, you had so much votes in there...
Oh my, you are just so fantastic drawing art on your nails manually. i even thought the bells were stamped! awesome job! perhaps you can choose a more colorful background (instead of nude) so that the design simply pops out (more eye-catching). im no nail polish expert though! LOL
rudolph and his red nose? ;)
youre soo talented thia!!! how i wish i can do my nails just like that.. you make it easy!!!
you're such an artist. great tutorial.
btw check out my blog and holiday giveaway http://www.fruitylashes.com/
nice bells you got there!=)
holy you got so much time on your hands haha I'm just saying that cuz that would take me a good hour to do. I love those little tiny bells you drew on, so cute and looks like nail stencils!
That looks great! I must say, if I had the patience, I would do this as well. Does the texture come out even regardless of the layering?
That nail art is gorgeous! I love it :)
Wow, you definitely have a talent for nail art! I would so attempt to copy your design, only that I know I'd mess it up!
Post a Comment