Showing posts with label eyelook-purples. Show all posts

Monday, January 24, 2011

eyelook: gradient blue purple

I already have a gradient blue look...as well as gradient purple, but i have not yet combined blue & purple. It's actually a good combination since they almost belong in the same family color so it's easy to combine the two.

For those who are having a hard time blending colors, this is an easy way to have a well-blended, gradient look without having to go to make-up school just to learn the basics of it. I was once at a loss on how to achieve that gradient look & i even considered going to make-up school just to achieve it! LOL I'm serious though!

I have done a couple of gradient looks already & if you are quite familiar with how i do it, i use 4 colors which makes blending the colors really easy. The key, of course, is to have a good blending brush. If you are on a budget then just get the ELF blending brush. I love it! I have a couple of blending brush but ELF is the one that i reach whenever i do my eye make-up. I actually have 3 of those!


Let's let the pictures do the talking now...

These are the colors that i use. If you don't have the 88 palette just pick any colors that are almost the same with these...


Line them up like how i did. By the way, make sure that you got a good primer underneath & a sticky base so that your eyeshadow will really stick. Apply the colors in a patting motion so that you will be able to pack more colors on your lid.

Blend colors 1 & 2 first. It's easier to work with the lighter colors first. If you feel that you don't have enough colors to work with, then feel free to dip your brush to get more color. Click the pic if you want to see it better.


Then blend 3 & 4 together. At this stage, you can slowly bring the purple at the top part of the lid so that the top part of the blue has a hint of purple on it.
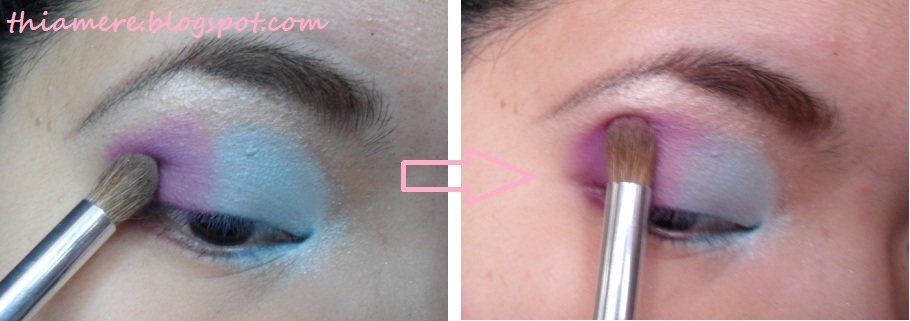

 Now's the time to blend the 2 colors together...


After a couple of blending motion, you'll be able to have this look.


Believe me when i say that this tutorial is dummy-friendly. I am a living proof that even beginner's like me can achieve a well-blended look! You might be needing more colors than necessary but it is worth it!

So, of course, you would have to bring the colors down on your lower lash area... Apply the colors how the way you did it at the lid area. A good angled brush will do the trick!


Then get rid of all the fall-outs & excess colors that you have to polish off the look!

Now, this is the hardest part of all... eye-lining! I'm not that good in achieving an equal-looking eyeliner, but with practice im sure you'll be able to get the hang of it.


Did you notice how obvious the blue color at the root of my lashes are on the 1st picture? When you tight-line, make sure that after you apply it on your upper water line you also do feathery strokes going upwards like the 2nd picture so that you'll be able to fill the space where your lashes grow. Doing so will help make your eye lining perfect!

This is how it looks like after all the trouble of waterlining. It would look full & well-defined after mascara application. Oops, i didn't line my lower lash line though.


Since I don't have enough time when i did this tutorial so i did just one eye..hehe

Finish the look with your favorite lipstick. Since this is not really a dark smokey look so you can get away with using pinks & corals!


 Whew~!
2nd make-up post!

Hope y'all have a good day!
Jaa ne~!
^_^

ps:
i used Mac Viva Glam Cyndi in this pic
^_^

Saturday, June 26, 2010

Sedona Lace your Face with NV Beauty Contest Entry

I haven't joined a make-up contest for a long time & i thought to myself that i probably won't be since i don't seem to have the passion for make-up like before. But when i read about Nicole's contest & saw all the lovely pictures to be used as inspiration, the artist in me awakened.


Isn't this just a very inspiring picture?
Mother Nature is still the best painter ever for this sunset is really exquisite!

I originally wanted to paint it, but then i remember that i ran out of my supplies like the brushes & turpentine so i can't, but the longing to paint it is still with me. I will paint this is time, but for the meantime using make-up would do.

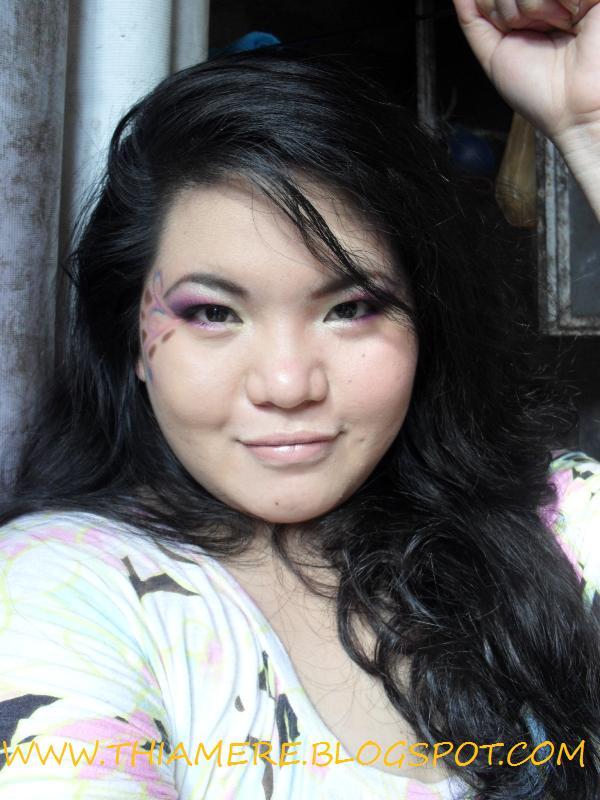
This is what i came up with


BB Cream is really great in giving that dewy finish! Too bad i can't let it stay in my skin for long....


The look is wearable..well the eye make-up that is...
A burst of color in the beautiful sunset with pink, magenta, blue, purple & lots more!  Sorry about the other eye, i guess i wasn't able to fully blend the light yellow together with the highlighter when i added more... But it wasn't that obvious in real life i guess it's because the quick frost pigment is not really that visible unless light would be reflected on it.


I just added the decoration to add more colors & i actually like the combination...
Pastel colors against the dark patch from the mountains below... The combination of purples & pinks gave that nice warm feeling as the bids goodbye to the sun. The hint of blue gives the feeling of calmness as dusk slowly engulfs the bright sky.


Not as good as the pic though..but still..hehe

If you notice, my cheeks look different with each other. I applied blush on the other half of my face without the decoration, whereas i left the other side bare.

I left my lips bare so as not to overpower the colors that i have on my eyes.

It was fun being able to open my palette again, seeing all the colors in it because it has been a long time. I felt like a kid swatching colors on my arm looking for the perfect color to be used for this look. It was then i realized that the passion that i had before was still there. I guess work & other things just took most of my time so i wasn't able to give as much time as i do before to play with my palettes.

But i think now, i'll be doing more looks as much as my schedule would allow me.


I was outside holding the clothesline when i took the pic, hence my hands are raised.hehe
I had a great time doing the look. If you want me to do a tutorial just tell me.

PRODUCTS USED
Eyes:
Too Faced Shadow Insurance
88 eyeshadow palette
MAC Quick Frost pigment
MAC Woodwinked
Fashion 21 liquid eyeliner
Fiberwig Mascara
Ardell False Lashes 110
Face:
VMV Hypoallergenic Monolaurin Gel
Dr Jart+ BB Cream Silver Label
Maybelline Pressed Powder in Honey
Maybelline Mineral Power Blush in Soft Mauve II 

Lips:
Etude House Lip Concealer
MAC Blankety


Hope y'all have a great weekend!

Jaa ne~!
^_~

Tuesday, November 17, 2009

eyelook: gradient purple

Another series for my gradient eyelook...

Oh, you might ask why i use 'eyelook' as the tag..It's just that i want to be different. Most use "EOTD", i just want to have my own. Anyways, it's not like i always do eye make-ups. I only do it when i feel like it. I only do simple make-up when i go out. So, don't be confused when you see 'eyelook' on my labels,ok?

Plus, for the most posts on my eyelook, i just focus on the eye area. It's because i mostly experiment on color combination after my work is done. I don't want to apply any face make-up at night as much as possible.

So, this time, it would be purple. I think most girls favor purple. This is the look that we are going for:

The pop of blue compliments the look just so to brighten it up instead of the usual black.

For those who are familiar with how i do my gradient look, it's just the same. I used my 88 matte & satin palette. I numbered the colors that i used.

As for the inner corner of my eye, i used NYX White Pearl. Just use any shimmery/satin eyeshadow so to open up your eyes.

dupe alert: for those who have access to Careline Loose Eyeshadow (a Philippine brand), i think it can be a good dupe for NYX White Pearl. I have it before, but i can't find it now. I'll confirm it once i have seen/bought Careline eyeshadow again,ok? But based on what i remember, it is!
\(^_^)/

Now, on to the tutorial:
  • Line the colors like so (refer to the colors that i used on the palette.
  • Blend numbers 1& 2...then 3 & 4
  • When the 2 are well blended out, then you can now blend the 2 colors together. I'll be saying in advance why i have to do it this way. I do them separately because i want the colors to be well blended together. I don't want to see any streak of un-blended colors.
  • For those who have a wide crease, feel free to darken it by applying a darker shadow at the area that i pointed out on the pic above. I just don't darken my crease because i have a small eye. If i do so, it just closed my eyes all the more.
  • Don't forget to bring the colors down the lower lash line.

Fix your brows. Highlight the brow area using your favorite highlighter. Line your upper lash line using your favorite liner. I only have a black liner, but since i want a pop of color, i just made my own liner. Finish it all off by curling your lashes & applying mascara.

I just used petroleum jelly & a blue-green shimmer shadow. I apply the petroleum jelly first on my lash line, you can use chapstick. It will just serve as a sticky base so that the shadow would stick. Then apply the color on the area where you apply the chapstick. Press it a bit hard just so that the colors won't fall.

note:
It's not advisable to do this if you have a monolid. You don't want the shadow liner to stick on your lids. Now, if you have an eye sealant, then that's a different story. For those that have deep set eyes, then feel free to make your very own liner. It would save you a lot of bucks & the possibility is endless!

Let's do a little dance for that! whoopee!
<(^_^<) - shake it to the right!
<( ^_^ )> - jump up
(>^_^)> - now bring it to the left!

wooh! we all wanted to save money,right?
*looks at the clock*
Oh! it's already 1:26Am...time to sleep & not dance
*clears throat*
sorry about that..blame it on the sugar rush & was listening to pop songs..

Anyway, this is how it would look like afterward
Whoopee!

The numbers of my eyelook is getting bigger little by little..lol! As what you notice, im not much into doing eye make-up. But i'll try to make some because that's what some suggested.

For those who have not yet joined my giveaway, don't forget to join. Link is on the sidebar

Have a nice day,girls!

Jaa ne~!
^_~

excess:~for my new followers
Thank you so much for following my blog.
^_^
Monday, August 24, 2009

my first take on arabic inspired makeup

Arabic Makeup is mostly a combination of bright colors with heavily-lined eye....

This is my first time doing an arabic makeup...lining my eye is the most difficult thing for me because i can never quite get it right... I always ended up smearing it because i tend to blink whenever i do it...i guess it because it tickles...but then im up for the challenge!

When Sharlene announced her contest, i knew right there & then that i will join it even if i haven't tried making it yet...

Now tell me what you think...

It's a pink to purple gradient look...

I don't have a black scarf..only this colorful one... XD

Emphasis on the eyes that's why i have neutral lips...

Now a little tutorial on how i achieved the look...

These are what i used...
  • UDPP
  • 88 palette
  • Skin Food Cactus Bb cream
  • mineral blush
  • fashion 21 brow duo
  • Maybelline Lash Stylist
  • ELF liquid liner
  • Lancome pencil concealer
  • NYX lip gloss in neutral
  • Avon shadowstick in vibrant blue
  • Ever bilena eyeliner in black
  • face & eye brushes
Now let's start with the mini tutorial...i labeled the colors that i used on the palette..i numbered it as 1, 2, 3, 4...i forgot the highlight..but the highlight color is the top color on the left side...


After prepping your eyes with primer & shadesticks..then line the 4 colors on your eyes...like so

then blend colors 1 & 2...& also 3 & 4...like what i did...

blend the 2 colors now so that there would be a nice soft & gradient color on your lids...

don't forget to also bring the colors down...just do what you did at the top eye.... ^_~
& the highlight too!


As for lining it...i lined the top lash line & also the bottom lash line...so if you take a closer look

you will see that i have 2 'wings'..one at the top & the other is below...then i just finished it with rhinestones....

& for the first time in my life....i love my lashes...I don't even have to use falsies....can you see my lashes?!

my short asian lashes was given life all because of Maybelline Lash Stylist...i love that mascara...review will be up after a couple of days...

Lesson learned:
Lining the eyes takes practice & steady hands...If you are having a hard time using liquid liners, you can line your eyes first using a pencil liner....then if you are satisfied with it, then you can top it off with the liquid liner
^_~

Anyways...freestyle shots....
It's always nice to finish everything with a nice fun pic
^_~


For those who wanted to join her contest, these are the details:

Theme:
Create an Arabic Style Inspired Makeup. From what I noticed, when I google 'Arabic Style Makeup', They usually have flawless, porcelain-like skin, and really bright colors on the eyes yet it still looks smokey because of the heavy eyeliner on both the lashline and lower lashline.


Rules & Requirements:
·First of all you must be a member of blogger.
·You must be a follower of my blog.
·Post as an entry to your blog. Copy these rules onto your entry and link back to this post.
[To copy, highlight and then press ctrl+c, right click has been disabled]
·Take a picture of: Your face, one with your eyes opened and one closed. And a freestyle pose. ·Also include your inspirational photo, if any. Don't forget to list down and take a picture of the products you used.
·Send in your contest entry url as a comment to this post only [for organizational purposes].
All others will not be aknowledged, sorry!


Deadline:
August 31, 2009 11:59 PM Guam Time - That's about 3 weeks from now, so you have plenty of time.
Note: Guam time is advance a few hours from U.S.


Im pretty sure you will have fun doing this too

Jaa~!

Sunday, June 14, 2009

entry For Eki's cosplay contest

I love Final Fantasy!

I grew up playing it...i didn't start it because of FF7 although i know that that is the popular one...but i fell in love with Final Fantasy 8...

For those who don't know the FF series, it is an RPG game playable in playstation console (ps1, ps2 & ps3). Just like most RPGs out there, there will be tasks that you need to do to unravel the mysteries & complete each level...i so love that game...

So i decided to do a FF character as my entry for Eki's Cosplay Contest. I was thinking of doing another character but i changed my mind so i just decided to stick with FF...

Final Fantasy X

I went for Lulu of Final Fantasy X & FFX-2... Mind you, i just came up with this idea last night So i wasn't able to prepare much... T_T

this is how she looks like
pretty,right?

This is my attempt at doing a Lulu look....


If only i have a moogle with me...i'd be ecstatic!


the necklaces are definitely not like hers, but then its better than nothing XD


the sticks that i used on my head are just pencils...hehehe...
im used to using sticks as my hair 'pins'..so its easy to do this...

i just put some accessories on them like dangling things to make them look at least ok..

There ya go...
It was fun to do that...although i don't think i did justice for Lulu but nevertheless i had a great time...maybe Lulu can forgive me with that..lol

Now, time for the things i used to do that


  • Lash curler
  • UDPP
  • Dark Blue shadow (i dont know what brand because i removed the sticker)
  • Covergirl Eye Enhancers in Artic Glow
  • Face & eye brushes
  • Nyx Jumbo Pencil in Milk
  • Fashion 21 Brow Duo
  • Everyday Minerals foundation in Buttered Tan
  • Everyday Minerals Eyeshadow in Matinee (for my lips)
  • Wet & Wild Mega Shine Lip Gloss
  • Fashion 21 Blush Powder
  • Petroleum Jelly
And with that, im done with my entry!
Good thing i was able to finish it on time..lol!

Believe in B.liv's Dump Off Drawn! I do!

I was contacted by B.liv weeks ago to try out their products. I have been so lazy in applying any skin care products lately that I can alrea...