Tuesday, November 30, 2010

Weekend Nails: Snowman nails

As what i said before, i want to have great nails this holiday season so i am already trying to do some drafts on what kind of nail design i'll be donning. I was thinking of posting this tomorrow but since i decided to join the Etude House Nail Art Contest  for fun so i just might as well do it now so that people would also have the idea how i did this. But i don't know how to upload...
*sniff*
*sniff*
T_T

So, i have been preparing for the holidays & i have already thought of a couple of designs already. This is one of them...


It's not stickers... they look messy to be stickers... lol
Wanna know how i do it?

Materials needed:


  • nail polish (i have included the color on the pic above)
  • nail art pens
  • dotting tool
  • detailing brush (optional)

Instructions:
1. Apply the baby blue base color


2. Then add in the pink & white details by painting the top & bottom part of the nail with pink polish, then using the nail art pen (or liner brush dipped in white polish) draw white lines at the bottom & top. Let it dry.


3.  We'll now draw in the detail in the middle. Apply white dots randomly first (as snow), then using the white nail art pen (or detailing brush dipped in white polish) draw the snowman. Number 2 - draw a half circle at the bottom part to serve as the base of the snowman. Number 3 - draw a smaller circle at the top of the half circle for the head of the snowman.


4. Using a red nail art pen (or detailing brush dipped in red polish), we will draw his hat & scarf. Refer to numbers 2 & 3 for instructions...


5. Last part is to give life to our snowman by putting eyes & buttons. This time using the smallest dotting tool dipped in black (or black nail art pen) put dots on the head for his eyes & buttons. This needs a steady hand for you want the eyes of your snowman to be equal.. you don't want your snowman to have a lazy eye,right? LOL


Dekimashita!
We're done!

Don't forget to put top coat to make your nail art last. Also don't forget to clean the edges of your nails,ok? It's better to use a synthetic flat brush dipped in polish remover in cleaning the edges rather than Q-tips to avoid any cotton particles clinging to your wet design.


Hope you'll give this a try!


There ya go!

My first nail art design for this upcoming christmas. More nail designs will be up for the next couple of days...

Hope you all are having a great day,hunnies!
Jaa ne~!
^_^

I would really appreciate it if you could LIKE my entry HERE.Thank you in advance!

ps:
for all those who love nail art & would want to meet nail art enthusiast, please join our FAB UR NAILS Facebook group. It's really a very nice group to join in. It's fun talking to fellow pinay nail art enthusiasts!

Monday, November 29, 2010

Food: Homemade Hoddeok

This has been sitting on my draft for like forever.
(-__-")

I'm beginning to lag again when it comes to posting. Anyway, i figured that i should post it now before i left this buried & forgotten in my draft..hehe

So, this time, i'll be showing you how to make homemade Hoddeok. I made the classic hoddeok (left) & the one with cheese filling on it (right).


Hoddeok is a Korean pancake, actually it's more of like a popular street food in Korea mostly during winter season. To be able to enjoy this treat at its maximum its best served when it's piping hot & has just been out of the pan.

It's really easy to make this & it would be perfect for kids during snack time for you can put in a filling that you want. You can buy the ingredients in the grocery. I have most of the ingredients here at hand because i am mostly the one who cooks & i love trying out different recipes.

So, let's get on the recipe...
Ingredients:
  • 2 tsp. instant dry yeast
  • 2 cups all purpose flour
  • 2 tbsp sugar
  • 1/2 tsp salt
  • 1 tbsp vegetable oil
  • a cup of lukewarm water (or milk- but i prefer water)
  • 3 tbsp brown sugar
  • 1/2 tsp cinnamon powder
  • chopped nuts (you can go for cashew, peanut, walnuts, almond, etc)
Procedure:

1. In a mixing bowl combine the lukewarm water (make sure that it's not too hot so that the yeast will live), sugar, salt, yeast & vegetable oil. Stir well. Let it sit for 15 minutes at the most until there would be some bubbles forming at the top (which would mean that the yeast are already active).

2. Then add the flour on the mixture then mix it well.


3. You can use a spoon on whatever you feel like using in mixing it. Mix, Mix, Mix....


4.  Once everything is all mixed, let it sit for an hour or two or up until it's double in size. Waiting time will depend on your kitchen temperature. The hotter your kitchen is, the more likely it will rise faster. Cover it with a plastic wrap


5. Then you can prepare your filling. You can put any filling that you feel like eating. In this case, i want to go for the classic hoddeok filling which is just brown sugar, cinnamon & nuts. Just mix them altogether...


6. When the dough has risen (sorry i forgot to take a pic of it), knead it to remove the gas. I suggest that you cover your hands with flour/oil before you start kneading it with your hands so that it won't stick. Then let it rise again for another 20 minutes.

7. After it has risen the second time, knead it again to remove the bubbles then that's when you will start dividing them. This recipe will yield 10-12 pancakes so i suggest that you roll out the dough then divide it into equal parts.


8. Take one dough then roll it in a circle... flatten it then make a small well in the middle where you can put in the filling like so....


9. Then pick the edge of the dough to seal the filling in.


10. As what i said, this recipe will yield 10-12 pancakes. In my case, i was able to make 12 but of course it will depend on your personal preference, the bigger pancake you make, then the less you'll be able to have. My pancakes are ready to be cooked!


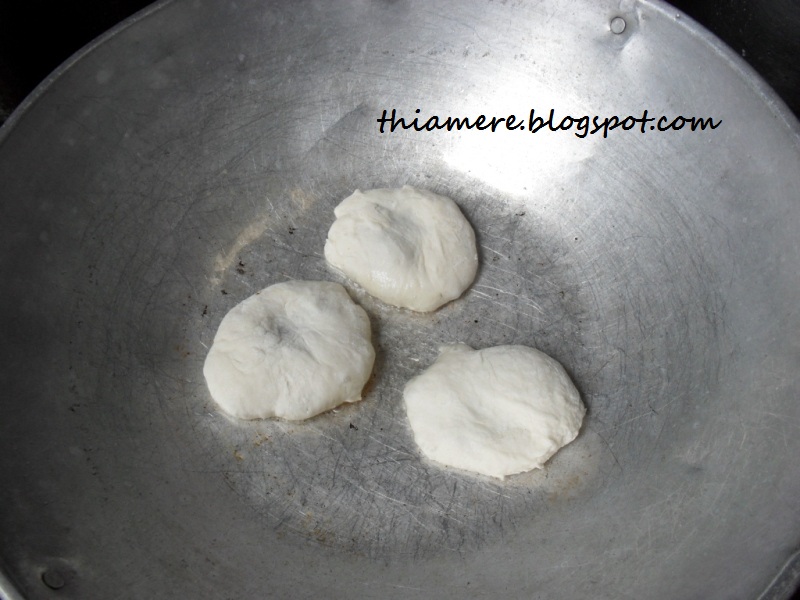
11. Heat the pan then add a bit of oil... just a little bit of oil so that it won't stick on pan. When the pan is hot, then put it. If you were not able to seal dough in a neat way, then put the sealed part facing the bottom of the pan.


12. Flip it after 20 seconds then flatten it using your spatula. Pancakes are flat so just do it. Flatten it with all your might!Then continue cooking until it's golden brown...


13. Then flip it again so the other side will cook too. See the brown sugar? They're already melting & beginning to caramelize in this stage.


14. Serve hot!

Itadakimasu!
*bites*
Be careful when you bite it for the hot caramel might burn your tongue if you are not careful!

Unlike the usual pancakes which has a liquid-y texture, this one is easy to cook since this is like a bread. It's better than the usual pancake too because this one is firm to the bite & it's chewy.I can't quite describe it, but it just something that i will be making over & over. You won't need any syrup at all since the inside of this pancake is already sweet & caramel-y with that cinnamon on it!

You can put different fillings like cheese or finely chopped ham or whatever you are craving for! I know that this one takes more work but, believe me, this is worth all the work! You won't ever want ordinary pancakes again once you eat this. hahaha!

You can prepare this in the morning to be served for your kids for their after-school snack. You can prepare this ahead of time, just cover it with wet towel so it won't dry out.

Hope you give this a try!
^_^

I want to be able to make Taiyaki (or Bunggeopang in Korea) but i don't know where to buy that fish shape mold. Do you know where i can buy it here in the Philippines? Buying it online (internationally) is out of the question for i don't want to be charged a fortune once i go to the PO to get it.

Hope you all will have a good start for this week!
I can't believe that November is almost over & we are already on the last month of this year. Christmas is definitely in the air!

Jaa ne~!
^_~

Thursday, November 25, 2010

Weekend Haul: another Etude House trip

I did the weekend series earlier than it's supposed to be like my Sunflower Nails!

I went grocery shopping today because i have to get ready for Saturday. I overspent again...goodness!
-__-"

Here i was telling myself over & over that it's Christmas & i would need to save more & spend less.... *sigh*
Oh well, I needed the things that i bought anyway... *trying very hard to convince myself*

I made a quick stop at Etude House because i wanted to buy another Proof 10 primer as a backup but it's out of stock...too bad... but i didn't go empty-handed of course. One thing though, i was surprised when they just wrapped what i bought in a simple plastic like this. It doesn't have any label on it & i have a total of Php 1000+... but i'm not really bothered by it, just wondering.


On to the haul...


I remember reading Lane's post about the Dr. Mascara Fixer Perfect Lash & i wanted to see if it will also work with me. I tried it on my one eye today & it looks great!!!! Plus, they have a promo where if you buy any mascara (i think) you'll get a free lip & eye make-up remover for those who have the pink card. I have been meaning to make a post about their 2 removers... i'll try to post it before the end of this month though..hehe

Then i saw that they have a new polish remover which is in a cute glass bottle. I asked the SA what's the difference between the old one & he said that this one is like a treatment or something like that so i wanted to see for myself.

Then also the Cleansing Water, which i made a post before. You can click HERE to read it. My acne is going bananas again & i don't want to use any oil-based removers on my face as much as possible so this is the safest option for me.

When i went shopping for some dresses & other needs, i stopped by the toiletries section & i remember Pammy's post about the Lip Ice balm so i looked for it & included it in my purchases.


I like it!
I'll do a review on it sometime after i've really tested it out but i can say now that im really liking this product a lot!

There ya go!
Just a quick post for today.

Hope you are having a great evening/day,sweeties!

Jaa ne~!
^_^

Wednesday, November 24, 2010

Weekend Nails: Sunflower nails

I'll be accompanying my little bro this Saturday in his school field trip. I decided to do my nails earlier than when i i regular do it for i know that i'll be busy this Friday making bento for both of us. I want a nail design that would look fun & bright so i just decided to make sunflower nails since sunflower is a bright & lovely flower!


This is not that hard to do. If you are not used to using nail polish in doing details on your nails acrylics are a much safer option since you can easily wash it off.... which reminds me... i need to get a couple of tubes of acrylics tomorrow when i go shopping.

Anyway, let's start with the tutorial...

Things needed:
  • base/top coat
  • green polish
  • yellow polish/acrylic
  • black polish/acrylic
  • golden brown polish/acrylic
  • detailing brush
  • dotting tool/hairpin
Instructions:
  • Start with clean nails then apply base coat & also the green base color.

  •  Apply half circles on the edges of the nail like so. Let it dry.


  •  Using yellow polish/acrylic make small petals on the side of the circle. I tried to do a diamond shape but since my hands are a bit shaky so it ends up with a not-so-diamond-like shape,,, but it's ok..


  • Then  put a black line on the edge of the circle to have a more define shape.


  • Put random dots on the brown circle. Apply top coat to make it last longer.


Dekimashita~!
We're done!


There ya go!
Hope you'll be able to try out this design especially now that it's almost winter time. This will give you a hint of warmth just by looking at it!

Hope y'all have a good day,ladies!
Jaa~
^_^

Tuesday, November 23, 2010

Purederm Deep Moisture Hand Mask Review

I like to wash my hands regularly up to the point that it has become a habit which eventually leads to dry hands. I have stopped using hand sanitizers because of the alcohol content in it. That's why i always have lots of wet wipes with me to keep my hands clean all the time, but it is still managing to dry my hands with my constant hand wiping.

*sigh*

That's why i have brittle nails. Constant hand washing takes away the oil from your hands & nails that is necessary in protecting & making your nails stronger. Constant hand washing is recommended of course but too much is bad. We know that too much of something is bad,right?

Anyway, i try to use hand creams & lotions as much as i can to make up for it but sometimes it's not enough, especially in the evening when the AC is in full blast. It's making it hard for me to use my touch screen phone because it keeps slipping from my hands.

It's a good thing that i get to try this hand mask for it would be good for my dry hands. So, let's get to know this product...

Purederm Deep Moisture Hand Mask

It has Almond oil & Shea Butter on it that is know for their good moisturizing ability. 


This is the description at the back & also the direction in using it. There's a korean & english description in it.


It is divided in two...
The top part is where the dry stuff are packed like the plastic gloves & the tape that will be used in securing the edge of the gloves.. the bottom part is where the hand mask is.


These are what's included in the top part...


Then the hand masks... it actually smells pretty nice!


See how big it is?
Even males with really big hands can use this...


Sorry if the pics are not really clear because i am using both hands & i can't find my tripod so it looks a bit blurry.

This is the before pic... if you zoom it in, you'll see the dryness especially in my fingers.


My phone really keeps in slipping & it's hard to text message because of my dry hands..grrr!


I applied it on my hands...


Waited for 30 minutes...
then voila!

My hands are all moist & soft. No more dry spots & my hand smells good!


What i like about this product is that the formula is almost fluid-like which makes it easier for the skin to be absorbed. It might not be water-based that is readily absorbed by the skin, but this leaves the skin really moist as the product seeps in the skin.


It doesn't leave you with an ultra-oily feeling that some lotion leaves upon application. It would somehow feel silky. I used this in the evening & the moment i wake up, my hands felt like how it was before.. the effect will only be temporary.

I just used it once so i don't know what will be the long-term effect of this if ever. I would want to see if it will make a difference through long-term use. But this is a pretty nice product to have when your hands really need a deep moisturizing that ordinary lotions can't give.

There is only one lotion that i've used that can come close to providing the moisture that this product gave me. It is the Skin MD Shielding lotion, which is not locally available....too bad.

It is priced for Php 79 ( i think). It could either be expensive or cheap depending on how you feel about it. If you like the instant "moisturization" that it provides & if it indeed will produce a good effect after a long-term use then this is definitely worth it! 

But when you think about it, it's just for one application so it might be pretty expensive buying the pack over & over.

So, let's do a summary...
PROS:
  • you'll see instant effect.
  • locally available
  • smells nice
  • will really leave your hands feeling silky soft
CONS:
  • the effect will only last for a while
Will i buy it?
Yeah, but not really that often.
I won't say that this would be a staple for me, but it would be nice to have especially during 'emergency' situations.

Have you tried any hand masks? What brand?
If not, what do you do in keeping your hands moisturize?

Hope y'all have a great day,hunnies!
Jaa~!
^_^

note:
product was sent for review purposes. this post is my 100% honest opinion.

Sunday, November 21, 2010

Sweets: Ice Cream Sandwich + a cute polish!

There was a time when ice cream sandwich is available here when i was a kid. I don't know the name though... i remember loving the Coney Island ice cream when i was a kid but it just disappeared after a while..so sad.

Anyway, i immediately bought this since i love ice cream sandwiches!


Sorry, i can't translate it since i can't read korean characters...


This is how it looks like. It's actually a sponge cake!


This greeted me when i opened it.
It's cookies & cream ice cream sandwiched between 2 soft sponge cake.


Itadakimasu!
*chomp*
*chomp*

This is delicious!
The sponge cake is actually really soft & compliments the ice cream perfectly.
It's not too sweet & it doesn't break off very easily unlike others that i have eaten. The ice cream is also not too sweet so you can gooble it down without any 'it-might-give-me-cavities' type of worry.

You might not believe it, but as i keep on eating it, i keep on saying "delicious!" every now & then. It's that good!


I try to do small bites trying to fool myself but i keep on eating & eating that i realize that there's no more.

Oh well, I'll definitely be buying this again. This is the perfect reward for me if ever i do something hard & accomplished it. It's just Php 39!

I bought it here at Homesaver...


Where they sell Korean housewares & etc...


They even sell some beauty tools & what nots.. I bought a really good nail polish that has a hint of holographic on it. It's really pretty! It's Ottie Nail Polish #45 in Tender Polish. I bought it for Php100 (approx $2).


I never realized that taking a good pic of holographic polish is hard to do. I wasn't able to take a good one since as what i said it's just a hint of holographic, not really a full holo look. But i'm already happy with it!


Can you see it?
It's hard to,huh?

Anyway, there are also a lot of nail art stickers on it which is only for Php 33 which is way cheaper compare to buying it at the mall! Yay for that!

Well, I always drop by Homesaver as much as i can. I also love the korean snacks that they carry. I'll make a post about the best ones that i've tasted so far.

I just had a pretty relaxing weekend.
How about yours?

Hope you will all have a good start for your week, ladies!
Jaa ne~!
^_^

Believe in B.liv's Dump Off Drawn! I do!

I was contacted by B.liv weeks ago to try out their products. I have been so lazy in applying any skin care products lately that I can alrea...